Showing posts with label 1950s. Show all posts

Monday, 4 July 2016

{Dorothy Moore} Lesson 2 Skirt Variations


Dorothy Moore presents a number of Instructions for drafting Skirt Variations: A-Line, Circle Skirt, Panel Skirts, a Wrap Around Skirt and yoked skirts.

I have drafted a slight A Line skirt with a yoke. (Instructions below)

My first version was up to the waist, made from stripey linen fabric with 4 panels cut on the bias (so you get a sort of chevron pattern in the front and at the sides)  and... it was awful. I didn't even finish it and didn't take a picture either. It was a bit much of everything. An abomination :) So I put the whole pattern and everything to the side, concentrated on other things and took it up again after several months had passed.

I don't usually like to wear my skirts right at the waist level (with pencil skirts it somehow works though...), so I used my pencil skirt as a guide for lowering the pattern down to the waist,  about 9 cms in total (just a bit more than 3 inch), that's quite low. I then added a yoke to the pattern following the instructions of Dorothy Moores's Lesson 2 so I could omit the waist darts. Et voilĂ !

Pattern for A Line Skirt with Yoke drafted to my measurements. Sorry, brown paper on wooden floor = not so good contrast. ;)

I've had 1 meter of this totall cute fabric in my stash, it's from Lewis & Irene "April Showers". Because it wasn't quite enough for a proper skirt, I added an underskirt. The underskirt is made of an old white cotton curtain (using the same pattern, just a bit longer) and I've had a bit of thin red zig-zag trim left which I added at the bottom of the underskirt. I didn't have enough fabric to cut the yoke in the same direction of the fabric, but I don't really mind.The invisible zipper is inserted on the left side. I've also added a tiny button and a bow. Can you find it? ;)


Due to rainy weather (I hope the choice of fabric didn't have anything to do with that...) I've not worn it yet.  

________________________
Total Cost 15,54 Euros
Umbrella Fabric : 15 Euros
Underskirt: Old Curtain 0 Euros
Trim and button from stash 0 Euros
invisible zipper 0,54 Cent

Here are the instructions  how to draft an A Line Skirt and A Yoked Skirt. You'll need to draft a Pencil Skirt first.

Dorothy Moore A Line Skirt

Dorothy Moore Yoke Skirt


Thursday, 17 March 2016

Preparing for {Dorothy Moore}

Taking your exact (i.e. honest...) measurements is essential to making your own clothes. Whether drafting patterns or altering them - you've go to know your measurements.

These are the measurements Dorothy Moore is working with for her pattern drafting course.

Before you take your measurements, think about what foundations you are going to wear with the garment you are going to draft - and then measure wearing those... (push-up)bra, shapewear, girdle, corset... they do make a difference...

Taking some of these measurements require a helping hand...  and an elastic band around the waist to indicate the waistline properly.


tie an elastic band around your waist and move around a bit so it settles were your natural waist is!

neckline is low, about where the collar bone is!

use elastic band at waist again

did I mention the elastic waistband?

CAVE: crotch measurement taken slightly angled to the front, not straight


then fill them in these sheets for better reference:


Sunday, 21 February 2016

{Dorothy Moore} Lesson 4 Basic Top

I didn't have enough brown paper to draft the trousers pattern (Lesson 3) and for the Lesson 2 "Skirt Variations" I still have to get a few notions (I have drafted an A-Line Yoke skirt already) so I am continueing unchronologically with Lesson 4 - a basic top.

The basic top pattern is used for all other patterns following in the book -> sheath dress, blouses, coats... so it is really the centre of all pattern/clothes-making and thus it is important to fit it well.


You first draft a basic top pattern


which you then adjust to the waist measurements and add darts


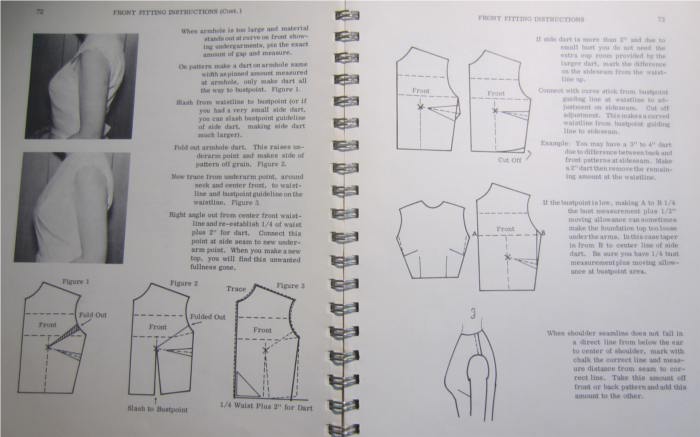
After making a muslin top from the first foundation top pattern you have to make what she calls "minor adjustments" to adjust this pattern to your shape. e.g. wide shoulder blades, gaping neckline, armhole gap, round upper back, low bust point, smaller cup room ...
I needed to make adjustments for a gap at the front armhole  following these steps. I also noticed I had taken a slightly too wide "shoulder-to-shoulder" measurement, so noted the right measurement now and shortened the shoulder seam length by about 1 cm.


this what my pattern looks like (final version)


I forgot to take a picture of me wearing the mock-up, but this is what it looks like in its final version. :)


I really enjoyed the drawing for this pattern, it was really straight forward, the changes I had to make were minor and easy to do and I think I achieved an acceptable fit without too much effort.


After completing the Lesson 2 (Skirt Variations" A-Line Skirt with yoke) I am going to spend some time on a top with this pattern. It's going to be the green fan vest from Marilyn Monroes "Bauman sitting" (1954). To go with the dark blue pencil skirt from Lesson 1. ;)

Friday, 8 May 2015

Marilyn's Dresses - "Misfits" headpiece

I've had a little bit of time to do things "DIY" (when not looking after the baby) and the first thing is an early 1960s headpiece, inspired by Marilyn Monroes headpiece from the film "The Misfits" (1961) (pictures further down).

Version 1

How come?


I've loved this picture ever since I saw it for the first time (which is a loooong time ago...). But only now I've come to the point where I started thinking about making the outfit myself. This year, starting with the headpiece.The dress and jacket are to come later in 2016.


As always, it is not as easy as it seems. My first thought was - that's just a bit of Chenille wire with a bit of bobble veiling. And then you start looking closer. (lots of pictures following) - and then I ended up watching the film. :) "The Misfits" on Youtube. :) https://www.youtube.com/watch?v=1lQ7xQfNMmc


1. the veiling: it's fine black veiling with different size bobbles - small at the top and slightly bigger at the bottom. That's a real problem. Modern veiling usually has bigger nets (this one seems quite delicate) and bigger (if not to say huge) bobbles/dots. And how on earth is it attached???

2. I was torn between thinking it was a melusine fascinator and chenille wire attached and thinking it was really just chenille wire. it looks SO NEAT!

Conclusion: 
From the pictures alone my question (hat or chenille wire) couldn't be answered, but watching the film (and the headpiece already appears in the first 15mins) did help (and it happens to be a good albeit slightly strange film) :) It is indeed a headpiece made from black (chenille?) wire, attached to the aforementioned veiling. In the back it has two little bows - she's wearing it over a french twist/bun hairdo. Beautifully simple and elegant!


My versions:

Nice black chenille wire is not a problem, I found it right away. But the veiling was a problem... you don't get netting as fine as the one on the picture and you also don't get fine netting with chenille dots like that...


I made a prototype first because I wasn't quite sure how that veiling was actually attached. I am still not sure, but I like it this way best. :) 


the prototype

After looing for modern veiling with suitable dots (not available) and vintage veiling with suitable dots (didn't find anything in black and with dots in exactly the right places and it's also ridiculously expensive) I decided to make my own chenille bobble veiling.

Version 1
I continued using the prototype and experimented with different size chenille wire. Yes, the ordinary one from the arts and crafts shop. It might not be as great as millinery chenille wire, BUT it is available and looks okay, too, I think. When I finished I noticed I had attached the bobbles the wrong way round... the fat ones need to be at the bottom... I do like this version a lot though, nearly better than Version 2.

bobbles wrong way round BUT at least I look friendly, don't I?


Version 2
I made a new frame, slightly bigger tulle bows at the back and fat bobbles at the top and the rows with the dots slightly different from both prototype and original ;) 


sorry, not as neatly attached as I would like it but I didn't have the time

Sorry there is no back view, I will try and add one later, the back looks pretty much like the original. black wire and two small bows. :)

The original:


all pictures from Pinterest. and here somewhere https://www.pinterest.com/hertzwerk/marilyn ) These pictures were taken 1960 in Reno and on the Set of "The Misfits". 

Film:
better back view. It's really just a wire.