Showing posts with label tutorial. Show all posts

Tuesday, 27 February 2018

In search of the perfect T-Shirt - Pattern drafting and an approximation (and lots of sheep)


Self drafted T Shirt! Nobody should look this stern with a self drafted shirt full of sheep. I don't know how I managed!

(If you just want the instructions for drafting a t-shirt and not so much talking: Here it is  How to draft Jersey shirt pdf)

And here is the talking:

Because my body is unique, I usually have problems with store-bought clothing:

1. the waist line is too low on me (sort of "on the hip", looks silly), because I am smaller than what standard clothes are made for. (if you want to know more about standard sizes in clothing  https://en.wikipedia.org/wiki/Clothing_sizes)

2. I have a comparably small waist  and bust in relation to my hip measurement (compared to standard sizing).

3. My hip point is lower than average.

4.  My shoulder width is rather small.

5. I have a sway back nobody seems to want to have anything to do with

Vogue Patterns calls this gallantly "triangle shape", I think it used to be called pear shape? :)

So, all in all with off-the-rack clothes, they are too long, the waist is in the wrong place and the hip width is too small, so if I wear e.g. a T-Shirt, that fits my upper body, the waistline is just a tad too low and the hips small (even with stretchy fabric) so everything is travelling upwards to the waistline with movement and I end up pulling shirts down all of the time, even if they seem to fit ok at first glance.

To cut a long story short, I decided to draft my own t-shirt pattern.
It is really easy, if you just follow instructions!

There are a lot of  tutorials on youtube, I used this one (in German) https://www.youtube.com/watch?v=yQ3kdhVyMNM.


The thing you have to know about pattern drafting is this: It will give you a close approximation (probably closer to your body than any of the off the rack clothing is though...) and you have to make the fine tuning with a muslin on your body. Then you transfer the changes to your pattern. If you've made a lot of alterations or big alterations, I recommend making another muslin. Is is a lot of work and a lot of fabric potentially going to waste, but in the end you will have the perfect jersey shirt pattern. Which you will be able to use for all sorts of Jersey shirt variations.

And you will know a lot about you body and clothes fitting.

When you have a pattern finally, bear in mind, that changes to the neckline might need more changes in the upper bodice than just cutting the neckline. Jersey fabric is rather forgiving, but still, everything you change in the fabric might have consequences in fit overall (Dorothy Moore is dedicating a whole chapter on neckline changes... but I will write about that another time)

Also the amount of stretch of the fabric influences the fit (and also the recovery...)!

My first muslin was made from a piece of cotton jersey without much stretch. So I accepted it would be a little tight. There was pulling above the chest towards the armpit. That's the fabric asking for a dart. Hm. And the basic pattern has a very high neckline.

First I cut out the neckline the way I like T-Shirts, which changed the whole appearance of those wrinkles. But they were still there.

I also found the shoulder width was a bit wide, so I reduced it by 1 cm on each side. And changed the paper pattern accordingly.

I also have lots of wrinkling in the lower back, because I have a sway back.

There are several options how to deal with a sway back in knit shirts.
1. Ignore it.
2. Make sure it's not a too small hip width which makes the shirt travel up.
3. Introduce a seamline in the center back. Or two. Or just two darts. Those can take up the excess fabric.
4. You can try to remove about 2-3cms (1inch) just above the waistline on the back pattern and when you assemble the shirt you stretch the side seamline about 10 cm (5inch) around that area. It works sometimes.

Oh, and those wrinkles in the front could  be removed if you introduce a side dart, either to the side seam or to the armhole.

Has anyone else got good ideas to seal with wrinkling and sway back on knit fabric?

I chose to go with option No 1 this time. After transferring all the other changes to the pattern, I made another muslin. This time I used a mad fabric which I bought years ago because I wanted to make shirts for the children from it. It's nice quality stretch jersey (i guess 95% cotton and 5% elasthane) and has a nice weight to it, which I bought in a sale because most people probably found the pattern a bit too busy. I even made a shirt for the children for it, but even on them it is a bit busy. So I had enough left to make this shirt.

I like the fit despite the wrinkling in the back and that little bit of pulling in the front. And there are a lot of sheep on this. A lohohot. I might use it for pyjamas, which makes just the right amount of sheep. I might need pyjama bottoms with dogs now, i suppose.


Sorry for not taking any pictures during the process of making it. I just assembled it.
1. Match shoulder seams. Sew.
2. Insert sleeves, Make sure front part of the sleeve is in the right place.
3. Close sleeve seam and side seam.
4. Insert neckline binding.
5. Hem sleeves and bottom.
6. Iron carefully.
Finish.

  Here's the resulting pattern and shirt though.

Actually I think the shirt fits better in real life than on this picture.
Less wrinkles around the chest.


see the wrinkles in the back -> not adapted for sway back. I can feel another muslin coming...
(And also quoting The Fast Show: "Does my bum look big in this?")

Below you will also find the description and drawing for drafting this shirt. Don't be put of by the instructions, you'll end up with you own personal shirt pattern.

Enjoy! Bah! Bah! Baaaah!

How to draft your own jersey shirt pdf

If you have questions, leave a comment!

On fitting t-shirts for FBA (I don't really need FBA, but it is interesting anyway and maybe you want to try this out!)

http://www.jenniferlaurenvintage.com/2014/06/how-to-do-full-bust-adjustment-fba-for.html
https://www.mariadenmark.com/2012/08/fitting-t-shirt-fba/
http://www.mariadenmark.com/2014/10/removing-bust-darts/


Wednesday, 20 September 2017

DIY Magnets


The children loved making these magnets and I have to admit - I love them, too!
We will be using them as Christmas presents this year and of course we are going to keep a few.
This project was suitable for my 5 year old (cutting the circles, glueing), the 2,5 year old helped and we gave her some pieces of paper and some scissors so she felt included. She also put the glasnuggets on the paper quite well.


What you need
- 2 pairs of children's scissors (because I have 2 children)
- a catalogue, magazine, newspaper, flyer... whatever motives you like. We used a book catalogue from a local book shop mainly. Completely for free.
- clear glue
- clear glas nuggets (ours are 17-20mm, the base is about 14mm)
- magnets (ours are 12,5mm in diameter)
- thin coloured carton (we used dark blue and dark green) to back the cut out paper
- felt tip pen to mark out the circles
- optional: efco circle punch 14mm

I bought the glass nuggets  and magnets here: https://www.bastelweltcreativ.de/glasnuggets-muggelsteine/c-145.html
And the puncher is from amazon. We used the 14mm hole (but it comes with 3 circles, maybe we use those for another project...)
(and I am not getting anything out of recommending my sources, it's purely informative)
Cost: I suppose this depends on where you live, we bought 30 glassnugets and 30 magnets and the circle punch (which is only optional...) for about 11 Euros altogether. The rest was from the stock or available for free.


How to do it


1. Mark out the areas you want cut. I made the circles slightly larger than the area we actually need, because the girls tend to cut well inside the circle I made. If you have the circle punch - still let them cut the circles, it improves their dexterity AND they love looking at the pictures and help choosing them enthusiastically.


2. The circles are then glued to a piece of dark blue construction paper by the children and after drying I punched them (the pictures, not the children). If your pictures have been printed on relatively firm paper, you can skip this step, but ours was just normal paper, so it is better to back it so the magnet doesn't show through. the puncher makes the circles nice and even and with the darker paper underneath eventual gaps (from too small cut circles... happens...) are filled out. If you don't want to invest in a puncher, you can also cut the circles with scissors. Depending on the age of the children they can do that, too...


3. Here comes the magic. Now you put one relatively small dot of liquid clear glue (we've used just ordinary liquid hobby glue... I have to admit this one wasn't solvent free... that somehow slipped my attention... we normally use solvent free glue...) Make sure the glass sits with the right side and nicely centered on the paper. They can be a bit slippy in the beginning. My youngest just sort of throws the glass on the paper, and then I adjust it. She loves it, though. Put them on a carton o piece of wood or something else that gives them stability and put them away for a night for the glue to dry. Before you leave them, check again, that the glass hasn't travelled away from the paper.


4. After drying thoroughly, you can attach the magnets. We've used magnets made for DIY, so one side has a little "dot" in it and is less magnetic than the other side. Again, one dot of liquid clear glue, careful adjusting and drying time. You can see in the picture (maybe) that the two WITH the magnets are sligthly higher than the ones in the middle that are still waiting to be magnetified.
If you are worried about scratching surfaces, you can then glue a small piece of 1mm thin felt underneath the magnet, but we don't worry about it much. :)


We made these over a time of 2 weeks, on rainy days. Cutting the paper circles took about 2 days and I didn't anticipate how much the girls would love it. Especially the older one LOVED to choose the motives and look through the catalogues. You can stretch this to whatever time you need, it's great in how many small "bitesize" portions this project can be diveded. Glueing them all to the paper took about 2 afternoon sessions again (the punching took about 20 mins... alone...). Glueing the magnets to the glass was like a "special treat" and we did this in batches from 5-7 at a time so the magic wouldn't go away. That worked quite well, especially as Little Miss No 1 got to choose the 5-7 pictures she wanted to glue herself.

If you make them as presents, you can choose paper matching for the recipient -
- an ardent "Game of Thrones" or "Lord of the rings" fan - print the maps!
- a traveller - you can get really old maps for near to nothing
- a book enthusiast - old books in pretty languages (e.g. kyrillic) or said book catalogues a brilliant
- an arts specialist - print pictures or photographs of his or her favourite artist
- a movie lover - black and white photographies make brilliant backgrounds
- a super cook - food photography can be fantastic!
- ... the possibilities are endless... whatever is printed, can be made into these magnets. Those glassnuggets also come in different sizes

Tadaaaa!!


Monday, 26 June 2017

one happy oven glove


Today's small DIY is one happy oven glove. I still had so much thermolam (link to company) left, that I though I'd make some oven gloves. Yes, I did make an pot holder just last week or so but to be honest: we don't use potholders. We use this kind of oven glove.

So I sat down and made a quick pattern, which you can download (including short instructions) here (it's a pdf). The pattern has added seam allowance (the thick black line), about 1/2 inch.

https://goo.gl/Mab4IK

It took about 2 hours to make them and I've had all th necessary material at hand. The green "grip area" is made from wool felt, about 2,5mm thickness.

Here are some pictures from the "making of"

inside cotton layer quickly quilted on one side of thermolam

all layers pinned, right sides together.


Alternative usage for the pattern:

A hand puppet (just add eyes on the top and maybe some wool as hair and if you want a tongue hanging from the mouth).

this is not my arm. :)
_________________
Cost:
No additional cost, I had all the material at hand.
If you can get the exact quantities, it would be about 5 Euros, I guess.

Monday, 5 June 2017

pot leaves - TopfblÀtter


I had seen a pot holder like this somewhere on the net ages ago (unfortunately I don't have the source any more, so if you know whose original idea it was, let me know!). And today I managed to make one. I used thermolam ( padding made for this purpose) and some cotton scraps I've had and a piece of wool felt - so none of it should melt. :)

This is what the other side looks like:

We usually use oven mitts, but it was a nice little project to do and I've had all the material there. I might try oven mitts next, because that's what we actually use. :)

Anyway, if you want to try, here is the pattern (A4 paper)

goo.gl/hEeynX

Print twice so you can cut top and bottom leaf.
Then cut the fabric (for the bigger bottom leaf with seam allowance, for the top leaf without) and one thermolam padding the size of the bottom leaf.
Applique top leaf onto bottom leaf for each side of the pot holder.
Then attach the first bottom leave by folding the seam allowance around and topstitching.
Attach the top band where indicated. 
The other side is attached by folding the seam allowances under and then putting it on top of the other side of the thermolam padding.

 ____________________________
Cost

Material: Thermolam 6,50 Euros (this is the price for the 1 meter, I only needed 1/10th of it, but as I had the entire meter here... so that piece would have been 0,65 Euros), 3 scraps of leftover fabric, 1 piece of wool felt (1,50 Euro), a bit of yarn in black cotton.
Time: 2 hours (including drawing the pattern).

Monday, 29 May 2017

DIY Mobile recharging holder thingy.

Don't get distracted by the many switches. It's about the felt pocket.


As you can see from the picture, it is a good thing, I'm not in advertising. I don't even know what to call this. Mobile recharging pocket from felt?
Anyway, I've been a bit fed up with the cable-mobile-lying around thing and stumbled over a box with felt in the cellar and remembered I actually had seen something like this for sale (for about 5 Euros... but why buy something when you can make it yourself?!). So I made this. I found out there are lots of tutorials to make these online, but here you go, this is my pattern. 


The entire piece is 38,7cm x 10,5 cm big, the felt is about 3mm thick. (15,23" x 4,13", thickness 0,12"). The width is exactly half of an A4 sheet, it's a bit longer, though. 
If your piece of felt is big enough you can cut and fold the pattern on the dotted lines. If not, you can make up to 3 pieces (cutting and extra "pocket piece" and an extra "enforcement piece" for the top). Don't forget to cut a small hole at the bottom (or if you don't fold the bottom over, just leave the seam open about 2cm for the cable). Then just stitch around everything - fini. 

This prototype (which is fully functional, so I doubt I will make more of them, unless asked) is just plain, but you could add a label on the front pocket, or insert it into the side seam. You can use different colour felt or pieces in different colours. You could use contrast coloured yarn (maybe extra thick?) or paint it, or embroider something on it. Or do some appliqué. You can add an extra pocket for the cable (on the front or the back or both) and you could add a press-stud at the very top and the very bottom to take it with you and not loose the cables. You can lengthen it if you want to include your mobile in that pocket. You can widen it or make it smaller if your mobile is smaller than mine (it fits a Samsung Galaxy S3 fine). Ahh, the possibilities!


Tuesday, 27 December 2016

OP Haube nÀhen - Pattern for Scrub Cap

Found this on https://www.balloonhq.com/column/hans/nov00/glove1.jpg


Hei everyone,

today I am sharing my slightly experimentasl pattern for a scrub cap (in German that's "OP Haube") with you.
I apologize for the "far from perfect" pattern, but I wanted to get it on the blog ASAP because it's been lying around here for so long and I didn't manage to publish it.

Scrub Pattern OP Haube.pdf

Print it on A4 paper (2 pages) and cut it out.


You also have to add seam allowances on all sides when cutting the fabric. I strongly recommend making a mock up, to see, whether it fits your head (I think it fits up to 56cm head circumference).

The long straight side of the headband is the bottom. You might have to add 2cm at the slimmer end (that's the center back). And don't forget to cut the center front line on the fold. Otherwise you will have a seamline right down your forehead (unless you want that as a special feature...).
If you need a longer headband, just extend it at the back.  You can also make it higher, if you like, just extend it at the bottom.

The top piece is also cut with seams allowances. The back (that's the thin side) will have to be gathered  or pleated so it fits you headband. If you've extended the head band, don't forget to enlarge the top piece slightly. (just draw it a bit wider at that slim end)

To make the whole thing fit snuggly, I have zig-zagged a slightly streteched 5mm wide elastic ribbon (about 7-10cms in length) in the center back inside.
Or you can attach ties to the outside and make a cute little bow.

Fabric recommendation: Cotton, washable at 60 degrees. Prewash at that temperature, otherwise it will shrink and not fit afterwards. And that would be SUCH a shame!

I will add a picture of it as soon as I can manage to have one taken. :)

If you have any questions, just ask! :)


Even Wikipedia has an article on Scrub caps (amazing... )

https://en.wikipedia.org/wiki/Scrubs_%28clothing%29#Scrub_caps


Monday, 22 August 2016

jersey knit neckline band - different options!


Today I quickly want to share with you the different ways of attaching knit fabric edging.
I like these two tutorials, so I share them with you:
No 1. http://hamburgerliebe.blogspot.de/2014/08/tutorial-tuesday-kleines-kragenlatein.html
No 2. http://hamburgerliebe.blogspot.de/2012/08/kleines-kragenlatein-3-teil.html

Also, I want to emphasize, that the techniques have their advantages and disadvantages. I usually like  Technique No 1, because it is quick and easy. However, with the Technique no 2 you get a smaller tape at the neckline and if you want to make an "American Neckline" it might be more suitable because of the "inside" or "outside" curves. You can have a look at my "American neckline Disaster" to see what happens if you use the wrong technique in the wrong way. :)

Just saying.. :)

Have a great day sewing!

Monday, 27 June 2016

Cutting patterns or not cutting patterns!


I just wanted to share how I am keeping my patterns intact. Not cutting them has a lot of advantages:

  • if the first size you chose isn't right, you can still trace it again
  • or maybe your size changes and you need it again
  • if you want to make it for somebody else, you can use it again. 
  • you can give away or sell the pattern if you don't want it anymore
 I am using plastic foil (the one you use if you want to repaint your room, to cover floor and furniture, the strong quality) and am tracing with a black waterproof pen. make sure it doesn't come off otherwise you damage you fabric...

If you've copied your size on a plastic sheet, it has a lot of advantages, too:
  • if you've found your "perfect size" you can use that foil again and again and again.
  • changes can be made easily and permanently to the foil (e.g. shortening)
  • you can make changes to the design  by putting your "basic pattern" underneath the foil and tracing it with the desired changes. (I did that with my "1790s maja jacket" and the "American neckline disaster") 

It took me rather long to get to this stage, so I thought I'd share it. :) Also: basting and ironing is really helpful.

Monday, 26 October 2015

1770s big hair - a wig tutorial

When I made this wig, I didn't take any pictures, unfortunately, because I wasn't even sure how it would turn out. It turned out well (I think) and now I am a bit annoyed I have no pictures for a proper tutorial. I did a few drawings instead and am trying to describe what I was doing and how. If there are any problems, just let me know, maybe I can explain better. Also for the moment I haven't got better pictures, but I promise to add them ASAP. I wanted to get the tutorial out as soon as possible. :)

Pictures with very silly big cap and sockets. :)


I've made the instructions on paper, you can view and download them as a pdf. :)

https://goo.gl/EtF239


I have used

mesh wire
about 20x30cms
The holes are about 2-3cms (1 inch) wide


2 wigs (long hair, wavy or curly, no fringe; I have used lace front, but that's up to you; be careful with the colour, I have chosen something that is sort of similar to my own hair, and yes, it is synthetic.)

batting for the mesh wire "cage" (I used a piece of Vlieseline H640, because it was there. Just choose something that is softish to cover the "cage").

lots of pins
enormous amounts of hair spray and a bit of foam
lots of patience


You can find inspiration for hairdos on paintings and I found these drawings quite helpful. http://www.coiffure-ducher.fr/louisxvi_femdescr.html

As usual, I didn't copy anything in particular but just "absorbed" all the sources and then made something up that I think works for the 1770s. I have to admit though, that I might have looks at mid 20th century hairdos, I don't know why, I think I have made a set of victory rolls there... I like anachronisms though. And again it shows how much we are children of our own time...

I hope the tutorial is helpful, if you have any questions, just leave a comment below. 


wearing experience: after wearing the wig for an entire evening, I now know, why posture was so essential "back then". Despite my wig being very well secured to my head and reasonably well balanced, it does have quite a bit of weight and being a rather lively person (pulling faces, turning my head quickly ....) I felt it forced me to move more ... elegant... and slower... and while it suited the evening and the whole ensemble (the "Landgravine Anglaise"), I wouldn't want to wear it on a daily basis. I am too 21st century. ;)


Sunday, 6 September 2015

Danish Chemise Dress - Tutorial

Because I am so in love with this light, airy, elegant Chemise Dress and there is a free pattern available on the Museum homepage here  http://natmus.dk/historisk-viden/temaer/modens-historie/1790-1840/hvid-brudekjole/


I thought I'd write a small tutorial how to assemble the dress - because all of the info on the pattern is in Danish.


http://natmus.dk/historisk-viden/temaer/modens-historie/1790-1840/hvid-brudekjole/

So, after you've downloaded the pdf I suggest you do this to get something to work with:


1.Copy the museum's pdf into inkscape
2. Enlarge it so the boxes are 5cms wide (about 2 inches)
3. Save it as a .png
4. Copy that it into a Word Excel file (adjust the pages so there is hardly any margin, other wise you just have tons of overlap and waste paper...)
5. Print. I printed only the pages with the bodice pieces, and the top pleats of the skirt to safe paper, because the length of the skirt I have to determine anyway after finishing the bodice piece. And you can also measure that on the pdf.
6. Make a print-out of the Museum's pdf, too, so you know how to assemble your paper.
7. Don't forget to save the pdf to your computer, in case the museum's page goes down or so... :)


Now you've got a pattern for a lovely gown
- The underbust measurement is 67-70cms (about 26,5-28 inches)
- Chest is about 80-83 cms (about 31,5-32,5 inches)
- Length from underbust middle to floor: 115cm (45inch), back middle waist seam to floor about 136cms (53inch)
- bust point about 25cms
- back width about 30cms (12 inches)

Obviously, if these aren't your measurements, you've got to adjust the bodice. If you've never made that before, maybe this isn't the right project to start. You should know how to adjust stuff and have a bit of experience with sewing. I recommend sewing this by hand, it's easiest. also carefully mark and match.

Make a mock-up, at least of the bodice and the bodice-cover and the draping and sleeves, so you understand how the pleating works and where you might need to make further changes before cutting your nice favourite fabric. Especially the sleeves need attention, because they are set deeply into the back and have no folds or tucks to give enough space.

To be worn over appropriate underwear. (e.g. bodiced petticoat, short stays...)


Fabric required:
At least 6meters of thin cotton batist or voile or something comparable. About 50cms of thin canvas or thin twill or other suitable fabric for the bodice base.

Cut out the bodice cover and bodice base (don't forget the seam allowances).

bodice base assembly
center backs together. The original has a 6cms long piece of string or small band attached to the center back inside. Then proceed  with side back, sides and fronts. Attach shoulder strap only at the front.
The original has a tunnel with a string at the front, which I omitted.
Finish all visible (and if you want all invisible) hems. Sew the eyelets by hand. Use buttonhole stitch and poke throught the future-eyelet-hole with an awl after every stitch. Insert string. Try the bodice on before you proceed.

Bodice cover assembly
Center backs together and then sides. Attach shoulder straps at front only. Follow pleating guide to make it lie nicely on the bodice base and wing it a bit here. The front flaps overlap a little to cover the eyelet fastening. Don't forget to make the pleat "K". The double pleats are attached with only one seams on the bodice base as you can see on the picture.

Now the bodice base and cover should be assembled and you try them on and attach the shoulder straps together in the right place.

Finish remaining seams. 

Sleeves
Sew together sleeve and sleeve lining and treat as one. Set in sleeves by hand by easing them in, they go in quite wide into the back, but that's part of the fun. Finish sleeve hems.

Front draping
Again, make a mock-up first to understand the pleating. Then pleat the 2 sides, iron nicely and stitch together at the two lines "F" and just about "H".  Stitch Center Back (will be a slight V-shape) and mount on a piece of band, about 1,5cms wide, from "D" to "E". (I've used twill tape, Petersham should work nicely, too, something that gives it a bit of stability). Attach the back and sides to the Bodice where indicated on the pattern. Make sure to leave enough space at the bottom to attach to the Front Skirt. Finish all other hems.

Skirts
Cut the skirts, sew back and front together and pleat according to pleating guide, to match back and sides. Attach the front panels to the Front Draping only, not to the bodice and make the seam wide enough to create a tunnel for the drawstrings. Then attach the back panel on the bodice from point B to C. Finish all hems, the original has a 7mm ribbon at the side "pocket opening" and at the bottom.

Insert string in front and attach.

I hope this could help you, if you have any problems, just ask.

Again, here is the link to my gown. (And I know already what I sould have done differently...)
http://hertzwerk-freiburg.blogspot.de/2015/09/danish-chemise-dress-1790s.html

Sunday, 5 October 2014

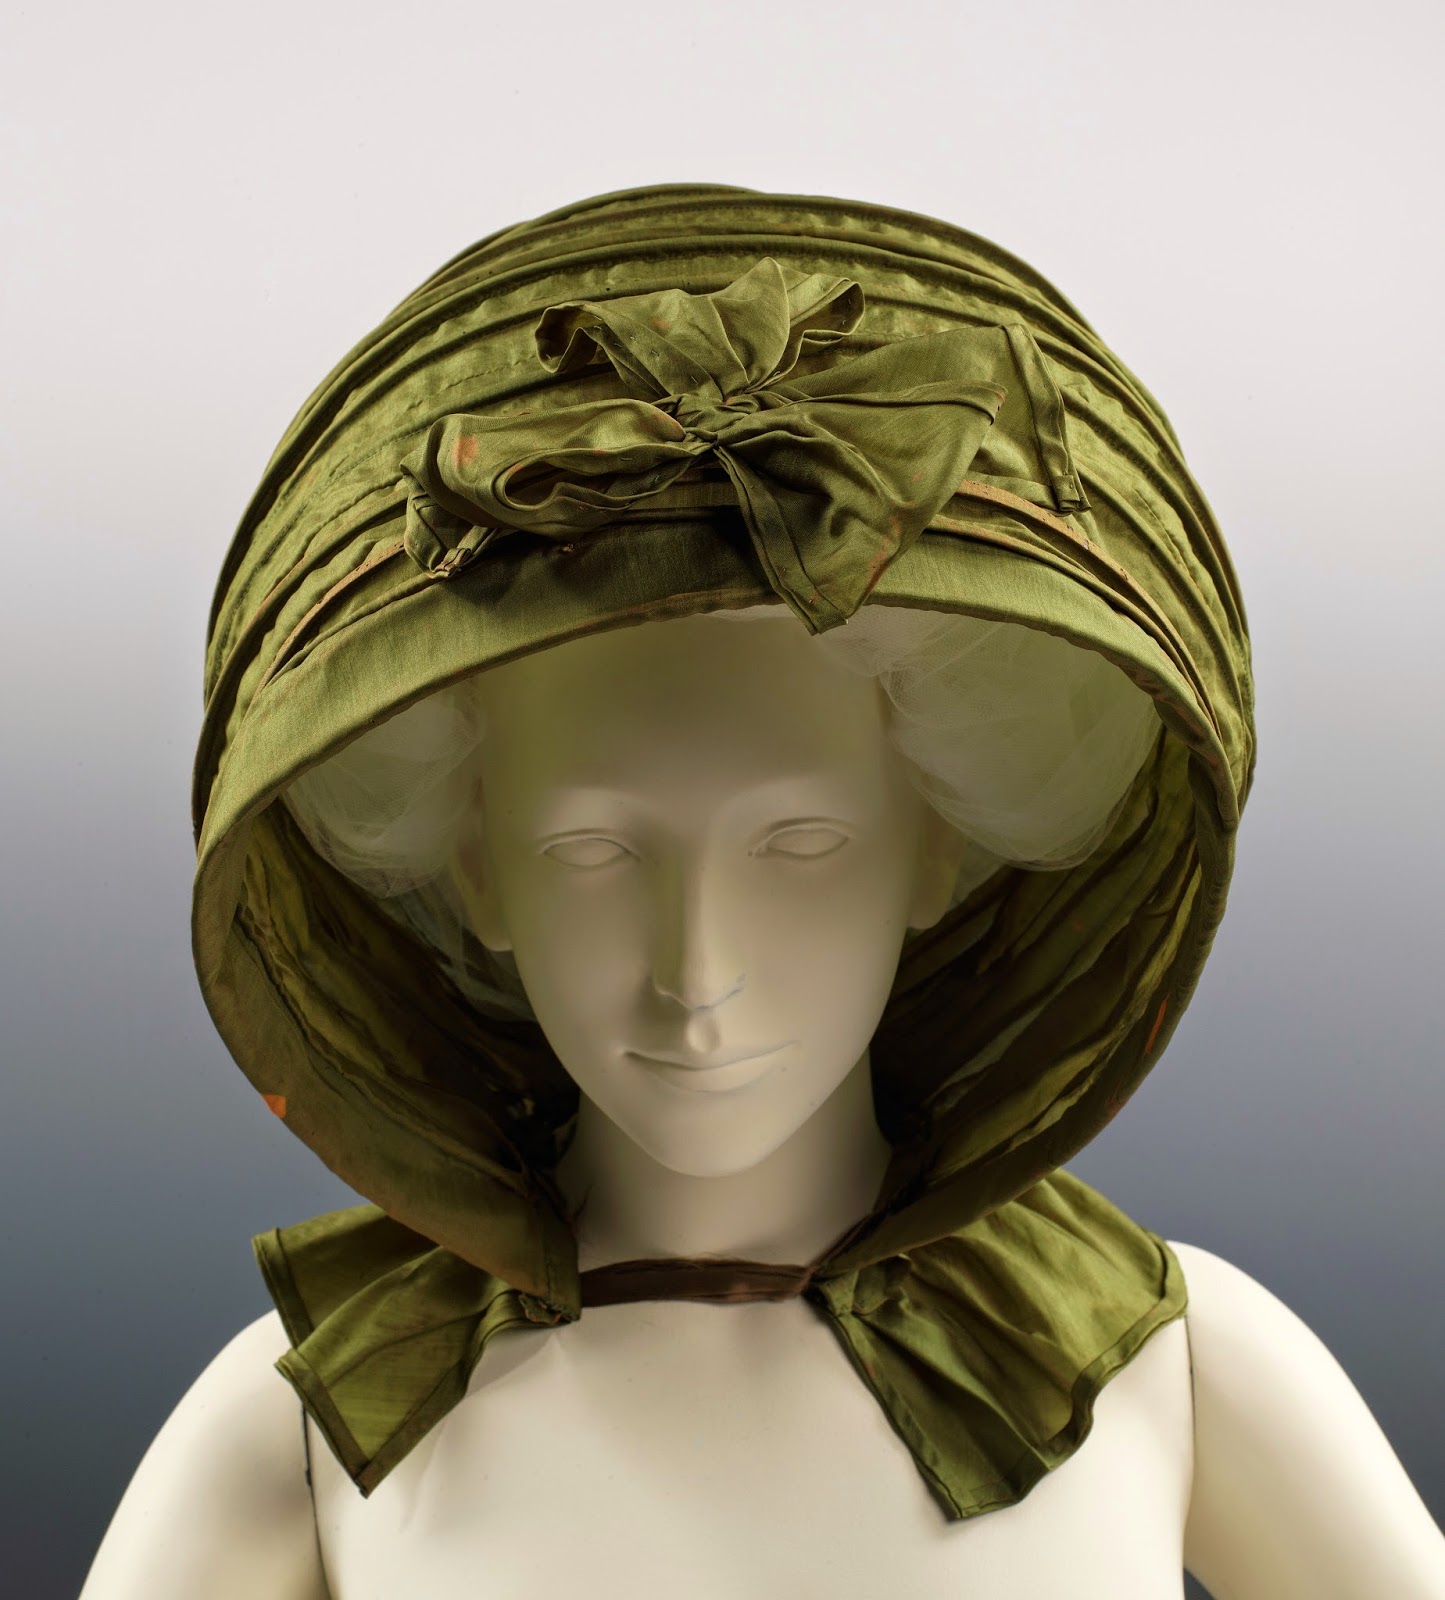
Oh help! Oh no! It's A Calash!


I am reading the Gruffalo a lot with our little daughter and when I came to writing this post about my latest project, I couldn't help thinking in those words.

Anyway. It was a rather spontaneous project which had the purpose of keeping my mind busy (for various reasons) and being inexpensive. So, I've been thinking about a calash for some time and had looked at some pictures, and now the time was ripe.
I've still had plenty of reed and some silks left over.
Calash (or CalÚche) is a horse carriage, really. (read more here at Wikipeda e.g. )

First a quick analyses of the calashes I used as examples. They can be found on the metmuseum.org homepage. Also refer to my pinterest board for more examples or this homepage, that has plenty of links to museums


http://www.metmuseum.org/collection/the-collection-online/search/116612?=&imgNo=0&tabName=related-objects


http://www.metmuseum.org/collection/the-collection-online/search/157763?img=1&imgNo=0&tabName=related-objects


If you follow the links you will find a few more photographs. The MetMuseum has some other Calashes from the 18th and early 19th century and also Pinterest is a good source for finding more pictures.

From those (and a few more, but let's not get overly into this) I have deducted the following things for my project:

1. The calash itself is based on a rectangle. The size of the rectangle is determined by the height and depth you want ot achieve. I noticed that in the above examples the boning seems to be "riding" on top of the calash. I assume, that first the lining is mounted to the outside fabric and then the tunnels are sewn through all layers. The reed probably has a distance of 2 inches. And in between there seems to be either a gathering stitch or an actual seem to allow that accordeon-like folding.

2. The back is either just the rest of the rectangle gathered and cut to fit into that sort of horse-shape OR it is a neatly cut flat extra piece of fabric and lining. Most calashes seem to have a ribbon in the back.

3. A ruffle (at least, could also extend to a "nearly-cape" length) was attached to the bottom of the calash and a ribbon in front to secure it and keep it in shape. Also seems to be a simple rectangle mostly.

4. Some calashes have (like the green one above) extra decoration (I love that extra bow on the green one!).

5. Although you don't see them on the pictures, I would think they had a small ribbon somewhere to pull them up agains the wind and over the head.

6. Both calashes have a sort of brim in the front, the green one has a rather straight one that might be padded with an extra layer of stiffer fabric, the violet one has some sort of double ruffle. Anyway, neither of them ends with a bone but with something decorative.

Personally I like the shape of the green one best, not very bulky and ruffly. So that's the shape I was trying to achieve.

13 boning chanels, 2 thereof in the back so slightly shorter. aprox. 2 inches apart?
in between fold to the inside, w/o boning.
2 bows.
supposedly flat back.
simple straight brim in front, possibly stiffened.
simple self fabric ties.

I've had particular fun with the reed I've used. It came in a round bundle and gave the whole thing the shape of an orange. But I wanted horse-shoe. My mock-up wasn't promising. So after doing some research into reed (which led me to most informative sited about basket making...) I've learned a lot of new stuff. Did it help the calash? Who knows.

So here we are, this is my version of a calash. Sorry, no big hair day... :) 


Also not a big smiley face day. Could be worse, though. 

my favourite view.


And for everyone who's made it this far: Here's an experimental pattern. It's not complete and will still take a bit of fiddling I'm afraid, but then I'm not a professional pattern person and it's free. ;) The pattern is in English. Sort of.

Calash Pattern.pdf

Enjoy your day!
(PS: No, it's not entirely handsewn, I've used the machine a fair bit, because I wasn't convinced it would turn out okay... shame on me... I would recommend sewing the boning channels on the outside by hand, though... if you want to do it half-properly... but well... next time...)

Friday, 24 January 2014

My 18th century muff

So, after my thoughts about the what's and when's on 18th century muffs I've come up with my own version.
I really liked the idea of having a muff base and then the option of sewing many many many different covers. Here's Katherine's tutorial muff base and muff cover for reference. It's really just working with rectangulars (this reminds me of this video on Sesame Street "Dancing with Triangles")

So I started with the base. I have used twill from my fabric stash. And the filling is synthetic fibre that used to be the stuffing of an IKEA pillow that was just sitting there waiting to be given another purpose. ;) I needed most of the stuffing, I was really surprised how much material you can stuff into that muff base!
My base was a 21x26 inches rectangle. I foldes that in half and made a tube (see Katherines tutorial) make sure you close the right end of the tube. :)


I've had some faux fur in black (or blackish blue, I'm not quite sure..) sitting around here for 12 ( in words TWELVE!!!) years and cut a 21x15 inch rectangle. Again, I did what Katherine did, I closed one side, made two tunnels on the "open" sides, some ribbon in it, FINISHED!!!


I think I am going to attach some sort of sturdier ribbon to one side so I can casually carry it around, but as I've not got anything suitable at home at the moment and I am not yet sure what that ribbon is supposed to look like... it might not happen. ;)
 I could also carry it around like this:


 And now I can make SO many covers, maybe like this...


All in all this muff business was done in about 2-3 hours (fabric search included), and making the cover takes about 30min... maximum....