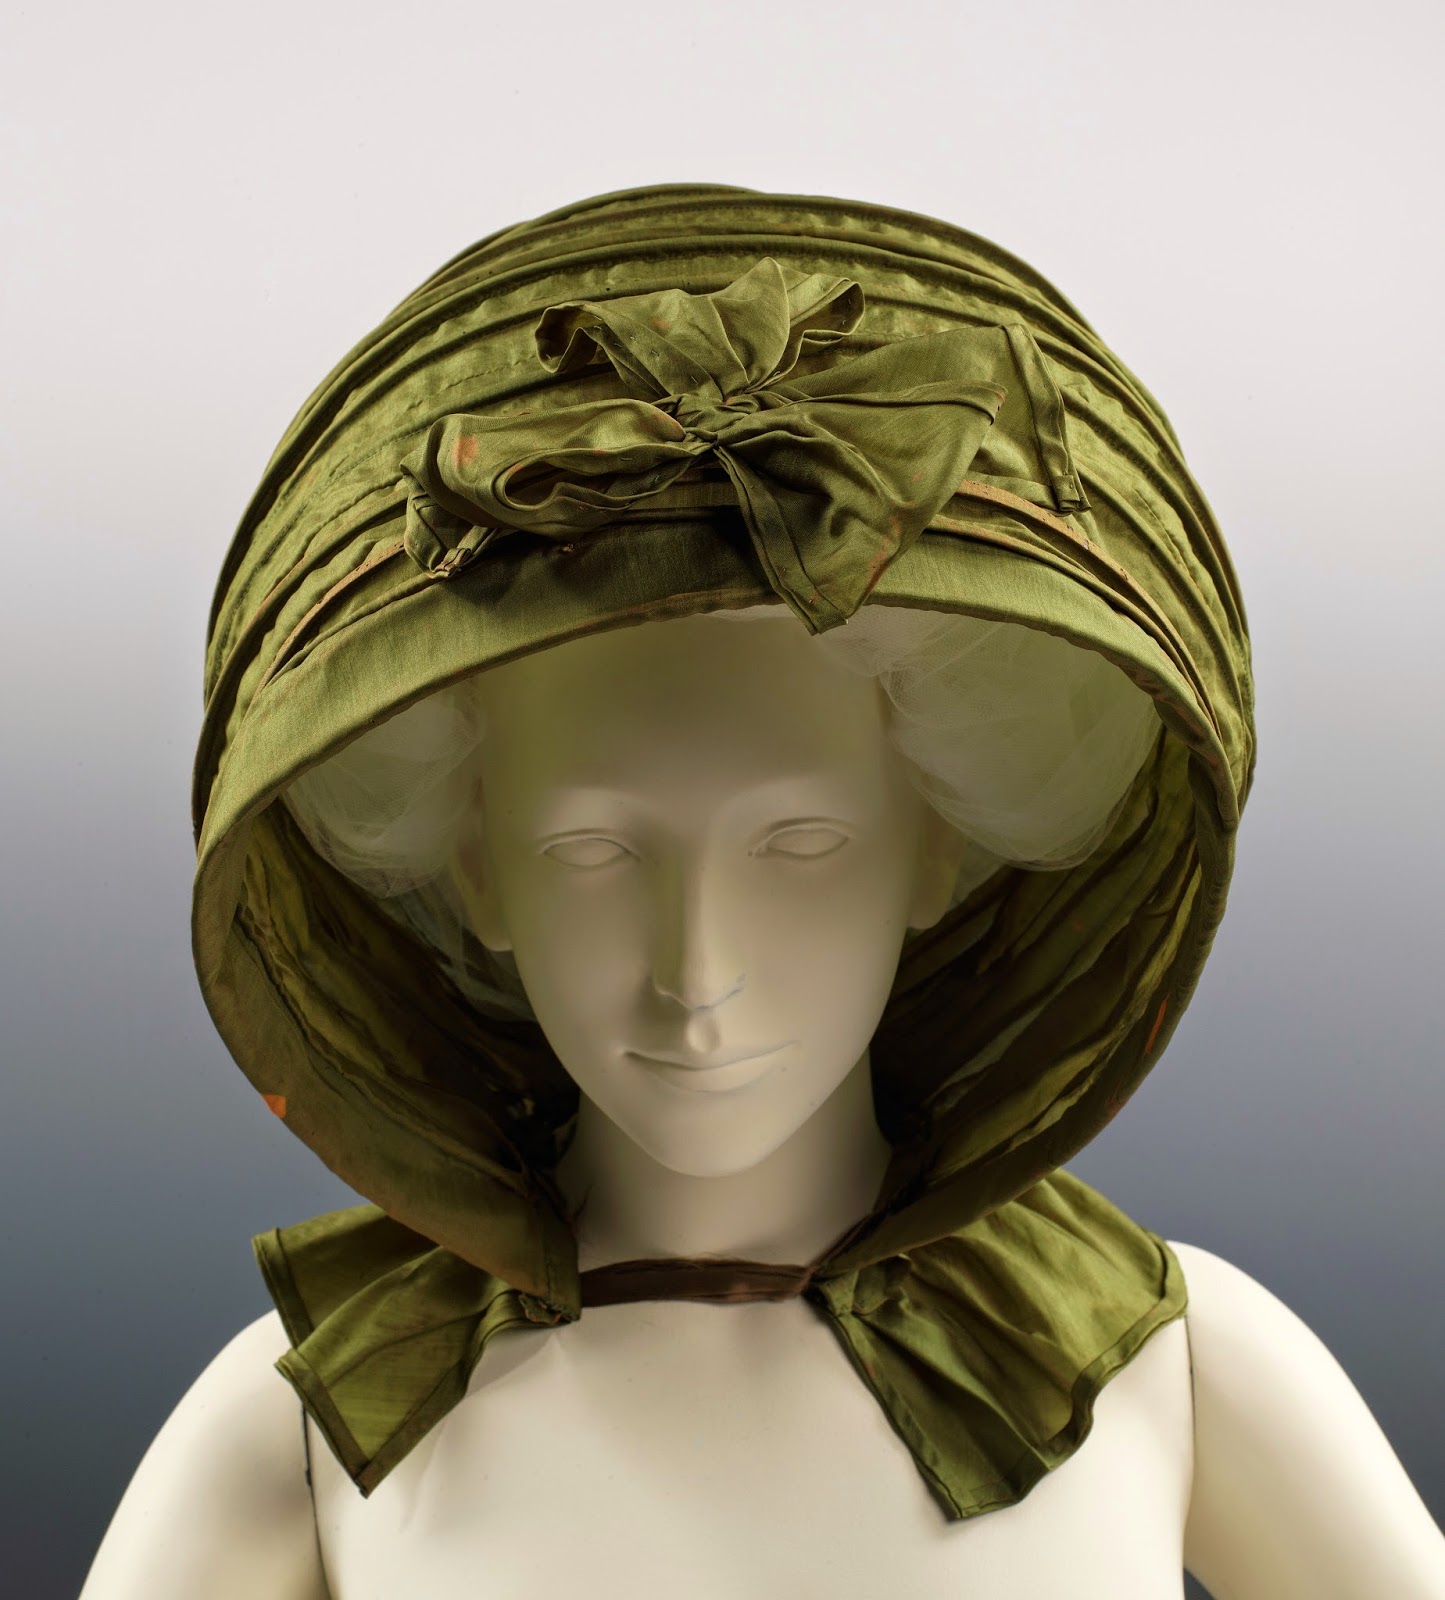
This enormous 1770s cap was lovingly nicknamed "the Mrs Miggins cap" by my husband. The name sort of stuck. :)
These pictures were my inspiration, but I changed and combined, as usual. I am just no good at exact reproductions. :)
https://www.pinterest.com/pin/325807354270921179/
https://www.pinterest.com/pin/325807354270921177/
https://www.pinterest.com/pin/325807354270921172/
https://www.pinterest.com/pin/325807354270921170/
more pictures of 18th century caps: https://www.pinterest.com/hertzwerk/18th-c-caps/
I used white or off white (I can't really tell...) silk organza (2,8), which is very thin and nice. Some of the ribbons/frills I treated with corn starch to stop them from fraying, because I didn't want to hem them to keep the whole cap "airy" despite its many decorations. It doesn't totally stop fraying, but it helps a little to keep the fibres together.
I didn't use a pattern, but if you want to use a commercial pattern, the base of the cap is close to JP Ryans Dormeuse/Baigneuse. All in all I used nearly 2 metres of fabric.
(yes, the wig is hilarious, I've written a tutorial about it...) :) http://hertzwerk-freiburg.blogspot.de/2015/10/1770s-big-hair-wig-tutorial.html
Showing posts with label accessoires. Show all posts
Tuesday, 24 November 2015
Thursday, 23 April 2015
Getting into millinery - the materials
Because of the fitting issues connected with my post-pregnancy shape, I am getting into millinery this year. I've always wanted to do that anyway ... :)
(yes, I am pausing woolly things for now - what good is a warm scarf or poncho in July at 35 degrees Celsius? - and I am planning to get into sewing again by the end of 2015/beginning 2016)
A word on millinery:
Millinery is a highly specialized trade. It's not something you just "do". It requires not only special equipment and material but also knowledge and skills. Something that you usually learn in years of an apprenticeship and refine all though your life.
I am hoping to acquire some skills in the future, but you never know what happens.
I am expecting this to be a long and hard ride with successes and setbacks, with good ideas that turn out completely horrible and mistakes that turn out wonderfully. I am hoping to be able to use these skills for my historical projects as well as vintage inspired headwear for "everyday" (1920s cloches, 1950s headpieces).This will include covered buckram frames as well as felt based hats.
Hatmaking/Millinery also includes making the decorations yourself - e.g. work with feathers or making silk flowers from scratch. I have to be honest - I'd LOVE to be able to make one of those hilariously big and beautiful silk peonies or silk roses, but I am not sure, whether I am ever going to get there. Especially the japanese flower making art seems so appealing... Making something like this would be great, wouldn't it?
Anyway, back to millinery:
It all started with always wanting a properly fitting 1920s cloche. And never finding one. And then I stumbles across free-form hat blocking (see e.g. here, a video on youtube.com: https://www.youtube.com/watch?v=-Nj0bBbkBA8)
And then I found this book:
I really like this book, the author gives an overview over materials first. What I REALLY appreciate was her suggestions to use an old fashioned waterkettle to generate steam. So far I had only found apologetic "yeah, these professional steamers are, like, really expensive, but what can you do..." (you can only get these apparently jiffy steamers (Germany)). And to be completey honest with you, I didn't really think spending about 250 Euros just to do a bit of millinery on just a steamer was quite worth it.
I also got this one:
It is in German and it focusses on modern millinery, too, with reference to stuff available in Germany.
People don't wear headwear as much here, so it's more difficult to get things.
So over the last months I have slowly started to collect the ingredients
An old fashioned water kettle.
You can't see it, but it is big. It can contain about 4 litres and the bottom circumference is about 22cms. I love the spout. I could even make tea in it. It is in perfect, spotless condition, looks as if it had never been used before. Or just really gently. It should produce lots of lovely steam. :)
And lots of bits and bobs
- sturdy needles (I got some that are meant for model plane making, they have a finger friendlich plastic top, "Stoßnadeln")
- for a start simple wool felt cones (I prefer the softer surface of melusine or peachbloom, but for practising simple ones should do) and plain 100% wool felt pieces
- millinery wire (Hutdraht)
- millinery needles (Modistennadeln)
- suede brush (Rauhlederbürste)
- felt stiffener (this proved to be the most difficult part, more on this in a later post) and brushes
- water spray bottle
- petersham ribbon (cotton/viscose blend) (Ripsband)
- and last but not least a hat block
- due to the need for experiments regarding felt stiffener I got a small fascinator hat block, so I could try out different stiffening techniques before ruining the felt cones.
- For free form hat blocking a hat block like this is required, you can also use it for small headpieces, fascinators and wig-dressing. We'll see to that later. Due to the need to experiment with the stiffener first,
The hat blocks are the biggest investment if you want to get into millinery...
So long!
Coming up next in millinery: the felt stiffener project.
(yes, I am pausing woolly things for now - what good is a warm scarf or poncho in July at 35 degrees Celsius? - and I am planning to get into sewing again by the end of 2015/beginning 2016)
A word on millinery:
Millinery is a highly specialized trade. It's not something you just "do". It requires not only special equipment and material but also knowledge and skills. Something that you usually learn in years of an apprenticeship and refine all though your life.
I am hoping to acquire some skills in the future, but you never know what happens.
I am expecting this to be a long and hard ride with successes and setbacks, with good ideas that turn out completely horrible and mistakes that turn out wonderfully. I am hoping to be able to use these skills for my historical projects as well as vintage inspired headwear for "everyday" (1920s cloches, 1950s headpieces).This will include covered buckram frames as well as felt based hats.
Hatmaking/Millinery also includes making the decorations yourself - e.g. work with feathers or making silk flowers from scratch. I have to be honest - I'd LOVE to be able to make one of those hilariously big and beautiful silk peonies or silk roses, but I am not sure, whether I am ever going to get there. Especially the japanese flower making art seems so appealing... Making something like this would be great, wouldn't it?
![]() |
| from an alaya bar ad, google, never mind the jewellry, look at the flowers!! |
Anyway, back to millinery:
It all started with always wanting a properly fitting 1920s cloche. And never finding one. And then I stumbles across free-form hat blocking (see e.g. here, a video on youtube.com: https://www.youtube.com/watch?v=-Nj0bBbkBA8)
And then I found this book:
![]() |
| http://us.macmillan.com/books/9780312656867 |
I really like this book, the author gives an overview over materials first. What I REALLY appreciate was her suggestions to use an old fashioned waterkettle to generate steam. So far I had only found apologetic "yeah, these professional steamers are, like, really expensive, but what can you do..." (you can only get these apparently jiffy steamers (Germany)). And to be completey honest with you, I didn't really think spending about 250 Euros just to do a bit of millinery on just a steamer was quite worth it.
I also got this one:
It is in German and it focusses on modern millinery, too, with reference to stuff available in Germany.
People don't wear headwear as much here, so it's more difficult to get things.
![]() |
| (picture form amazon.de) |
So over the last months I have slowly started to collect the ingredients
An old fashioned water kettle.
You can't see it, but it is big. It can contain about 4 litres and the bottom circumference is about 22cms. I love the spout. I could even make tea in it. It is in perfect, spotless condition, looks as if it had never been used before. Or just really gently. It should produce lots of lovely steam. :)
![]() |
| (picture from ebay.de bidding) |
- sturdy needles (I got some that are meant for model plane making, they have a finger friendlich plastic top, "Stoßnadeln")
- for a start simple wool felt cones (I prefer the softer surface of melusine or peachbloom, but for practising simple ones should do) and plain 100% wool felt pieces
- millinery wire (Hutdraht)
- millinery needles (Modistennadeln)
- suede brush (Rauhlederbürste)
- felt stiffener (this proved to be the most difficult part, more on this in a later post) and brushes
- water spray bottle
- petersham ribbon (cotton/viscose blend) (Ripsband)
- and last but not least a hat block
- due to the need for experiments regarding felt stiffener I got a small fascinator hat block, so I could try out different stiffening techniques before ruining the felt cones.
![]() |
| (picture from etsy.com, easyhatblocks) |
- For free form hat blocking a hat block like this is required, you can also use it for small headpieces, fascinators and wig-dressing. We'll see to that later. Due to the need to experiment with the stiffener first,
![]() |
| (picture from etsy.com, borsolino) |
The hat blocks are the biggest investment if you want to get into millinery...
So long!
![]() |
| From http://www.alice-in-wonderland.net/alice2a.html |
Coming up next in millinery: the felt stiffener project.
Monday, 16 February 2015
getting into knitting... and crocheting.. but WHY?...
So, my 2015 project "learning how to knit (and crochet) properly" has begun.
Some of you might ask "why on earth is she doing this? Why can't she just stick to sewing?"
And there are even several answers to this question!
1. Because sewing and made to measure garments just don't make sense when you are 9 months pregnant or still have the "post-baby-belly" (for those of you not so familiar with physical changes in pregnancy remember the old saying "9 month the belly comes, 9 months the belly goes" - which adds up to 18 months of weird sizes - ideally -) - and i don't want/need that much of maternity clothes...
2. Because the children don't need that many clothes...
3. Because I couldn't resist learning something new...
4. Just LOOK at the woodland knits book, HOW can you not?!? (and theres another one just begging me to have a look into it: botanical knits by Alana Dakos. And then you could indulge in estonian lace knits and faire island knits and norwegian patterns and and and...
5. Because for my vintage-inspired wardrobe I could do with a few of those knitted or crocheted tops/blouses ... and you can still get original instructions - what could be better? I've even seen a pattern for a 1930s crochet swim suit... Irresistable!! :) (yes, that's the real reason, really, but I am not yet couragous enough to start on those...)
My first project after the warming up phase (woolly hats) are mitts. They are knitted in a basic lace-pattern (Ajourmuster) in blue merino wool. Never done mitts or Ajour before...
I am using the book "stricken basisc" by Stephanie van der Linden (a German publication, knitting proper stuff in English will be the next step). It's a basic techniques book for beginners with a few nice projects and lots of explanations. Her instructions are clear and easy to follow and the pictures that go with the intructions are really helpful. Very recommendable. They also have instructions for left-handed knitting.
My next projects are from the book "woodland knits" by Stephanie Dosen and are a lot more challenging. Unfortunately, there are also a lot of techniques involved, that the basic knitting book doesn't include, but I am going to consult youtube and knittinghelp.com and generally the internet for that. If I don't challenge myself, I will only knit garter stitch, so... I am going to learn how to knit cables, how to wrap and turn and how to knit 4 below... I might end up knitting upside down altogether. :)
Also, I think it will take me so long to master these techniques, that until then the baby bump should be ... well... considerably reduced I hope. I don't dare to hope it will go back to "before".
So, we can all look forward to weird knitted and crocheted accessoires and in the end, hopefully, vintage pattern inspired blouses/tops or even a swimsuit. ;)
Now, if that's not a bunch of really good reasons, I don't know what to say!
Some of you might ask "why on earth is she doing this? Why can't she just stick to sewing?"
And there are even several answers to this question!
1. Because sewing and made to measure garments just don't make sense when you are 9 months pregnant or still have the "post-baby-belly" (for those of you not so familiar with physical changes in pregnancy remember the old saying "9 month the belly comes, 9 months the belly goes" - which adds up to 18 months of weird sizes - ideally -) - and i don't want/need that much of maternity clothes...
2. Because the children don't need that many clothes...
3. Because I couldn't resist learning something new...
4. Just LOOK at the woodland knits book, HOW can you not?!? (and theres another one just begging me to have a look into it: botanical knits by Alana Dakos. And then you could indulge in estonian lace knits and faire island knits and norwegian patterns and and and...
5. Because for my vintage-inspired wardrobe I could do with a few of those knitted or crocheted tops/blouses ... and you can still get original instructions - what could be better? I've even seen a pattern for a 1930s crochet swim suit... Irresistable!! :) (yes, that's the real reason, really, but I am not yet couragous enough to start on those...)
My first project after the warming up phase (woolly hats) are mitts. They are knitted in a basic lace-pattern (Ajourmuster) in blue merino wool. Never done mitts or Ajour before...
I am using the book "stricken basisc" by Stephanie van der Linden (a German publication, knitting proper stuff in English will be the next step). It's a basic techniques book for beginners with a few nice projects and lots of explanations. Her instructions are clear and easy to follow and the pictures that go with the intructions are really helpful. Very recommendable. They also have instructions for left-handed knitting.
My next projects are from the book "woodland knits" by Stephanie Dosen and are a lot more challenging. Unfortunately, there are also a lot of techniques involved, that the basic knitting book doesn't include, but I am going to consult youtube and knittinghelp.com and generally the internet for that. If I don't challenge myself, I will only knit garter stitch, so... I am going to learn how to knit cables, how to wrap and turn and how to knit 4 below... I might end up knitting upside down altogether. :)
Also, I think it will take me so long to master these techniques, that until then the baby bump should be ... well... considerably reduced I hope. I don't dare to hope it will go back to "before".
So, we can all look forward to weird knitted and crocheted accessoires and in the end, hopefully, vintage pattern inspired blouses/tops or even a swimsuit. ;)
Now, if that's not a bunch of really good reasons, I don't know what to say!
Sunday, 5 October 2014
Oh help! Oh no! It's A Calash!
I am reading the Gruffalo a lot with our little daughter and when I came to writing this post about my latest project, I couldn't help thinking in those words.
Anyway. It was a rather spontaneous project which had the purpose of keeping my mind busy (for various reasons) and being inexpensive. So, I've been thinking about a calash for some time and had looked at some pictures, and now the time was ripe.
I've still had plenty of reed and some silks left over.
Calash (or Calèche) is a horse carriage, really. (read more here at Wikipeda e.g. )
First a quick analyses of the calashes I used as examples. They can be found on the metmuseum.org homepage. Also refer to my pinterest board for more examples or this homepage, that has plenty of links to museums
http://www.metmuseum.org/collection/the-collection-online/search/116612?=&imgNo=0&tabName=related-objects
http://www.metmuseum.org/collection/the-collection-online/search/157763?img=1&imgNo=0&tabName=related-objects
If you follow the links you will find a few more photographs. The MetMuseum has some other Calashes from the 18th and early 19th century and also Pinterest is a good source for finding more pictures.
From those (and a few more, but let's not get overly into this) I have deducted the following things for my project:
1. The calash itself is based on a rectangle. The size of the rectangle is determined by the height and depth you want ot achieve. I noticed that in the above examples the boning seems to be "riding" on top of the calash. I assume, that first the lining is mounted to the outside fabric and then the tunnels are sewn through all layers. The reed probably has a distance of 2 inches. And in between there seems to be either a gathering stitch or an actual seem to allow that accordeon-like folding.
2. The back is either just the rest of the rectangle gathered and cut to fit into that sort of horse-shape OR it is a neatly cut flat extra piece of fabric and lining. Most calashes seem to have a ribbon in the back.
3. A ruffle (at least, could also extend to a "nearly-cape" length) was attached to the bottom of the calash and a ribbon in front to secure it and keep it in shape. Also seems to be a simple rectangle mostly.
4. Some calashes have (like the green one above) extra decoration (I love that extra bow on the green one!).
5. Although you don't see them on the pictures, I would think they had a small ribbon somewhere to pull them up agains the wind and over the head.
6. Both calashes have a sort of brim in the front, the green one has a rather straight one that might be padded with an extra layer of stiffer fabric, the violet one has some sort of double ruffle. Anyway, neither of them ends with a bone but with something decorative.
Personally I like the shape of the green one best, not very bulky and ruffly. So that's the shape I was trying to achieve.
13 boning chanels, 2 thereof in the back so slightly shorter. aprox. 2 inches apart?
in between fold to the inside, w/o boning.
2 bows.
supposedly flat back.
simple straight brim in front, possibly stiffened.
simple self fabric ties.
I've had particular fun with the reed I've used. It came in a round bundle and gave the whole thing the shape of an orange. But I wanted horse-shoe. My mock-up wasn't promising. So after doing some research into reed (which led me to most informative sited about basket making...) I've learned a lot of new stuff. Did it help the calash? Who knows.
So here we are, this is my version of a calash. Sorry, no big hair day... :)
| Also not a big smiley face day. Could be worse, though. |
| my favourite view. |
And for everyone who's made it this far: Here's an experimental pattern. It's not complete and will still take a bit of fiddling I'm afraid, but then I'm not a professional pattern person and it's free. ;) The pattern is in English. Sort of.
Calash Pattern.pdf
Enjoy your day!
(PS: No, it's not entirely handsewn, I've used the machine a fair bit, because I wasn't convinced it would turn out okay... shame on me... I would recommend sewing the boning channels on the outside by hand, though... if you want to do it half-properly... but well... next time...)
Friday, 12 September 2014
18th century garter MFA
While I was waiting for material for the 1790s Imatex jacket, I started this project which in the end I finished after the jacket, for various reasons. I have taken the liberty to change some details, but no worries, they essentially stayed garters. :) I've used scrap silk taffeta and cotton thread and I changed the motive in the middle, because I didn't quite understand what it is supposed to be... and I wasn't that motivated to stitch lots of strange birds.
It's been a quick and easy project that was just the thing to do. :) Plus you can never have enough small accessoires. :)
Have a lovely day!
Friday, 24 January 2014
My 18th century muff
So, after my thoughts about the what's and when's on 18th century muffs I've come up with my own version.
I really liked the idea of having a muff base and then the option of sewing many many many different covers. Here's Katherine's tutorial muff base and muff cover for reference. It's really just working with rectangulars (this reminds me of this video on Sesame Street "Dancing with Triangles")
So I started with the base. I have used twill from my fabric stash. And the filling is synthetic fibre that used to be the stuffing of an IKEA pillow that was just sitting there waiting to be given another purpose. ;) I needed most of the stuffing, I was really surprised how much material you can stuff into that muff base!
My base was a 21x26 inches rectangle. I foldes that in half and made a tube (see Katherines tutorial) make sure you close the right end of the tube. :)
I've had some faux fur in black (or blackish blue, I'm not quite sure..) sitting around here for 12 ( in words TWELVE!!!) years and cut a 21x15 inch rectangle. Again, I did what Katherine did, I closed one side, made two tunnels on the "open" sides, some ribbon in it, FINISHED!!!
I think I am going to attach some sort of sturdier ribbon to one side so I can casually carry it around, but as I've not got anything suitable at home at the moment and I am not yet sure what that ribbon is supposed to look like... it might not happen. ;)
I could also carry it around like this:
And now I can make SO many covers, maybe like this...
All in all this muff business was done in about 2-3 hours (fabric search included), and making the cover takes about 30min... maximum....

I really liked the idea of having a muff base and then the option of sewing many many many different covers. Here's Katherine's tutorial muff base and muff cover for reference. It's really just working with rectangulars (this reminds me of this video on Sesame Street "Dancing with Triangles")
So I started with the base. I have used twill from my fabric stash. And the filling is synthetic fibre that used to be the stuffing of an IKEA pillow that was just sitting there waiting to be given another purpose. ;) I needed most of the stuffing, I was really surprised how much material you can stuff into that muff base!
My base was a 21x26 inches rectangle. I foldes that in half and made a tube (see Katherines tutorial) make sure you close the right end of the tube. :)
I've had some faux fur in black (or blackish blue, I'm not quite sure..) sitting around here for 12 ( in words TWELVE!!!) years and cut a 21x15 inch rectangle. Again, I did what Katherine did, I closed one side, made two tunnels on the "open" sides, some ribbon in it, FINISHED!!!
I think I am going to attach some sort of sturdier ribbon to one side so I can casually carry it around, but as I've not got anything suitable at home at the moment and I am not yet sure what that ribbon is supposed to look like... it might not happen. ;)
I could also carry it around like this:
And now I can make SO many covers, maybe like this...
All in all this muff business was done in about 2-3 hours (fabric search included), and making the cover takes about 30min... maximum....

Tuesday, 21 January 2014
Analysing - 18th century muffs
I have given making another 18th century accessoire some thought. A muff.
A while ago I have seen this tutorial by Kathrine http://koshka-the-cat.blogspot.de/2013/01/an-18th-century-muff-cover-tutorial.html and thought it was a rather simple task. Unfortunately she doesn't give any reference as to the suitable decade. To cut a long story short, this sort of smallish muff works for the whole century, which might account for the fact that she didn't refer to a certain decade. If you want to look at a few more pictures, I have collected some muff-picture on may Pinterest - 18th Accessoires
Muffs in the 18th century seem to be smallish (rather earlier) to medium (always suitable) size. Towards the end of the 1780s and the 1790s muffs tend to grow up to ridiculous measurements. But also medium sized ones can be seen on fashion plates. What seems to always work is a smallish-medium sized fur coated muff.
Here are a few examples:
1740s
1750s
1760s
1770s
1780s
1790s
I recommend the above mentionned tutorial by Katherine. :) Some time soon I shall post my own version. See you!
A while ago I have seen this tutorial by Kathrine http://koshka-the-cat.blogspot.de/2013/01/an-18th-century-muff-cover-tutorial.html and thought it was a rather simple task. Unfortunately she doesn't give any reference as to the suitable decade. To cut a long story short, this sort of smallish muff works for the whole century, which might account for the fact that she didn't refer to a certain decade. If you want to look at a few more pictures, I have collected some muff-picture on may Pinterest - 18th Accessoires
Muffs in the 18th century seem to be smallish (rather earlier) to medium (always suitable) size. Towards the end of the 1780s and the 1790s muffs tend to grow up to ridiculous measurements. But also medium sized ones can be seen on fashion plates. What seems to always work is a smallish-medium sized fur coated muff.
Here are a few examples:
1740s
| Jean Baptiste Massé (French, 1687–1767), 'The Blue Muff' c 1740 |
| 1755. Louise Henriette de Bourbon. |
![]() |
| French 18th Century Young Woman with a Muff, c. 1750 Chester Dale Collection 1943.7.5 |
| Portrait of Madame de Pompadour with a Fur Muff - François-Hubert Drouais, 1763-1764 - The Athenaeum |
![]() |
| Catherine Havers, attr. Barthélemy du Pan, ca. 1765; LMG LEEAG.PA.1966.0002.0002 |
1770s
![]() |
| Galerie des Modes, 11e Cahier, 2e Figure Middle class woman in a striped Satin Gown with a furred pelisse and a white muff. (1778) |
| Miss Lovejoy, 1772. |
1780s
| Muff. English, 1785–1800. Silk satin, mezzotint on fabric, silk embroidery, pearls, gauze appliques, and silk plain-weave lining - in the Museum of Fine Arts Boston. |
| Mrs. Wilbraham Bootle, 1781 by George Romney, oil on Canvas, (c) National Gallery of Scotland, Edinburgh, Scotland. |
| Dress of the Year 1781, by Ann Frankland Lewis. |
| Striped dress ensemble with large striped fur muff - Magasin des Modes - March 1789 .- I LOVE that outfit, actually. :) |
| Gallery of Fashion, January 1796. |
| Gallery of Fashion, March 1798. |
I recommend the above mentionned tutorial by Katherine. :) Some time soon I shall post my own version. See you!
Thursday, 22 December 2011
Julklapp Christmas bells
Remember? I made something small for the Advent coffee Julklapp?
Here is the result: Small christmas bells that you can put on the Christmas tree or whereever you want.
It is really easy to make those:
Take 2 squares of fabric (not too thick!) about 8-9cm side length. Sew them together and turn. then fold on the sides to achieve the bell shape and sew together. turn. Attach ribbon. That's it!
- Hier ist also die Auflösung zur Julklapp-Näherei: Kleine Weihnachtsglocken. Kann man an denWeihnachtsbaum oder wo auch immer man Lust hat, hinhängen. Selber machen ist ganz einfach. Man nehme 2 Stoffquadrate (Seitenlänge etwa 8-9cm, nicht zu dick!) und näht sie zusammen - wenden!. Dann so zusammenfalten (und auch nähen), dass sie Glockenform entsteht und wenden. Band dran. Fertig!!

Saturday, 8 October 2011
free baby knot-hat pattern!!
Das hier hab ich im Netz gefunden und finde den Hut SO süß! Und damit alle dran teilhaben können, hier der Link!!
I've found this free baby hat pattern on the internet and couldn't resist to share it with you. It's really simple and SO cute!!
free baby hat pattern and tutorial
the baby knot hat pattern pdf

| Stoff: An Apple a Day... von hamburgerliebe bei michas-stoffecke.de |
free baby hat pattern and tutorial
the baby knot hat pattern pdf

Sunday, 10 July 2011
1750s La Canadienne Complete
To finish off the 1750s outfit, here you can see the fichu and apron following La Fleur de Lyse 18101. For decency: the cap is "La Cornette" of the La Fleur de Lyse 18101. And to keep my feet warm and cosy in the wooden clogs: a set of self-knitted stockings in red wool is to follow. :)
And of course my little basket is filled with all sorts of goodies! :)
Tuesday, 10 May 2011
Regency hats - empire Hüte
Eine Bergère passend zum petrolfarbenen Wollmusslinkleid mit einem kleinen Blumensträusschen an der Seite. Das Band wird hinter dem Kopf geknotet.
- The bonnet is decorated with a checked Ribbon and a bow, topped with a tiny bouquet if forget-me-nots.
Subscribe to:
Posts (Atom)