Showing posts with label free pattern. Show all posts

Monday, 12 August 2019

Cocoon cardigan pattern

from https://www.mooglyblog.com/hygge-cocoon-cardigan/

I am a big fan of cardigans/shrugs that are easy to wear and easy to make. So here is a pattern for a crochet cocoon cardigan, of you want to go all the way.

BUT you can also take a shortcut and just take and kind of fabric that you seem suitable to be used/seen from both sides. E.g. a wool knit or a punto di roma jersey or a heavier wool knit  - whatever works for you. Just keep in mind that the inside will be seen and the weight of the fabric will determine the drape of the cardigang. Anything goes though.

You need a rectangle. The instructions call for 91x101cm (37"x40") but you can see what you like best. And you need some fabric for the cuffs. you can make them longer or thin, you can omit them completely and leave a wider opening (just add some bias tape to finish the edge). Anything goes.

And then put the fabric together the same way the cochetes rectangle would be put together.

That's it!

https://www.mooglyblog.com/hygge-cocoon-cardigan/

Friday, 22 March 2019

Twister Dress Disco Ball


Before I tell you how easy and quickly to assemble this dress is, I have to admit a few things

1. I like making things again that went well before.
2. I have the urge to make more twister dresses.
3. I made this dress as a friend's birthday present.
4. After seeing the pictures, I am SO tempted to keep it (but I won't)
5. I might make a disco-ball twister dress for myself
6. I like assymmetrical things.

Anyhow, I used a stretchy velvety fabric that had the sequins mounted (I would love to see the machine that puts sequins on fabric...) and just followed the instructions for the ingenious Twister Dress by Apfelblüte: https://www.burdastyle.com/patterns/my-neon-twister-dress

I LOVE the pattern. It is SO extremely easy and so fast to put together. I would say, if you manage to put a pdf pattern together without too much trouble, you can make this dress in no time. It takes about 1 hour to make. With cutting and making small adjustments. I made the neck opening a little wider and the long sleeve a little tighter. I also prefer wearing the longer sleeve at 3/4 length, but I wear it pushed up, I didn't shorten the sleeve).

You can see more examples on the burda page and also a great batty version here:
http://www.oonaballoona.com/2011/05/sew-weekly-sunday-shes-gone-completely.html

Here is another view


And just in case you ask yourself, what to do with a disco ball dress like that - listen to this music!


Tuesday, 17 July 2018

Knickerrrrrs!! (and a horse)

there is absolutely no way I show you my bottom in self made undies.
Have a look at this cutie instead. 


Hi guys, as you can see, I am going from one project to the next in no time. From Ginger Jeans to knickerrrss!! The steep... erm.. difference in complexity makes me laugh. My crazy patterns make me laugh, too. I've got very happy underwear now (fabric remains from nearly every knit project I've ever made...) Is there anything better? :)

I used this pattern from "So, Zo...", it's free and comes with easy instructions. Perfect.

Pattern: http://sozowhatdoyouknow.blogspot.de/2012/12/free-downloadable-pdf-pattern-pants_4.html
Instructions: http://sozowhatdoyouknow.blogspot.de/2010/08/how-to-construct-undies-with-serger-and.html

As far as I know there is also a free pattydoo pattern but I've not tried that.

It is fun.
I've played a bit with pattern designs, because I wanted to try out 1. enclose the gusset and 2. have a bit of a leg, too, which all works fine.

The good thing about cutting the gusset piece extra is the even more economic use of fabric. And it  also looks neater.

I can strongy recommend making knickers. It is a brilliant project to use up knit jersey scraps, is very satisfying (because quick) and hey, any complaints about fitting knickers EVER heard? No. See. Make knickers. Even if they don't fit, they won't be worse than storebought AND you can improve the pattern.

With the first few pairs I made a few mistakes: Because I feared the waistband would be too tight (and didn't trust the elastic and my sewing skills), I didn't stretch the elastic enough so some of them sort of roll away from by lower back. Which looks stupid. I also used a slightly too wide binding.I've used 19mm width first, which is just a tad too wide. The second batch was made with 14mm wide FOE (fold over elastic) and that is just perfect.


Tuesday, 5 June 2018

My "loud" Twister dress

t's asymmetrical, it's loud, it's weird, it's as comfy as pyjamas and I couldn't care less what other people think about it, because THIS is the most comfortable dress EVER!

I'm in a bit of a sewing frenzy at the moment... I am amazed, how many project are suddenly coming together without any stress. And I am grateful for the joy it is giving me.

My latest project is the burdastyle.com twister dress. It is a free pattern by apfelbluete, who is also the host of the brilliant sewinggalaxy blog

UPDATE: Since Burda has remade their homepage, the pattern has unfortunately disappeared. Which is a real shame. I do not own the rights to the patterns, so I do not want to put them online, however as long as sewinggalaxy (see above) is up, you might want to try to contact the lady who put the pattern online originally. 


Here is the link to the free burdastyle pattern she provides in size 34-40
Neon Twister Dress Burdastyle.com
And the link to the full-figured version, also free
Twister Dress Plus Size Burdastyle.com


It takes absolutely no time to put the dress together. It uses a minimal amount of fabric (1,2m length x1,4m width) and anyting goes, as long as it is stretchy. I've bought some fabric on ebay which turned out to be wonderfully soft to wear and also great to work with. It is 95% cotton and 5% elasthan. I chose a fabric I usually wouldn't go for... my husband calls it a "loud" pattern - I agree. But somehow it works for me for this dress. In fact it is so incredibly comfortable, that it might be my favourite pattern of the year. I am already dreaming of another one with a supernova-space inspired pattern.... or just black with glittery stars? Or electric sparks or something like that? Oh my goodness, imagine this in sequins... gasp.... *love*- I think I am starting to hyperventilate here... 😍

I didn't make many changes to the pattern. I've cut a size 40 and lengthened it a bit (about 5cms) and I made the right sleeve tighter. Other than that I followed instructions. Including washing and drying the fabric it took me 2 days. The cutting and sewing was about 1 hour.

I think I was trying to run away half through taking pictures... 


______________________________
Cost: 
total: 20 Euros
Pattern: free downloadable pdf, paper, printer
fabric: 1,3m Jersey 19,50 Euros
notions: all in stock

Wednesday, 23 May 2018

Free 1961 Pattern drafting book!


I've come another great resource for drafting patterns. I was actually looking for ways people adjusted Ginger Jeans, when I came across this blog Kat Makes and she's doing a lot of great stuff and despite the fact that she has a completely different shape to me, I found lots of really cool stuff on her page. So check her out.

She's also drafting her own patterns and is using this free(!) and downloadable resource, which I recommend. It has the same sort of feel my "Dorothy Moore" book has, but is so much easer to access. :)

Pattern drafting and grading (by Michael Rohr, 1961)


Enjoy!!

Tuesday, 27 February 2018

In search of the perfect T-Shirt - Pattern drafting and an approximation (and lots of sheep)


Self drafted T Shirt! Nobody should look this stern with a self drafted shirt full of sheep. I don't know how I managed!

(If you just want the instructions for drafting a t-shirt and not so much talking: Here it is  How to draft Jersey shirt pdf)

And here is the talking:

Because my body is unique, I usually have problems with store-bought clothing:

1. the waist line is too low on me (sort of "on the hip", looks silly), because I am smaller than what standard clothes are made for. (if you want to know more about standard sizes in clothing  https://en.wikipedia.org/wiki/Clothing_sizes)

2. I have a comparably small waist  and bust in relation to my hip measurement (compared to standard sizing).

3. My hip point is lower than average.

4.  My shoulder width is rather small.

5. I have a sway back nobody seems to want to have anything to do with

Vogue Patterns calls this gallantly "triangle shape", I think it used to be called pear shape? :)

So, all in all with off-the-rack clothes, they are too long, the waist is in the wrong place and the hip width is too small, so if I wear e.g. a T-Shirt, that fits my upper body, the waistline is just a tad too low and the hips small (even with stretchy fabric) so everything is travelling upwards to the waistline with movement and I end up pulling shirts down all of the time, even if they seem to fit ok at first glance.

To cut a long story short, I decided to draft my own t-shirt pattern.
It is really easy, if you just follow instructions!

There are a lot of  tutorials on youtube, I used this one (in German) https://www.youtube.com/watch?v=yQ3kdhVyMNM.


The thing you have to know about pattern drafting is this: It will give you a close approximation (probably closer to your body than any of the off the rack clothing is though...) and you have to make the fine tuning with a muslin on your body. Then you transfer the changes to your pattern. If you've made a lot of alterations or big alterations, I recommend making another muslin. Is is a lot of work and a lot of fabric potentially going to waste, but in the end you will have the perfect jersey shirt pattern. Which you will be able to use for all sorts of Jersey shirt variations.

And you will know a lot about you body and clothes fitting.

When you have a pattern finally, bear in mind, that changes to the neckline might need more changes in the upper bodice than just cutting the neckline. Jersey fabric is rather forgiving, but still, everything you change in the fabric might have consequences in fit overall (Dorothy Moore is dedicating a whole chapter on neckline changes... but I will write about that another time)

Also the amount of stretch of the fabric influences the fit (and also the recovery...)!

My first muslin was made from a piece of cotton jersey without much stretch. So I accepted it would be a little tight. There was pulling above the chest towards the armpit. That's the fabric asking for a dart. Hm. And the basic pattern has a very high neckline.

First I cut out the neckline the way I like T-Shirts, which changed the whole appearance of those wrinkles. But they were still there.

I also found the shoulder width was a bit wide, so I reduced it by 1 cm on each side. And changed the paper pattern accordingly.

I also have lots of wrinkling in the lower back, because I have a sway back.

There are several options how to deal with a sway back in knit shirts.
1. Ignore it.
2. Make sure it's not a too small hip width which makes the shirt travel up.
3. Introduce a seamline in the center back. Or two. Or just two darts. Those can take up the excess fabric.
4. You can try to remove about 2-3cms (1inch) just above the waistline on the back pattern and when you assemble the shirt you stretch the side seamline about 10 cm (5inch) around that area. It works sometimes.

Oh, and those wrinkles in the front could  be removed if you introduce a side dart, either to the side seam or to the armhole.

Has anyone else got good ideas to seal with wrinkling and sway back on knit fabric?

I chose to go with option No 1 this time. After transferring all the other changes to the pattern, I made another muslin. This time I used a mad fabric which I bought years ago because I wanted to make shirts for the children from it. It's nice quality stretch jersey (i guess 95% cotton and 5% elasthane) and has a nice weight to it, which I bought in a sale because most people probably found the pattern a bit too busy. I even made a shirt for the children for it, but even on them it is a bit busy. So I had enough left to make this shirt.

I like the fit despite the wrinkling in the back and that little bit of pulling in the front. And there are a lot of sheep on this. A lohohot. I might use it for pyjamas, which makes just the right amount of sheep. I might need pyjama bottoms with dogs now, i suppose.


Sorry for not taking any pictures during the process of making it. I just assembled it.
1. Match shoulder seams. Sew.
2. Insert sleeves, Make sure front part of the sleeve is in the right place.
3. Close sleeve seam and side seam.
4. Insert neckline binding.
5. Hem sleeves and bottom.
6. Iron carefully.
Finish.

  Here's the resulting pattern and shirt though.

Actually I think the shirt fits better in real life than on this picture.
Less wrinkles around the chest.


see the wrinkles in the back -> not adapted for sway back. I can feel another muslin coming...
(And also quoting The Fast Show: "Does my bum look big in this?")

Below you will also find the description and drawing for drafting this shirt. Don't be put of by the instructions, you'll end up with you own personal shirt pattern.

Enjoy! Bah! Bah! Baaaah!

How to draft your own jersey shirt pdf

If you have questions, leave a comment!

On fitting t-shirts for FBA (I don't really need FBA, but it is interesting anyway and maybe you want to try this out!)

http://www.jenniferlaurenvintage.com/2014/06/how-to-do-full-bust-adjustment-fba-for.html
https://www.mariadenmark.com/2012/08/fitting-t-shirt-fba/
http://www.mariadenmark.com/2014/10/removing-bust-darts/


Tuesday, 13 February 2018

Pattern drafting and sewing tutorials


This is a German video by a very talented lady who is also drafting her own patterns. I think she is explaining it very well and I also really like her style.

Kleider für Julia - by Andreia

https://www.youtube.com/channel/UCIErcwywBwlUO55fvv8c8XA

Friday, 2 February 2018

I'm a fan - more sewing and pattern drafting!


Although I've not been sewing a great lot recently, and didn't really make a lot of progress with the pattern drafting (non whatsoever...), I've been researching patternmaking and stuff. Dreaming sort of... And in this lovely blog -> Sewing galaxy (german and russian) I came across this lady, and it's just great. I love looking at what she's doing (because of the kids I am mainly watching on mute...)

 Looks at this!

The Channel of Paukshte Irina https://www.youtube.com/channel/UC_VhfmP15VMjJhha5TRtTPQ

Try out her "no pattern 10 min summer dress" https://www.youtube.com/watch?v=8M0VwfF7r1A 

If you know russian, go to her russian channel (or learn from watching only...)
https://www.youtube.com/channel/UClFZNw1KA_yLcNHMWFgab1A


Tuesday, 27 December 2016

OP Haube nähen - Pattern for Scrub Cap

Found this on https://www.balloonhq.com/column/hans/nov00/glove1.jpg


Hei everyone,

today I am sharing my slightly experimentasl pattern for a scrub cap (in German that's "OP Haube") with you.
I apologize for the "far from perfect" pattern, but I wanted to get it on the blog ASAP because it's been lying around here for so long and I didn't manage to publish it.

Scrub Pattern OP Haube.pdf

Print it on A4 paper (2 pages) and cut it out.


You also have to add seam allowances on all sides when cutting the fabric. I strongly recommend making a mock up, to see, whether it fits your head (I think it fits up to 56cm head circumference).

The long straight side of the headband is the bottom. You might have to add 2cm at the slimmer end (that's the center back). And don't forget to cut the center front line on the fold. Otherwise you will have a seamline right down your forehead (unless you want that as a special feature...).
If you need a longer headband, just extend it at the back.  You can also make it higher, if you like, just extend it at the bottom.

The top piece is also cut with seams allowances. The back (that's the thin side) will have to be gathered  or pleated so it fits you headband. If you've extended the head band, don't forget to enlarge the top piece slightly. (just draw it a bit wider at that slim end)

To make the whole thing fit snuggly, I have zig-zagged a slightly streteched 5mm wide elastic ribbon (about 7-10cms in length) in the center back inside.
Or you can attach ties to the outside and make a cute little bow.

Fabric recommendation: Cotton, washable at 60 degrees. Prewash at that temperature, otherwise it will shrink and not fit afterwards. And that would be SUCH a shame!

I will add a picture of it as soon as I can manage to have one taken. :)

If you have any questions, just ask! :)


Even Wikipedia has an article on Scrub caps (amazing... )

https://en.wikipedia.org/wiki/Scrubs_%28clothing%29#Scrub_caps


Monday, 12 September 2016

Silk Sorbetto - Colette Patterns

About a year ago I had bought two small pieces of a vintage japanese silk, possibly remnants of a kimono. I had initially intended to make a small summer dress for little Miss No 1 from it, but when the fabric arrived I just couldn't see it as a child's dress... the silk seems to be handpainted/printed with leaves and the thought of chocolate ice cream on that made me cringe. So I let it mature.
Some months ago I stumbled over this free pattern Sorbetto by Colette Patterns. https://www.colettepatterns.com/catalog/sorbetto 

I made one big change - I inverted the front center pleat and only closed it up to the height of the darts to make the whole shirt nice and wide and airy for summer. 

The fabric was just enough to make the pattern (I couldn't cut the pieces on the fold though, but as the pattern is quite lively, it doesn't really show). I used french seams so the inside would look and feel nice and it was just enough fabric to make self-fabric bias tape for the neckline and the arm holes. 

I really like the outcome, although the pattern of the fabric is far more lively than what I usually wear. The silk is flowing and cool, although it is quite thick and not see-through at all. It was also very forgiving while sewing. :) 

I didn't seem to be able to put on a normal face while the picture was taken. Sorry for that. Concentrate on the shirt. 


As for the pattern: The sizing is very accurate and there is not much ease (just right) in it, so I recommend to make a mock-up from cheap fabric first to make minor changes. Apparently Colette Patterns drafts their sizes for a C-Cup, but I didn't have to make any changes that way. Possibly my wish for a very loose fit had something to do with that.
Instructions are clear, I can definitely recommend this pattern.

Monday, 4 July 2016

{Dorothy Moore} Lesson 2 Skirt Variations


Dorothy Moore presents a number of Instructions for drafting Skirt Variations: A-Line, Circle Skirt, Panel Skirts, a Wrap Around Skirt and yoked skirts.

I have drafted a slight A Line skirt with a yoke. (Instructions below)

My first version was up to the waist, made from stripey linen fabric with 4 panels cut on the bias (so you get a sort of chevron pattern in the front and at the sides)  and... it was awful. I didn't even finish it and didn't take a picture either. It was a bit much of everything. An abomination :) So I put the whole pattern and everything to the side, concentrated on other things and took it up again after several months had passed.

I don't usually like to wear my skirts right at the waist level (with pencil skirts it somehow works though...), so I used my pencil skirt as a guide for lowering the pattern down to the waist,  about 9 cms in total (just a bit more than 3 inch), that's quite low. I then added a yoke to the pattern following the instructions of Dorothy Moores's Lesson 2 so I could omit the waist darts. Et voilà!

Pattern for A Line Skirt with Yoke drafted to my measurements. Sorry, brown paper on wooden floor = not so good contrast. ;)

I've had 1 meter of this totall cute fabric in my stash, it's from Lewis & Irene "April Showers". Because it wasn't quite enough for a proper skirt, I added an underskirt. The underskirt is made of an old white cotton curtain (using the same pattern, just a bit longer) and I've had a bit of thin red zig-zag trim left which I added at the bottom of the underskirt. I didn't have enough fabric to cut the yoke in the same direction of the fabric, but I don't really mind.The invisible zipper is inserted on the left side. I've also added a tiny button and a bow. Can you find it? ;)


Due to rainy weather (I hope the choice of fabric didn't have anything to do with that...) I've not worn it yet.  

________________________
Total Cost 15,54 Euros
Umbrella Fabric : 15 Euros
Underskirt: Old Curtain 0 Euros
Trim and button from stash 0 Euros
invisible zipper 0,54 Cent

Here are the instructions  how to draft an A Line Skirt and A Yoked Skirt. You'll need to draft a Pencil Skirt first.

Dorothy Moore A Line Skirt

Dorothy Moore Yoke Skirt


Saturday, 4 June 2016

Mummy, I want a shirt like that, too!!!


Maybe you remember the post about the shirts I made for Little Miss No 2? Little Miss No 1 decided, she absolutely needed the same shirts like her little sister. Luckily, I still had some fabric leftover from both the seahorses  and the whale-fabric. It's a lovely knit, 95% Cotton, 5 % Elasthan, has a nice touch and is SO soft. I am nearly a bit jealous. :) I needed 0,40cm from the seahorses/whale knot for the "body", and the sleeves are from remnants I had in my stash.


So, I made 2 more shirts for Little Miss No1. I used the "Mama hoch 2" pattern for raglan shirts. (https://shop.mamahoch2.de/produkt/freebook-autumn-summer-rockers-kids/) - the sizing is very precise and the pattern is free!

The fabric is from this online shop (http://www.michas-stoffecke.de).


____________________________


Total cost:  ~5 Euros each shirt

pattern: free, from Mama Hoch 2
fabric: remnants of whale/seahorse knit, dark blue knit and yellow stars knit for sleeves, adds up to about 5 Euros each shirt. Bought here, from stash
notions: "hertzwerk" tag from Dortex, "Cottonera 15", 50 Cents per tag.


Saturday, 28 May 2016

Some Raglan Shirts for the little ones... (mamahoch2)

I found this page with lots of free (or "pay as you wish") patterns just recently and wanted to share it.

They have patterns for all sizes and ages and my first deed were 6 beanie hats for the children... unfortunately in the past month (before I managed to take a picture) ALL of them have disappeared... no idea where to... I thought I had seen a survivor just a couple of days ago but there is absolutely no trace of them now. So, no pictures for you, but there are plenty on  https://www.mamahoch2.de/2013/05/muetzenparade.html


Monday, 23 May 2016

A shirt with "American Neckline"...! (Schnabelina)

I have so much knit fabrics in my stash (don't ask...), I am really going crazy with making shirts for the girls.

This is one of my favourite FREE patterns at the moment (besides the raglan shirt from "mamahoch2"):

Schnabelina Regenbogenbody. It's originally a bodysuit, but obviously you can also just use it as a t-shirt pattern. Again, the sizing is really accurate, I appreciate that a lot.


There are plenty of sizes available 46 (small newborn) to 146 (teenager). And 3 different necklines. I personally love the "American neckline". In fact I would love a shirt like that myself...

Schnabelina is really creative, there are lots of tutorials and free patterns on her page!

all her patterns: http://schnabelina.blogspot.de/p/tutorials.html

http://schnabelina.blogspot.de/p/regenbogenbody-365.html

Sunday, 21 February 2016

{Dorothy Moore} Lesson 4 Basic Top

I didn't have enough brown paper to draft the trousers pattern (Lesson 3) and for the Lesson 2 "Skirt Variations" I still have to get a few notions (I have drafted an A-Line Yoke skirt already) so I am continueing unchronologically with Lesson 4 - a basic top.

The basic top pattern is used for all other patterns following in the book -> sheath dress, blouses, coats... so it is really the centre of all pattern/clothes-making and thus it is important to fit it well.


You first draft a basic top pattern


which you then adjust to the waist measurements and add darts


After making a muslin top from the first foundation top pattern you have to make what she calls "minor adjustments" to adjust this pattern to your shape. e.g. wide shoulder blades, gaping neckline, armhole gap, round upper back, low bust point, smaller cup room ...
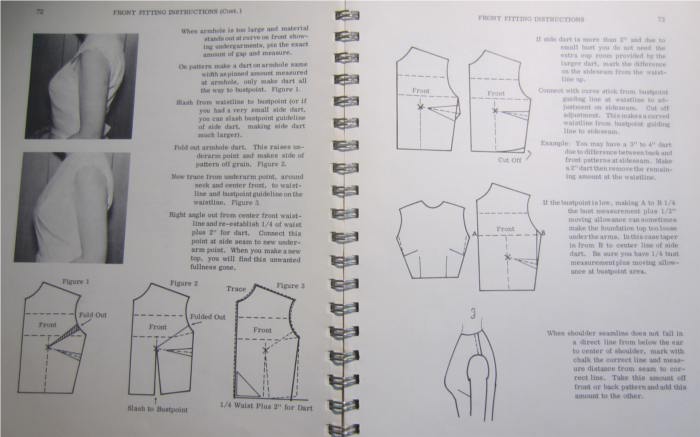
I needed to make adjustments for a gap at the front armhole  following these steps. I also noticed I had taken a slightly too wide "shoulder-to-shoulder" measurement, so noted the right measurement now and shortened the shoulder seam length by about 1 cm.


this what my pattern looks like (final version)


I forgot to take a picture of me wearing the mock-up, but this is what it looks like in its final version. :)


I really enjoyed the drawing for this pattern, it was really straight forward, the changes I had to make were minor and easy to do and I think I achieved an acceptable fit without too much effort.


After completing the Lesson 2 (Skirt Variations" A-Line Skirt with yoke) I am going to spend some time on a top with this pattern. It's going to be the green fan vest from Marilyn Monroes "Bauman sitting" (1954). To go with the dark blue pencil skirt from Lesson 1. ;)

Friday, 19 February 2016

{Dorothy Moore} Lesson 1 Straight Skirt

Dorothy Moore's Patternsdrafting and Dressmaking

Lesson 1 - Straight Skirt


In other words...  how to draft a classic Pencil Skirt.


Out of general doziness I drafted the first skirt with wrong measurements and then started to wonder, why it didn't fit ... ah well.. so I drafted it again.
I then tried out a version for "big ratio for waist and lower hips/thighs", which suggested darts slanted towards the hip bone. I didn't quite like the outcome (hence no picture) and just went with the normal darts that I had to extend 1 inch in the skirt front piece to achieve a smoother fit in the mock-up.

This is what the drafting scheme looks like:


I wanted the pencil skirt to be quite "wiggly" so I didn't just use the straight skirt pattern but took the side seam in a bit: from the hip point I used the curve stick and tapered in slightly and then out again to the original seam. It's only about a centimetre (1/2 inch) at the most, but it does make a difference, I think.

I then stumbled across about 1,6m of a nice looking fabric at a local sale, and albeit being Polyester I took it with me (along with some lining fabric). It's a medium weight fabric suitable for suits in a very very dark blue. I don't usually go for Polyester. I don't ususally go for dark blue, either. :) The lining fabric is a very dark aubergine coloured Polyester (again...), I used the less shiny side as my "right" side. :)

I basted the fabric and lining together and then treated it as one layer (more in the sense of an underlining) because I wanted to try it out. :) The good thing about an underlining is that the nice outer fabric gets a bit of support and you can also make an invisible hem. I also inserted an "invisible" zipper. Now I might have to be careful I don't turn invisible myself. :)

I've not taken many construction pictures, it's just a skirt, really.

I fact I have only taken 1 construction picture. You can see the underlining with the darts marked and then center basted through all layers and partly pinned together.


And voilà, the all-over result:

[I am looking a bit strange on these... I've got a nasty cold and somebody elses's voice which didn't really make me feel like dressing up a lot and putting on make-up. I did make an effort putting on nice shoes, though.]

The skirt also needs a bit more ironing.. I know...


as you can see, you can't really see the kick pleat, but I promise, it's there...


For an easy step by step introduction on how to sew a pencil skirt for beginners refer to this site, her instructions are quite good and she's got a good sense of humour, too. :)
http://blog.tuppencehapenny.co.uk/2012/11/beginner-sew-along-1-yard-pencil-skirt.html

Sunday, 6 September 2015

Danish Chemise Dress - Tutorial

Because I am so in love with this light, airy, elegant Chemise Dress and there is a free pattern available on the Museum homepage here  http://natmus.dk/historisk-viden/temaer/modens-historie/1790-1840/hvid-brudekjole/


I thought I'd write a small tutorial how to assemble the dress - because all of the info on the pattern is in Danish.


http://natmus.dk/historisk-viden/temaer/modens-historie/1790-1840/hvid-brudekjole/

So, after you've downloaded the pdf I suggest you do this to get something to work with:


1.Copy the museum's pdf into inkscape
2. Enlarge it so the boxes are 5cms wide (about 2 inches)
3. Save it as a .png
4. Copy that it into a Word Excel file (adjust the pages so there is hardly any margin, other wise you just have tons of overlap and waste paper...)
5. Print. I printed only the pages with the bodice pieces, and the top pleats of the skirt to safe paper, because the length of the skirt I have to determine anyway after finishing the bodice piece. And you can also measure that on the pdf.
6. Make a print-out of the Museum's pdf, too, so you know how to assemble your paper.
7. Don't forget to save the pdf to your computer, in case the museum's page goes down or so... :)


Now you've got a pattern for a lovely gown
- The underbust measurement is 67-70cms (about 26,5-28 inches)
- Chest is about 80-83 cms (about 31,5-32,5 inches)
- Length from underbust middle to floor: 115cm (45inch), back middle waist seam to floor about 136cms (53inch)
- bust point about 25cms
- back width about 30cms (12 inches)

Obviously, if these aren't your measurements, you've got to adjust the bodice. If you've never made that before, maybe this isn't the right project to start. You should know how to adjust stuff and have a bit of experience with sewing. I recommend sewing this by hand, it's easiest. also carefully mark and match.

Make a mock-up, at least of the bodice and the bodice-cover and the draping and sleeves, so you understand how the pleating works and where you might need to make further changes before cutting your nice favourite fabric. Especially the sleeves need attention, because they are set deeply into the back and have no folds or tucks to give enough space.

To be worn over appropriate underwear. (e.g. bodiced petticoat, short stays...)


Fabric required:
At least 6meters of thin cotton batist or voile or something comparable. About 50cms of thin canvas or thin twill or other suitable fabric for the bodice base.

Cut out the bodice cover and bodice base (don't forget the seam allowances).

bodice base assembly
center backs together. The original has a 6cms long piece of string or small band attached to the center back inside. Then proceed  with side back, sides and fronts. Attach shoulder strap only at the front.
The original has a tunnel with a string at the front, which I omitted.
Finish all visible (and if you want all invisible) hems. Sew the eyelets by hand. Use buttonhole stitch and poke throught the future-eyelet-hole with an awl after every stitch. Insert string. Try the bodice on before you proceed.

Bodice cover assembly
Center backs together and then sides. Attach shoulder straps at front only. Follow pleating guide to make it lie nicely on the bodice base and wing it a bit here. The front flaps overlap a little to cover the eyelet fastening. Don't forget to make the pleat "K". The double pleats are attached with only one seams on the bodice base as you can see on the picture.

Now the bodice base and cover should be assembled and you try them on and attach the shoulder straps together in the right place.

Finish remaining seams. 

Sleeves
Sew together sleeve and sleeve lining and treat as one. Set in sleeves by hand by easing them in, they go in quite wide into the back, but that's part of the fun. Finish sleeve hems.

Front draping
Again, make a mock-up first to understand the pleating. Then pleat the 2 sides, iron nicely and stitch together at the two lines "F" and just about "H".  Stitch Center Back (will be a slight V-shape) and mount on a piece of band, about 1,5cms wide, from "D" to "E". (I've used twill tape, Petersham should work nicely, too, something that gives it a bit of stability). Attach the back and sides to the Bodice where indicated on the pattern. Make sure to leave enough space at the bottom to attach to the Front Skirt. Finish all other hems.

Skirts
Cut the skirts, sew back and front together and pleat according to pleating guide, to match back and sides. Attach the front panels to the Front Draping only, not to the bodice and make the seam wide enough to create a tunnel for the drawstrings. Then attach the back panel on the bodice from point B to C. Finish all hems, the original has a 7mm ribbon at the side "pocket opening" and at the bottom.

Insert string in front and attach.

I hope this could help you, if you have any problems, just ask.

Again, here is the link to my gown. (And I know already what I sould have done differently...)
http://hertzwerk-freiburg.blogspot.de/2015/09/danish-chemise-dress-1790s.html

Thursday, 23 July 2015

Biohazard Sauber-Zauber-Windeletui

I am sewing lots of stuff at the same time at the moment, covering the time between the 1770s and well, now.... here's something practical, if you have children that still need nappies.
The instructions (German) are from this great blog http://schnabelina.blogspot.de/2009/11/sauber-zauber-windeletui.html

The Biohazard machineembroidery is from http://www.urbanthreads.com/products.aspx?ProductID=UT5101


Sunday, 5 October 2014

Oh help! Oh no! It's A Calash!


I am reading the Gruffalo a lot with our little daughter and when I came to writing this post about my latest project, I couldn't help thinking in those words.

Anyway. It was a rather spontaneous project which had the purpose of keeping my mind busy (for various reasons) and being inexpensive. So, I've been thinking about a calash for some time and had looked at some pictures, and now the time was ripe.
I've still had plenty of reed and some silks left over.
Calash (or Calèche) is a horse carriage, really. (read more here at Wikipeda e.g. )

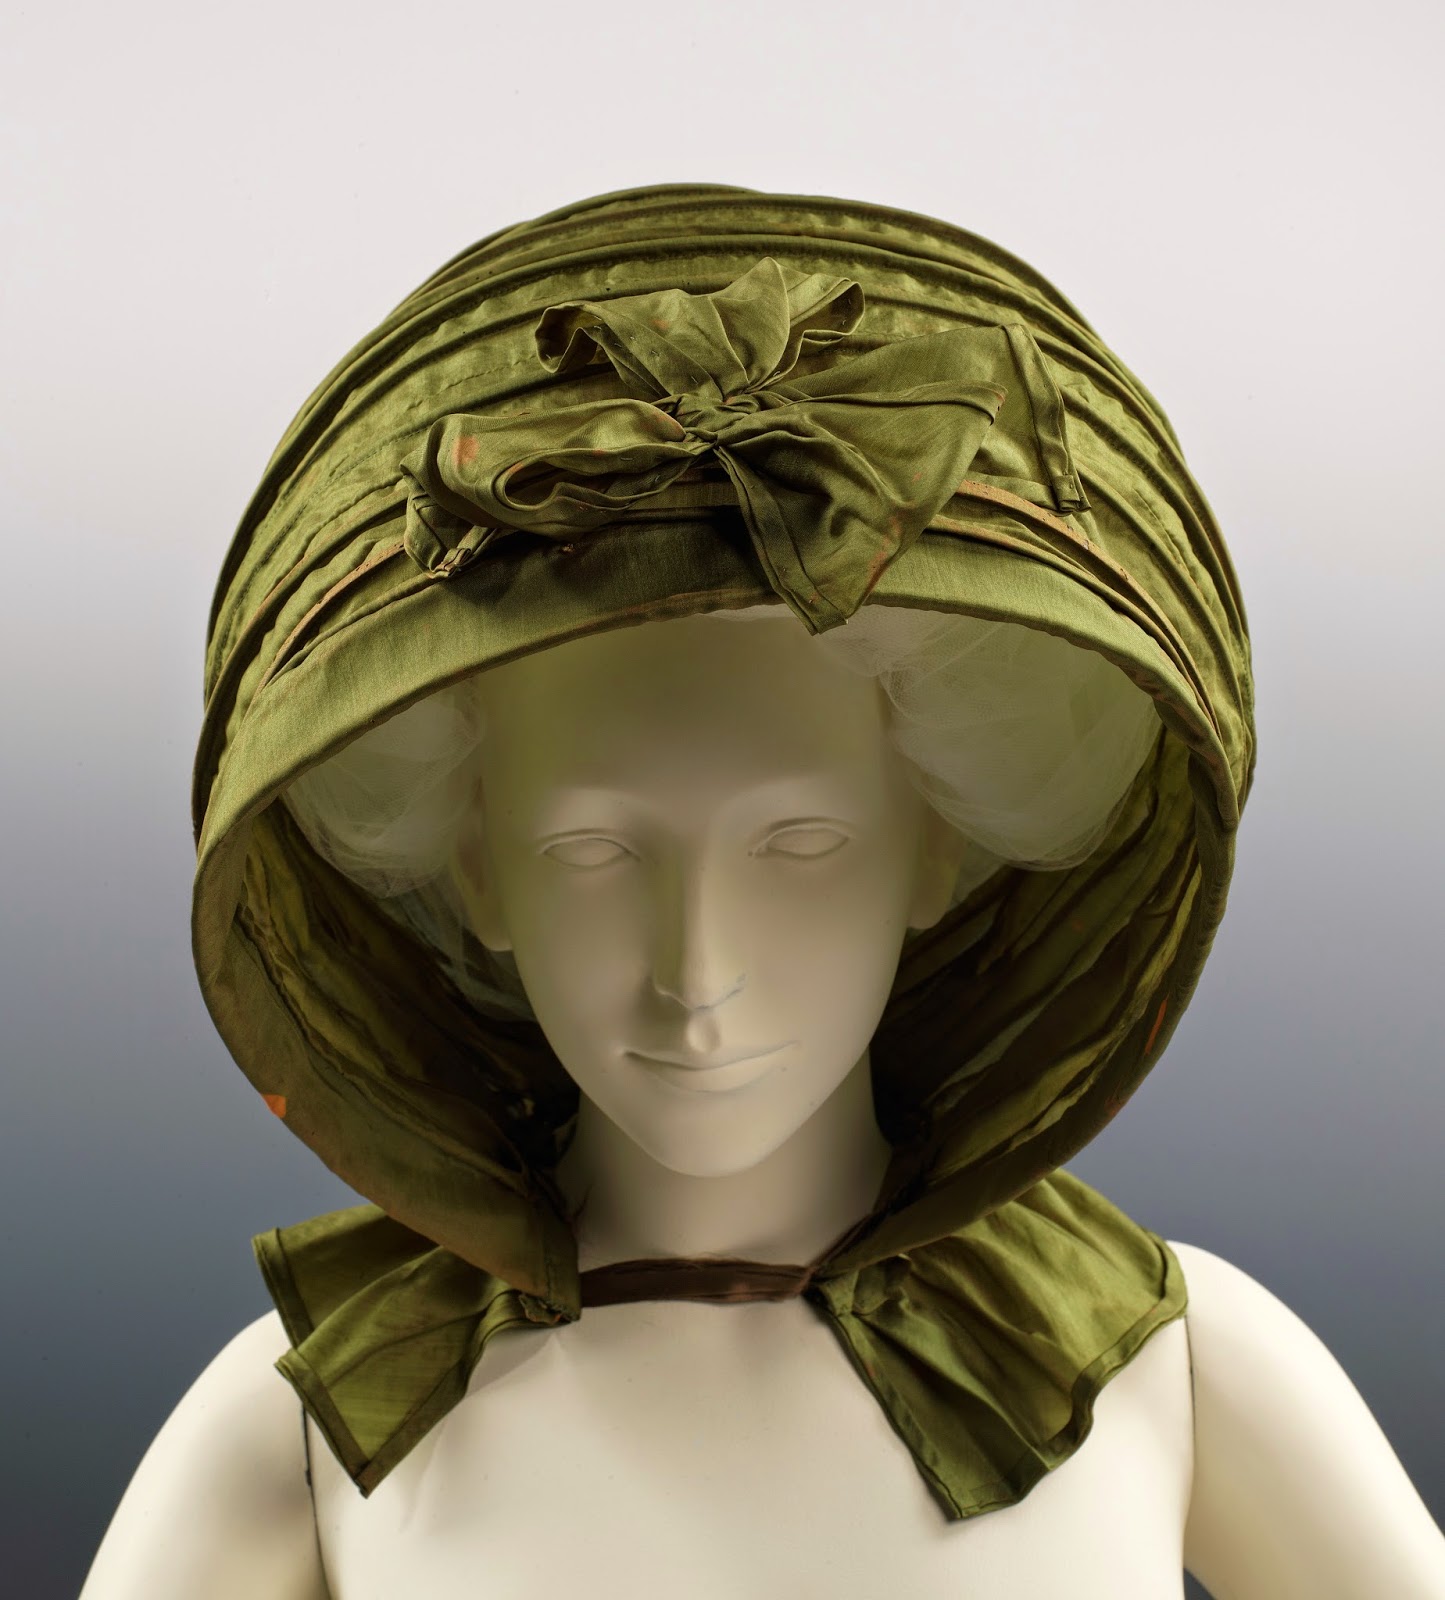
First a quick analyses of the calashes I used as examples. They can be found on the metmuseum.org homepage. Also refer to my pinterest board for more examples or this homepage, that has plenty of links to museums


http://www.metmuseum.org/collection/the-collection-online/search/116612?=&imgNo=0&tabName=related-objects


http://www.metmuseum.org/collection/the-collection-online/search/157763?img=1&imgNo=0&tabName=related-objects


If you follow the links you will find a few more photographs. The MetMuseum has some other Calashes from the 18th and early 19th century and also Pinterest is a good source for finding more pictures.

From those (and a few more, but let's not get overly into this) I have deducted the following things for my project:

1. The calash itself is based on a rectangle. The size of the rectangle is determined by the height and depth you want ot achieve. I noticed that in the above examples the boning seems to be "riding" on top of the calash. I assume, that first the lining is mounted to the outside fabric and then the tunnels are sewn through all layers. The reed probably has a distance of 2 inches. And in between there seems to be either a gathering stitch or an actual seem to allow that accordeon-like folding.

2. The back is either just the rest of the rectangle gathered and cut to fit into that sort of horse-shape OR it is a neatly cut flat extra piece of fabric and lining. Most calashes seem to have a ribbon in the back.

3. A ruffle (at least, could also extend to a "nearly-cape" length) was attached to the bottom of the calash and a ribbon in front to secure it and keep it in shape. Also seems to be a simple rectangle mostly.

4. Some calashes have (like the green one above) extra decoration (I love that extra bow on the green one!).

5. Although you don't see them on the pictures, I would think they had a small ribbon somewhere to pull them up agains the wind and over the head.

6. Both calashes have a sort of brim in the front, the green one has a rather straight one that might be padded with an extra layer of stiffer fabric, the violet one has some sort of double ruffle. Anyway, neither of them ends with a bone but with something decorative.

Personally I like the shape of the green one best, not very bulky and ruffly. So that's the shape I was trying to achieve.

13 boning chanels, 2 thereof in the back so slightly shorter. aprox. 2 inches apart?
in between fold to the inside, w/o boning.
2 bows.
supposedly flat back.
simple straight brim in front, possibly stiffened.
simple self fabric ties.

I've had particular fun with the reed I've used. It came in a round bundle and gave the whole thing the shape of an orange. But I wanted horse-shoe. My mock-up wasn't promising. So after doing some research into reed (which led me to most informative sited about basket making...) I've learned a lot of new stuff. Did it help the calash? Who knows.

So here we are, this is my version of a calash. Sorry, no big hair day... :) 


Also not a big smiley face day. Could be worse, though. 

my favourite view.


And for everyone who's made it this far: Here's an experimental pattern. It's not complete and will still take a bit of fiddling I'm afraid, but then I'm not a professional pattern person and it's free. ;) The pattern is in English. Sort of.

Calash Pattern.pdf

Enjoy your day!
(PS: No, it's not entirely handsewn, I've used the machine a fair bit, because I wasn't convinced it would turn out okay... shame on me... I would recommend sewing the boning channels on the outside by hand, though... if you want to do it half-properly... but well... next time...)

Friday, 14 March 2014

the OMG LBBD (=Oh My God little Black Bias Dress)

I've been stumbling around the internet again, in search of... well I can't really remember, but sucessfully stumbled over the most gorgeous little black bias dress pattern - AND IT's free!! The whole hompage is well worth a visit, so before you click on the links below, make sure you've got enought time on your hand! : )

picture from veravenus.com

picture from veravenus.com


The free OMG LBBD pattern (and article)

More free patterns by the same lady

The VeraVenus Hompage from the start -Link


That lady is doing some very cool stuff!

(I think I've got some black stretch satin that was supposed to be a skirt and never spontaneously develloped into one, sitting around here ... somewhere...I wonder if it is enough to make into the OMG LBBD!)