Showing posts with label retro. Show all posts

Monday, 4 July 2016

{Dorothy Moore} Lesson 2 Skirt Variations


Dorothy Moore presents a number of Instructions for drafting Skirt Variations: A-Line, Circle Skirt, Panel Skirts, a Wrap Around Skirt and yoked skirts.

I have drafted a slight A Line skirt with a yoke. (Instructions below)

My first version was up to the waist, made from stripey linen fabric with 4 panels cut on the bias (so you get a sort of chevron pattern in the front and at the sides)  and... it was awful. I didn't even finish it and didn't take a picture either. It was a bit much of everything. An abomination :) So I put the whole pattern and everything to the side, concentrated on other things and took it up again after several months had passed.

I don't usually like to wear my skirts right at the waist level (with pencil skirts it somehow works though...), so I used my pencil skirt as a guide for lowering the pattern down to the waist,  about 9 cms in total (just a bit more than 3 inch), that's quite low. I then added a yoke to the pattern following the instructions of Dorothy Moores's Lesson 2 so I could omit the waist darts. Et voilà!

Pattern for A Line Skirt with Yoke drafted to my measurements. Sorry, brown paper on wooden floor = not so good contrast. ;)

I've had 1 meter of this totall cute fabric in my stash, it's from Lewis & Irene "April Showers". Because it wasn't quite enough for a proper skirt, I added an underskirt. The underskirt is made of an old white cotton curtain (using the same pattern, just a bit longer) and I've had a bit of thin red zig-zag trim left which I added at the bottom of the underskirt. I didn't have enough fabric to cut the yoke in the same direction of the fabric, but I don't really mind.The invisible zipper is inserted on the left side. I've also added a tiny button and a bow. Can you find it? ;)


Due to rainy weather (I hope the choice of fabric didn't have anything to do with that...) I've not worn it yet.  

________________________
Total Cost 15,54 Euros
Umbrella Fabric : 15 Euros
Underskirt: Old Curtain 0 Euros
Trim and button from stash 0 Euros
invisible zipper 0,54 Cent

Here are the instructions  how to draft an A Line Skirt and A Yoked Skirt. You'll need to draft a Pencil Skirt first.

Dorothy Moore A Line Skirt

Dorothy Moore Yoke Skirt


Sunday, 21 February 2016

{Dorothy Moore} Lesson 4 Basic Top

I didn't have enough brown paper to draft the trousers pattern (Lesson 3) and for the Lesson 2 "Skirt Variations" I still have to get a few notions (I have drafted an A-Line Yoke skirt already) so I am continueing unchronologically with Lesson 4 - a basic top.

The basic top pattern is used for all other patterns following in the book -> sheath dress, blouses, coats... so it is really the centre of all pattern/clothes-making and thus it is important to fit it well.


You first draft a basic top pattern


which you then adjust to the waist measurements and add darts


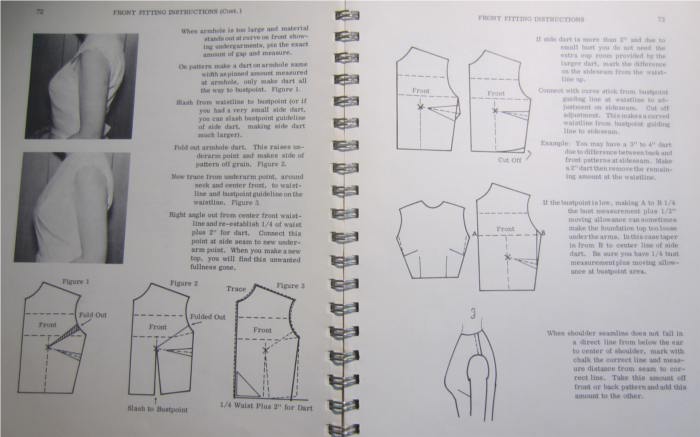
After making a muslin top from the first foundation top pattern you have to make what she calls "minor adjustments" to adjust this pattern to your shape. e.g. wide shoulder blades, gaping neckline, armhole gap, round upper back, low bust point, smaller cup room ...
I needed to make adjustments for a gap at the front armhole  following these steps. I also noticed I had taken a slightly too wide "shoulder-to-shoulder" measurement, so noted the right measurement now and shortened the shoulder seam length by about 1 cm.


this what my pattern looks like (final version)


I forgot to take a picture of me wearing the mock-up, but this is what it looks like in its final version. :)


I really enjoyed the drawing for this pattern, it was really straight forward, the changes I had to make were minor and easy to do and I think I achieved an acceptable fit without too much effort.


After completing the Lesson 2 (Skirt Variations" A-Line Skirt with yoke) I am going to spend some time on a top with this pattern. It's going to be the green fan vest from Marilyn Monroes "Bauman sitting" (1954). To go with the dark blue pencil skirt from Lesson 1. ;)

Friday, 19 February 2016

{Dorothy Moore} Lesson 1 Straight Skirt

Dorothy Moore's Patternsdrafting and Dressmaking

Lesson 1 - Straight Skirt


In other words...  how to draft a classic Pencil Skirt.


Out of general doziness I drafted the first skirt with wrong measurements and then started to wonder, why it didn't fit ... ah well.. so I drafted it again.
I then tried out a version for "big ratio for waist and lower hips/thighs", which suggested darts slanted towards the hip bone. I didn't quite like the outcome (hence no picture) and just went with the normal darts that I had to extend 1 inch in the skirt front piece to achieve a smoother fit in the mock-up.

This is what the drafting scheme looks like:


I wanted the pencil skirt to be quite "wiggly" so I didn't just use the straight skirt pattern but took the side seam in a bit: from the hip point I used the curve stick and tapered in slightly and then out again to the original seam. It's only about a centimetre (1/2 inch) at the most, but it does make a difference, I think.

I then stumbled across about 1,6m of a nice looking fabric at a local sale, and albeit being Polyester I took it with me (along with some lining fabric). It's a medium weight fabric suitable for suits in a very very dark blue. I don't usually go for Polyester. I don't ususally go for dark blue, either. :) The lining fabric is a very dark aubergine coloured Polyester (again...), I used the less shiny side as my "right" side. :)

I basted the fabric and lining together and then treated it as one layer (more in the sense of an underlining) because I wanted to try it out. :) The good thing about an underlining is that the nice outer fabric gets a bit of support and you can also make an invisible hem. I also inserted an "invisible" zipper. Now I might have to be careful I don't turn invisible myself. :)

I've not taken many construction pictures, it's just a skirt, really.

I fact I have only taken 1 construction picture. You can see the underlining with the darts marked and then center basted through all layers and partly pinned together.


And voilà, the all-over result:

[I am looking a bit strange on these... I've got a nasty cold and somebody elses's voice which didn't really make me feel like dressing up a lot and putting on make-up. I did make an effort putting on nice shoes, though.]

The skirt also needs a bit more ironing.. I know...


as you can see, you can't really see the kick pleat, but I promise, it's there...


For an easy step by step introduction on how to sew a pencil skirt for beginners refer to this site, her instructions are quite good and she's got a good sense of humour, too. :)
http://blog.tuppencehapenny.co.uk/2012/11/beginner-sew-along-1-yard-pencil-skirt.html

Wednesday, 2 December 2015

Sailor Pants 1940's inspired

"look fastidious!" he said... ;)

Part of my plans to make more clothes that are actually more wearable in everyday life came true with these trousers. It is the first proper pair of modern trousers I've ever made (i.e. that make me happy and seem to fit...) and also the first time that I used a pattern from this company: www.lekala.co . They are based in Moscow and they have translated most of their patterns (they say) into some sort of English (more on that later).

What is special about their patterns is
1. they are graded to the size you want (i.e you buy one individualized size, not a multizise package)
2. they are cheap.
Of course that was tempting so I thought I'd give it a try with a trouser experiment.
This is the pattern I ordered
http://www.lekala.co/catalog/women/pants/5742
The HP is in English, the whole ordering/payment/receiving the pattern (via Email) process is straightforward and quick.

I was very sceptical, I have to admit.
I am smaller than average and curvy (big waist-hip ratio) and I was really curious if the measurement that they asked for could provide me with a pattern for a garment, that fits.
I was more than surprised to find, that apart from tiny adjustments to the hip width (but that might have been partly my mistake, I was measuring myself a bit too pessimistically, it seems...), they fit just as I had wished for. I made exactly one mockup. And took the hip side seams in a bit. That was it.
I also made small changes to the pattern -> the original pattern has a sort of one-sided front flap, mine is the same on both sides, with fully functional self-fabric covered  buttons on both sides - not necessairily needed, but I like symmetry. I also lined the front flap wiht a separate piece, not with the suggested foldover-piece - again, not really necessary, I just liked it better.

To be truly 1940s the waistline is a bit too low, if you compare pictures from the time, you'd find the waistband would have to be at least at my natural waist which is considerably higher. Considering that I usually wear lower cut jeans, they are quite high though. :) I am thinking about making a "proper" (not sailor) style pair of slacks with a proper high 1940s waist at some point, though...
I made these from medium-weight teal coloured wool gabardine. I had about 2,5 meters of that maturing on my fabric stash. I can't resist teal coloured 100% wool gabardine... 

One reason why I STRONGLY recommend making a mock up, are the instructions (and as a side effect you can check the fit, which is always good). Despite finding lots of english words in the instructions, I have only little understanding of what they wanted me to do. The pattern pieces were marked in both English and Russian. I just assembled it my own way and knowing what was supposed to be the result (a pair of trousers...) helped a lot. To assemble the bound pocket (only a faux pocket in my version) I used a German sewing book (and of course the marks on the pattern...). Having made similar trousers (the Charles trousers) for my daughter before, helped a lot, too.

My resumée:
I like their patterns, they are well adjusted to the individual size (as far as I can judge on that now), you can find something for absolutely ANY purpose and they come at a great price (3 Euros per pattern). If you have sewing experience or are not afraid of a bit of experimenting - go for it!

I hate back views, but there you go...


Have a great day!

Friday, 8 May 2015

Marilyn's Dresses - "Misfits" headpiece

I've had a little bit of time to do things "DIY" (when not looking after the baby) and the first thing is an early 1960s headpiece, inspired by Marilyn Monroes headpiece from the film "The Misfits" (1961) (pictures further down).

Version 1

How come?


I've loved this picture ever since I saw it for the first time (which is a loooong time ago...). But only now I've come to the point where I started thinking about making the outfit myself. This year, starting with the headpiece.The dress and jacket are to come later in 2016.


As always, it is not as easy as it seems. My first thought was - that's just a bit of Chenille wire with a bit of bobble veiling. And then you start looking closer. (lots of pictures following) - and then I ended up watching the film. :) "The Misfits" on Youtube. :) https://www.youtube.com/watch?v=1lQ7xQfNMmc


1. the veiling: it's fine black veiling with different size bobbles - small at the top and slightly bigger at the bottom. That's a real problem. Modern veiling usually has bigger nets (this one seems quite delicate) and bigger (if not to say huge) bobbles/dots. And how on earth is it attached???

2. I was torn between thinking it was a melusine fascinator and chenille wire attached and thinking it was really just chenille wire. it looks SO NEAT!

Conclusion: 
From the pictures alone my question (hat or chenille wire) couldn't be answered, but watching the film (and the headpiece already appears in the first 15mins) did help (and it happens to be a good albeit slightly strange film) :) It is indeed a headpiece made from black (chenille?) wire, attached to the aforementioned veiling. In the back it has two little bows - she's wearing it over a french twist/bun hairdo. Beautifully simple and elegant!


My versions:

Nice black chenille wire is not a problem, I found it right away. But the veiling was a problem... you don't get netting as fine as the one on the picture and you also don't get fine netting with chenille dots like that...


I made a prototype first because I wasn't quite sure how that veiling was actually attached. I am still not sure, but I like it this way best. :) 


the prototype

After looing for modern veiling with suitable dots (not available) and vintage veiling with suitable dots (didn't find anything in black and with dots in exactly the right places and it's also ridiculously expensive) I decided to make my own chenille bobble veiling.

Version 1
I continued using the prototype and experimented with different size chenille wire. Yes, the ordinary one from the arts and crafts shop. It might not be as great as millinery chenille wire, BUT it is available and looks okay, too, I think. When I finished I noticed I had attached the bobbles the wrong way round... the fat ones need to be at the bottom... I do like this version a lot though, nearly better than Version 2.

bobbles wrong way round BUT at least I look friendly, don't I?


Version 2
I made a new frame, slightly bigger tulle bows at the back and fat bobbles at the top and the rows with the dots slightly different from both prototype and original ;) 


sorry, not as neatly attached as I would like it but I didn't have the time

Sorry there is no back view, I will try and add one later, the back looks pretty much like the original. black wire and two small bows. :)

The original:


all pictures from Pinterest. and here somewhere https://www.pinterest.com/hertzwerk/marilyn ) These pictures were taken 1960 in Reno and on the Set of "The Misfits". 

Film:
better back view. It's really just a wire.


Monday, 16 February 2015

getting into knitting... and crocheting.. but WHY?...

So, my 2015 project "learning how to knit (and crochet) properly" has begun.

Some of you might ask "why on earth is she doing this? Why can't she just stick to sewing?"

And there are even several answers to this question!

1. Because sewing and made to measure garments just don't make sense when you are 9 months pregnant or still have the "post-baby-belly" (for those of you not so familiar with physical changes in pregnancy remember the old saying "9 month the belly comes, 9 months the belly goes" - which adds up to 18 months of weird sizes - ideally -) - and i don't want/need that much of maternity clothes...
2. Because the children don't need that many clothes...
3. Because I couldn't resist learning something new...
4. Just LOOK at the woodland knits book, HOW can you not?!? (and theres another one just begging me to have  a look into it: botanical knits by Alana Dakos. And then you could indulge in estonian lace knits and faire island knits and norwegian patterns and and and...
5. Because for my vintage-inspired wardrobe I could do with a few of those knitted or crocheted tops/blouses ... and you can still get original instructions - what could be better? I've even seen a pattern for a 1930s crochet swim suit... Irresistable!! :) (yes, that's the real reason, really, but I am not yet couragous enough to start on those...)
 
My first project after the warming up phase (woolly hats) are mitts. They are knitted in a basic lace-pattern (Ajourmuster) in blue merino wool.  Never done mitts or Ajour before...

I am using the book "stricken basisc" by Stephanie van der Linden (a German publication, knitting proper stuff in English will be the next step). It's a basic techniques book for beginners with a few nice projects and lots of explanations. Her instructions are clear and easy to follow and the pictures that go with the intructions are really helpful. Very recommendable. They also have instructions for left-handed knitting.

My next projects are from the book "woodland knits" by Stephanie Dosen and are a lot more challenging. Unfortunately, there are also a lot of techniques involved, that the basic knitting book doesn't include, but I am going to consult youtube and knittinghelp.com and generally the internet for that. If I don't challenge myself, I will only knit garter stitch, so... I am going to learn how to knit cables, how to wrap and turn and how to knit 4 below... I might end up knitting upside down altogether. :)


Also, I think it will take me so long to master these techniques, that until then the baby bump should be ... well... considerably reduced I hope. I don't dare to hope it will go back to "before".

So, we can all look forward to weird knitted and crocheted accessoires and in the end, hopefully, vintage pattern inspired blouses/tops or even a swimsuit. ;) 

Now, if that's not a bunch of really good reasons, I don't know what to say!


Friday, 31 October 2014

Charles Pants - autumn sun!!

Just in time for a bit of late summer (20 degrees!) I've finished the Charles pants in wool with herringbone pattern. :)

The Pattern is the Charles Pants Pattern by Compagnie-M (http://compagnie-m.com/)

Again, the pattern went well together, the size is correct and I really enjoyed working with it. I can really recommend it. What I LOVE about children's clothes is, how little fabric you need... just 70cms for these pants and a bit of scrap yellow cotton. Brilliant. :) (and again I am really jealous, I'd LOVE to have pants like these... maybe one day I manage to make them for myself...although given enough time I might shrink into them.... maybe...)

Here are some suboptimal pictures, but I think you get the gist. :)


Have a lovely Day and WOHOO; it's HALLOWEEN today!!! :)

- Hertzwerk

Sunday, 26 October 2014

The Louisa Dress !

As Halloween is approaching and I had always searched for an excuse to get the Louisa Dress Pattern by Compagnie-M (http://compagnie-m.com/) I finally got it and made this dress for Lucy. :) It is also the first time I made experiences with piping. I DO love the outcome. Maybe I should make a similar dress for myself? ;) Sorry the pictures are slightly overexposed. :)

Add caption


The dress is made from black cotton twill that was hanging around here, doing nothing. ;)
The dress is fully lined with thin curry coloured cotton/PE mix. I've followed the assembly intruction about 70%, but I altered the back (instructions were for a zipper, but i REALLY didn't feel like inserting an invisible zipper...) and set the lining a little different than in the instuctions. Not a big deal really. The pattern went together nicely. Compagnie M has a few really nice instant-download patterns on their homepage, I really like the designs, they are simple and practical and with that special "je ne sais quoi", a twist. The prices are about 7 Euros, but she gives discount if you order several patterns in one go.


Have a lovely halloween!

Hertzwerk.


Picture Update:

The Child with the dress. :) she's a real UFO - unbelievablely fast object!


Monday, 14 May 2012

Moustache body suit

moustache baby grow... and the adorable
mushroom and mr carrot rattle i found on etsy.com...
Meine Näh- und Verzierwut macht wirklich vor nichts halt. :) Ich habe diese komische Vorliebe für Moustaches, natürlich nicht an Männern (zu kratzig! und irgendwie auch nicht richtig cool...), sonst vor allem auf Kleidungsstücken. Deswegen habe ich diesen einfachen weissen Babybody mit einem Bügelbild (einfach draufgedruckt und übergebügelt, mal schaun wie viele Wäschen er durchhält) verziert. Und der stolze Papa hat die Erwachsenenversion bekommen. :) Alternativ könnte man auch aus schwarzem Nickiplüsch eine Applikation fertigen... aber Bügeln ging einfach schneller. ;)

My sewing and decorating frenzy does not halt in front of Baby Lucy and grown up (Dads). I have had these transfer papers in my desk for ages (don't ask... I don't really know why...) and I couldn't resist to iron a fine moustache onto a body suit of Lucy and one of Papa Paul's T-shirts. I have this thing about moustaches... I really don't know why... I don't even like them in real life (i.e. on real male upper lips...). But I find them irresistable on shirts. Alternatively I was thinking about doing an application with velour/plush but ironing was just so much quicker. I am curious how long it will last...

I have used this: Transfer Inkjet


Daddy's Moustache shirt...


Friday, 11 May 2012

patchwork baby blanket


Meine allererste Tat in Sachen Patchwork. :) Ich wollte auch gar nichts kompliziertes machen (dafür fehlt mir einfach die Geduld) - und ich bin mir auch nicht so sicher, ob ich mehr Patchworken werde... aber hier das Resultat. :) Ja, zugegeben, neben dem Examen, das mich von der Näherei abgehalten hat war ich auch ein bisschen schwanger und die kleine Lucy ist am 03 Mai 2012 auf die Welt gekommen. Diese Decke ist extra und nur für sie entstanden. :) Ich hab die Anleitung aus der Ottobe design Frühling 2012 entnommen. :) Und jaaa, ich weiss, die Einfassungen am Rand sind nicht schön... aber einmalig. ;) (mich hat die Geduld verlassen...) - der Schnitt und die Anleitung waren aber wirklich gut. Sehr empfehlenswert. Die Buchstaben sind von der Ottobre Hompage. Die Stoffe von der Vorderseite sind von Tilda. Die Rückseite ist türkisfarbenes Vichykarto, innendrin ist ein 4cm dickes (störrisches...) Polyestervlies.

My very first quilting experience... very simple and nothing uberspecial, but I don't have much patience for quilting so... I am quite happy with it... not sure whether I am going to do more, though. :) But this is the result. :) Yes, apart from my exams that kept me from sewing a lot more, I have been a little bit pregnant and little Lucy was born on 03 May 2012. So this blanket is of course made just for her. :) I have followed the instructions from Ottobre design spring 2012. :) and yes, I admit it: The binding is less than neatly done, but I just went out of patience... let's say it's   ... unique?! ... ! ;) Pattern and instructions of Ottobre were really good, it's highly recommendable.the letters are from the Ottobre Homage. The front fabrics are all Tilda. The back is turquoise vichy squares and the inlet is a 4cm thick fleece.


Daisy


Ausserdem hab ich dann noch nach einer Anleitung  die ich auf der Ottobre Hompage gefunden habe, eine Esel-Schaf genäht: "Daisy". Stoffreste sind was wunderbares. :)http://www.ottobredesign.com/
(bei "schnittmuster" und zurückblättern) Das ging auch erstaunlich schnell. ;)

Also I've used some of the scrap fabric to make a donkey sheep called "Daisy". I have used a free pattern from the ottobre hompage for that. http://www.ottobredesign.com/
(see "print for free" and go a few pages back...) it went together surprisingly quick and easy! :)


Tuesday, 10 April 2012

Amy Butler free patterns

I have found this link a while ago and as I like the colours and patterns of Amy Butler, I thought I'd share it with you. :) http://www.amybutlerdesign.com/ 
Hold your mouse over "products" then go to "free patterns" -> sewing patterns. Or use this link directly to the free patterns section: http://www.amybutlerdesign.com/products/free_patterns.php

It is mostly quilts but also other little things...

this bag is great.. unfortunately it is not amongst the free patterns...


Sunday, 8 April 2012

Happy Easter!!! Frohe Ostern!

Ich wünsche Euch allen schöne Osterfeiertage mit gutem Wetter und noch besserer Laune und viel Spaß!!!

Have a Happy Easter alltogether! Lots of sunshine and a lovely weekend to you!

Tuesday, 14 February 2012

Friday, 6 January 2012

heilige 3 Könige!!!

Es ist wieder Königstag UND es ist (auch wieder) mein Geburtstag!!! Ich wünsche Euch allen einen wunderwunderschönen Tag!!!