Showing posts with label 1770s. Show all posts

Tuesday, 24 November 2015

A 1770s Dormeuse or the "Mrs Miggins Cap"

This enormous 1770s cap was lovingly nicknamed "the Mrs Miggins cap" by my husband. The name sort of stuck. :)


These pictures were my inspiration, but I changed and combined, as usual. I am just no good at exact reproductions. :)

https://www.pinterest.com/pin/325807354270921179/
https://www.pinterest.com/pin/325807354270921177/
https://www.pinterest.com/pin/325807354270921172/
https://www.pinterest.com/pin/325807354270921170/

more pictures of 18th century caps: https://www.pinterest.com/hertzwerk/18th-c-caps/

I used white or off white (I can't really tell...) silk organza (2,8), which is very thin and nice. Some of the ribbons/frills I treated with corn starch to stop them from fraying, because I didn't want to hem them to keep the whole cap "airy" despite its many decorations.  It doesn't totally stop fraying, but it helps a little to keep the fibres together.

I didn't use a pattern, but if you want to use a commercial pattern, the base of the cap is close to JP Ryans Dormeuse/Baigneuse. All in all I used nearly 2 metres of fabric.

(yes, the wig is hilarious, I've written a tutorial about it...) :)  http://hertzwerk-freiburg.blogspot.de/2015/10/1770s-big-hair-wig-tutorial.html

Monday, 23 November 2015

Schloss Freudental 1775

On one of the fairest and warmest weekends of November we've had a wonderful weekend in 1775 at the stunning "Schloss Freudental" located at the Bodensee (Lake Constance).


A few pictures to illustrate the weekend.

A place to be....

(C) schloss-freudental.de

 
(C) schloss-freudental.de


(C) SoSch
Following pictures (C) Stefan Winter if not otherwise stated.  

getting up leisurely

hunting for...?

Forest walks


(C) SaMa
  I think we qualify for the next BBC costume drama! (C)SaMa

Afternoon chats  and delicious caps
meringue

chantilly cream


Louis Carrogis dit Carmontelle


Evening pleasures


the players

Monday, 16 November 2015

The "Landgravine" Anglaise - 1770s


(C) Stefan Winter
(C) Stefan Winter


Sometimes you just fall in love.


(C)Stefan Winter

(C) Stefan Winter

And so I did with this dress and this portrait...
I just had to make it.

This is the long story of the evolution of the sage green dress ("The Landgravine Dress").

that colour!!! wow!
(Portrait by J. H. Tischbein d.Ä. (?), ca 1781)

Portrait Juliane von Hessen Philippsthal
more on this Lady here:
https://de.wikipedia.org/wiki/Juliane_von_Hessen-Philippsthal
https://en.wikipedia.org/wiki/Landgravine_Juliane_of_Hesse-Philippsthal


From National Trust. I LOVE the buttons! Dated 1770
Dress National Trust Snowshill Collection/Janet Arnold PoF 1 p. 41
(also in Nancy Bradfield's "Costume in Detail" pp 59)


I have to admit, this green fabric (silk taffeta) matured on my fabric stash for quite a while, until I finally started with it. I really really love the colour. First I thought I might make an interpretation of the portrait dress, but I wasn't really sure about all that gauze ruching and the long sleeves and the front of the dress... so... that leaves nothing really... but the colour is still great!

Then I remembered that dress from Patterns of Fashion (J. Arnold) (Vol 1, p 41) (=PoF1) (and it also happens to be on the front cover...) and decided I would go that direction and, if the amount of fabric allows it, would even make a gown with trimming. My trimmings are not exactly as they are in the original. I didn't use a pinked scalloped  edge (I used zig-zag scissors, which is also ok on Pinking on Marquise.de) and I didn't make tiny box pleats but just ruched the strips of taffetta, because I think the zigzagged edge looked nicer ruched than pleated (I do think a box pleated scalloped edge is the bees-knees, though...!!)

I've always wanted to use the patterns from PoF just to try it and my first obstacle was how to enlarge those patterns.I first copied them on 1-inch-paper by hand. And because I like to try pleating in paper first before I actually do it with the fabric, I had a go at that - and totally failed the first times. So I thought I might have copied something wrong and it took me half of a day to find out how to digitalize and print those patterns.

In case you like to try it, this is how I did it:
I scanned the pattern page or part of the page from the PoF book and saved it as a jpeg. Then I used "inkscape" (freeware) to enlarge it to 800%. Then I saved that as a png. And then inserted it into a Word Excel file. And then I printed it on A4 pages with Excel. Worked a treat. If you enlarge the PoF you'll notice you don't exactly get a print-out that has 1 square = 1 inch, because it's not 100% accurate in the book either. But as is it rather unlikely that the patterns will be exactly our size, it doesn't really matter if you have 1 inch more or less. If you are perfectionist (or German, or both), you can play with the enlarging, maybe you need 810% or so. But you'll still have to do lots of fitting anyway.

So, with this newly and successfully printed out pattern I made lots and lots of folding experiments. After the first few tries I was convinced that Janet Arnold must have made a mistake in her diagramms (how very snobbishly arrogant of me...). I had another go at it again and tried lots of different things and all of a sudden it seemed to work. I think that seamstress did an extremly clever thing when she was doing those pleats.(Unless J.A. actually did make a mistake and this is just how it turns out...)

The main problem was, that the folding instructions in PoF were rudimentary, apart from the general direction ("it's a box pleat") it doesn't tell you much. And the drawing isn't really a  big help, either.

The same dress can also be seen in "Costume in Detail" by Nancy Bradfield, p.59. While trying and failing with those pleats I looked at PoF and CiD again and again for guidance, only to find that the description and drawings of the dress somewhat differ in the two books. I'd love to have a look at the original gown, really.
I've come up with a solution that works and looks nice, as I've not had the chance to look at the original dress I can't tell you whether it is right, but I am positive that it is entirely possible. :)


Pleating guide (xps file, easy to open in internet explorer)

https://goo.gl/IEF0lR


After I had sussed out the pleating guide and I had enlarged the pattern anyway, I made a quick mock-up of the original pattern bodice. Of course it wasn't my size, the lady was a bit larger than me, especially in the shoulder area. And she was a good deal taller, too. Also I found that I didn't really like the look of the side seam (front to side back panel) so I got the pattern for my zone-gown out (basically a variation of JP Ryans Anglaise Pattern) and made a few changes to it. The back is four gored, but it is narrower/more parallel in the waist. The neckline is also a little lower. The front, obviously, is a "normal" Anglaise front. I didn't used hooks and eyes, i like to close the gowns with needles.

As an inspiration for the back panels I looked at this dress
http://www.metmuseum.org/collection/the-collection-online/search/159201?img=2 

If you have the chance to browse throught Nancy Bradfield's "Costume in Detail" or just have a look at one of the large museums' online collections, you will see, that all sorts of back panel alignment solutions, grainline and sleeve insertions were used, it's really mad and exciting.

I also made light changes to the sleeves, but that's just positions of the pleats at the shoulder, dart at the elbow and a tad tighter around the elbow. I don't really like lots of pleats around the shoulder seam ("puffy sleeves) but at the same time I am moving around a lot (wildly gesticulating, obviously) and need the "space" there to feel comfortable. I didn't add wide trimming because I ran out of fabric and just added a small ruffle at the bottom edge of the sleeve.

To wear the Robe à l'Anglaise à la Polonaise I have attached 3 loops inside the Anglaise. Again, there are various ways of looping up the skirt, 2 or 3 ribbons, loops, ties, buttons....all sorts.
I don't mean the dress as a full proper "Polonaise", I want it mainly for pulling the skirt up for dancing.
I suppose loops inside with buttons outside would be easier to loop up for a spontaneous dance, but after initially contemplating about 2  buttons outside, i tried it and it sort of took the "ooomph" away from the back pleats. 


I also decided I needed  new hair with the dress...

The big hair tutorial here: 
http://hertzwerk-freiburg.blogspot.de/2015/10/1770s-big-hair-wig-tutorial.html


A word on my sources

To create this dress, I used 4 sources

- The portrait of Juliane von Hessen-Phillipsburg (for the colour mainly... the portrait is from 1781)
- The picture of the original dress in the Snowshill collection (only 1 front view, dated 1770)
- Janet Arnold "Pattern of Fashion Vol. 1"
- Nancy Bradfield "Costume in Detail"

The portrait shows the overall appearance and proves the existance of the sage green colour. And the big hair.

The picture of the Original dress gives a feelin for the dress (albeit being a completely different colour) but there are no details or close-ups.

And here started the problems

Nancy Bradfield and Janet Arnold (both accredited authors and publications) had a close look at the same dress. Or so you would think.

- Janet Arnold suggests the dress would be worn "retroussee dans les poches" but there are no pocket slits where you could pull it through in the pattern. She also didn't mark or mention any loops for looping the dress up "a la Polonaise". She does indicate a front closure with hooks and eyes though. Her pattern shows the pleating of the dress in detail.

-Nancy Bradfield's beautiful drawings and descriptions somewhat differ from that. Her pleating guide for the skirt depicts just normal box pleats. She didn't observe any front closure or traces thereof. She does indicate where the dress was looped up to wear it "a la Polonaise".

Both mention that the sleeves show traces of a sleeve ruffle, but none of them indicate where ... they both suggest a broad ruffle though, so I suppose the traces of stitching must be wide.

this is just to state, what "research" would include. If I had intended to exactly reproduce the dress from the sources at hand I couldn't have done that, because they were contradictory (there are more details e.g. the size of the buttons, that aren't the same).


A short note on dating the gown: Robes a l'anglaise came really into fashion in the 1770s. There are a few Robe Anglaise/en fourreau from the late 1760s, but mainly it's 1770s thing. As the first partition of Poland happened in 1772, the style of Robe a la Polonaise or the fashion of wearing the Robe a l'Anglaise a la Polonaise could only develop after that. Although refashioning a simple Robe a l'anglaise into a Polonaise (by attaching a few strings) is so easy... so it is really difficult, to date the robe and the museum doesn't give us any hint, why they suppose such an early date for this plain Anglaise. So we must assume that the owner was either a fashion connaisseur, or the anglaise is of a later date (more mid 1770s).

Monday, 26 October 2015

1770s big hair - a wig tutorial

When I made this wig, I didn't take any pictures, unfortunately, because I wasn't even sure how it would turn out. It turned out well (I think) and now I am a bit annoyed I have no pictures for a proper tutorial. I did a few drawings instead and am trying to describe what I was doing and how. If there are any problems, just let me know, maybe I can explain better. Also for the moment I haven't got better pictures, but I promise to add them ASAP. I wanted to get the tutorial out as soon as possible. :)

Pictures with very silly big cap and sockets. :)


I've made the instructions on paper, you can view and download them as a pdf. :)

https://goo.gl/EtF239


I have used

mesh wire
about 20x30cms
The holes are about 2-3cms (1 inch) wide


2 wigs (long hair, wavy or curly, no fringe; I have used lace front, but that's up to you; be careful with the colour, I have chosen something that is sort of similar to my own hair, and yes, it is synthetic.)

batting for the mesh wire "cage" (I used a piece of Vlieseline H640, because it was there. Just choose something that is softish to cover the "cage").

lots of pins
enormous amounts of hair spray and a bit of foam
lots of patience


You can find inspiration for hairdos on paintings and I found these drawings quite helpful. http://www.coiffure-ducher.fr/louisxvi_femdescr.html

As usual, I didn't copy anything in particular but just "absorbed" all the sources and then made something up that I think works for the 1770s. I have to admit though, that I might have looks at mid 20th century hairdos, I don't know why, I think I have made a set of victory rolls there... I like anachronisms though. And again it shows how much we are children of our own time...

I hope the tutorial is helpful, if you have any questions, just leave a comment below. 


wearing experience: after wearing the wig for an entire evening, I now know, why posture was so essential "back then". Despite my wig being very well secured to my head and reasonably well balanced, it does have quite a bit of weight and being a rather lively person (pulling faces, turning my head quickly ....) I felt it forced me to move more ... elegant... and slower... and while it suited the evening and the whole ensemble (the "Landgravine Anglaise"), I wouldn't want to wear it on a daily basis. I am too 21st century. ;)


Sunday, 5 October 2014

Oh help! Oh no! It's A Calash!


I am reading the Gruffalo a lot with our little daughter and when I came to writing this post about my latest project, I couldn't help thinking in those words.

Anyway. It was a rather spontaneous project which had the purpose of keeping my mind busy (for various reasons) and being inexpensive. So, I've been thinking about a calash for some time and had looked at some pictures, and now the time was ripe.
I've still had plenty of reed and some silks left over.
Calash (or Calèche) is a horse carriage, really. (read more here at Wikipeda e.g. )

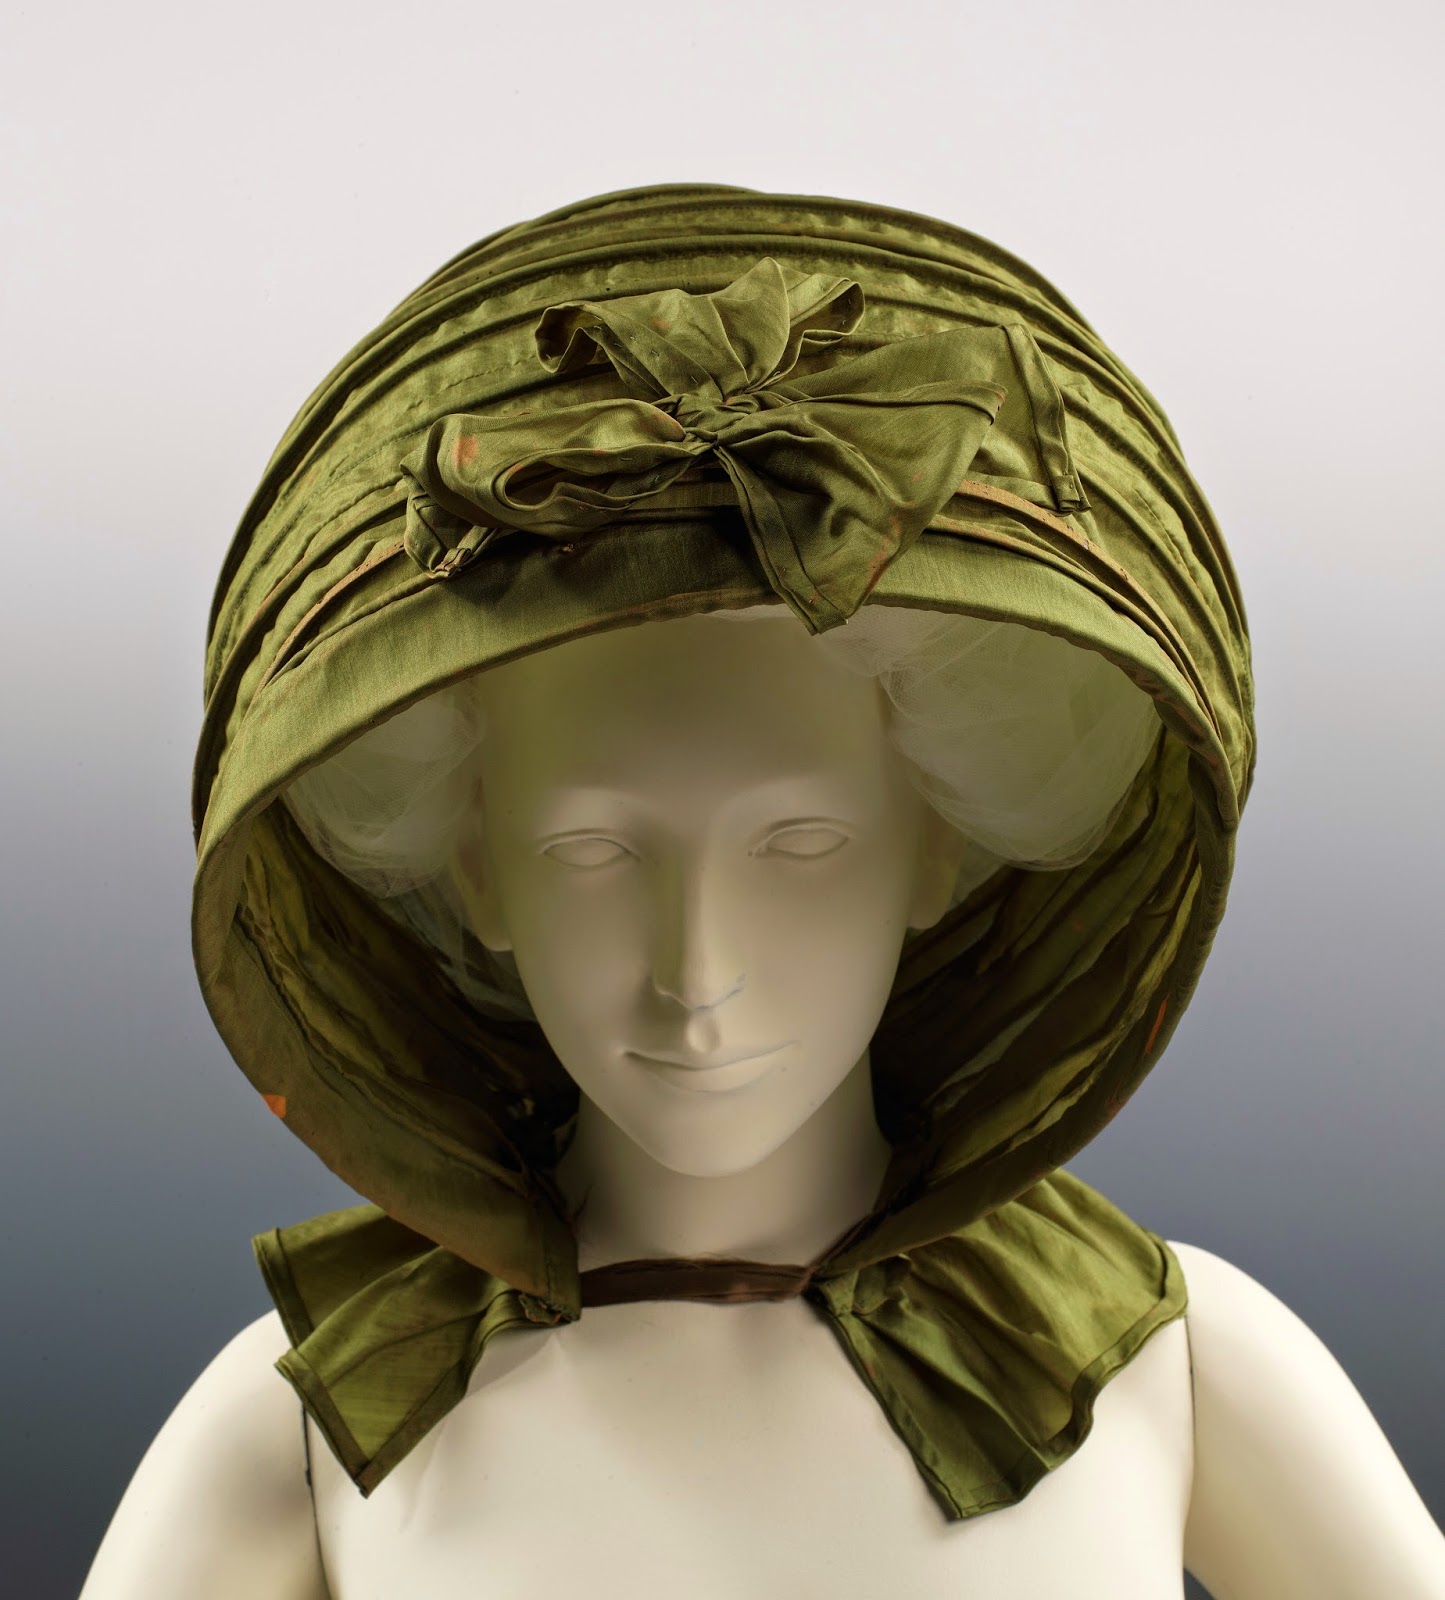
First a quick analyses of the calashes I used as examples. They can be found on the metmuseum.org homepage. Also refer to my pinterest board for more examples or this homepage, that has plenty of links to museums


http://www.metmuseum.org/collection/the-collection-online/search/116612?=&imgNo=0&tabName=related-objects


http://www.metmuseum.org/collection/the-collection-online/search/157763?img=1&imgNo=0&tabName=related-objects


If you follow the links you will find a few more photographs. The MetMuseum has some other Calashes from the 18th and early 19th century and also Pinterest is a good source for finding more pictures.

From those (and a few more, but let's not get overly into this) I have deducted the following things for my project:

1. The calash itself is based on a rectangle. The size of the rectangle is determined by the height and depth you want ot achieve. I noticed that in the above examples the boning seems to be "riding" on top of the calash. I assume, that first the lining is mounted to the outside fabric and then the tunnels are sewn through all layers. The reed probably has a distance of 2 inches. And in between there seems to be either a gathering stitch or an actual seem to allow that accordeon-like folding.

2. The back is either just the rest of the rectangle gathered and cut to fit into that sort of horse-shape OR it is a neatly cut flat extra piece of fabric and lining. Most calashes seem to have a ribbon in the back.

3. A ruffle (at least, could also extend to a "nearly-cape" length) was attached to the bottom of the calash and a ribbon in front to secure it and keep it in shape. Also seems to be a simple rectangle mostly.

4. Some calashes have (like the green one above) extra decoration (I love that extra bow on the green one!).

5. Although you don't see them on the pictures, I would think they had a small ribbon somewhere to pull them up agains the wind and over the head.

6. Both calashes have a sort of brim in the front, the green one has a rather straight one that might be padded with an extra layer of stiffer fabric, the violet one has some sort of double ruffle. Anyway, neither of them ends with a bone but with something decorative.

Personally I like the shape of the green one best, not very bulky and ruffly. So that's the shape I was trying to achieve.

13 boning chanels, 2 thereof in the back so slightly shorter. aprox. 2 inches apart?
in between fold to the inside, w/o boning.
2 bows.
supposedly flat back.
simple straight brim in front, possibly stiffened.
simple self fabric ties.

I've had particular fun with the reed I've used. It came in a round bundle and gave the whole thing the shape of an orange. But I wanted horse-shoe. My mock-up wasn't promising. So after doing some research into reed (which led me to most informative sited about basket making...) I've learned a lot of new stuff. Did it help the calash? Who knows.

So here we are, this is my version of a calash. Sorry, no big hair day... :) 


Also not a big smiley face day. Could be worse, though. 

my favourite view.


And for everyone who's made it this far: Here's an experimental pattern. It's not complete and will still take a bit of fiddling I'm afraid, but then I'm not a professional pattern person and it's free. ;) The pattern is in English. Sort of.

Calash Pattern.pdf

Enjoy your day!
(PS: No, it's not entirely handsewn, I've used the machine a fair bit, because I wasn't convinced it would turn out okay... shame on me... I would recommend sewing the boning channels on the outside by hand, though... if you want to do it half-properly... but well... next time...)

Wednesday, 11 June 2014

"Garthwaite Anglaise" - 1770s Anglaise en fourreau

I've finished my "Garthwaite Anglaise"!!! yay!


the only picture of me in the dress I could find...


 It all started with this fabric:


lovely fabric I got from www.silkresource.com

Apart from the fact that the fabric just begged me to buy it... I didn't have a real idea what to make of it. (roughly rococo was clear, though...). It's a silk lampas I ordered from www.silkresource.com. The design is called "carnation", the colour is a very light beige, "eggshell" called thing. Not what I would usually go for, but i LIKE it. Both sides of the fabric are equally appealing, it was hard to make a decision.
I also liked the fact that carnations have been flowers "with a meaning" for quite long.. -> wikipedia CARNATION
I first intended to make a 1740s Robe a la Francaise from it. BUT there were only 8yards available. Of course with a bit of tweaking that would be possible (remember, I AM petite...). BUT I also had just finished the green striped Chardin Francaise, which means I've got 2 Robes a la Francaise already that work for the 1740s/50s. And as much as I like that style, I didn't get the right feel for it. So I just put it aside for some time (remember: fabrics mature while you own them). and then I stumbled across these pictures:


Met Museum


Met Museum


Colonial Williamsburg

I love this dress: the colours are great (I wish I could have found a red like this!)

Museum at the Fashion Institute of Technology, NY

MFA Boston

With 8 yards I've had plenty of fabric to make a gown and have some more fabric left to mature. :) I had done the Anglaise en fourreau before, so no major issues here, just a few minor changes (back view).I was very torn between making an open gown or a round gown, but went for the open gown, because I like the contrasting white skirt a lot.

So, why a 1740s/50s fabric design for a 1770s Robe a l'Anglaise?
Several reasons:
It's different.
I've had quite enough of the Francaise pleating.
I like the "easy to wear" Anglaise-style. 
There are lovely extant garments with this mix. (The reason for this has been brought to my attention by the lovely Mme du Jard: Many people got fabrics for their christening and then would use them for a special dress, possibly even the wedding dress, in their 20s. tadaaa, a bit of calculating and you've got it! So not only though processing and altering garments but also through hording (!) fabrics you could get this result)
And last but not least: the fabric spoke to me. Ever had that feeling? ;)


So this is my "Garthwaite Anglaise". :) Sorry, I haven't got pictures with me inside, but it's 36 degrees Celsius (about 95 degrees Fahrenheit...) here and I just can't force myself into the stays.
Oh, and why is it called the "Garthwaite Anglaise"? Because the fabric design really reminds me of this wonderful designer, Anna Maria Garthwaite, see my blogpost about her -> HERE


yes, wrong pins, use your IMAGINATION!


edit 7/2015:
After making a Manteau de Lit from the leftovers I still had a bit of fabric left to make a skirt. I had to piece the back, but I don't think thats a problem. :)