Showing posts with label 1790s. Show all posts

Sunday, 6 September 2015

Danish Chemise Dress - Tutorial

Because I am so in love with this light, airy, elegant Chemise Dress and there is a free pattern available on the Museum homepage here  http://natmus.dk/historisk-viden/temaer/modens-historie/1790-1840/hvid-brudekjole/


I thought I'd write a small tutorial how to assemble the dress - because all of the info on the pattern is in Danish.


http://natmus.dk/historisk-viden/temaer/modens-historie/1790-1840/hvid-brudekjole/

So, after you've downloaded the pdf I suggest you do this to get something to work with:


1.Copy the museum's pdf into inkscape
2. Enlarge it so the boxes are 5cms wide (about 2 inches)
3. Save it as a .png
4. Copy that it into a Word Excel file (adjust the pages so there is hardly any margin, other wise you just have tons of overlap and waste paper...)
5. Print. I printed only the pages with the bodice pieces, and the top pleats of the skirt to safe paper, because the length of the skirt I have to determine anyway after finishing the bodice piece. And you can also measure that on the pdf.
6. Make a print-out of the Museum's pdf, too, so you know how to assemble your paper.
7. Don't forget to save the pdf to your computer, in case the museum's page goes down or so... :)


Now you've got a pattern for a lovely gown
- The underbust measurement is 67-70cms (about 26,5-28 inches)
- Chest is about 80-83 cms (about 31,5-32,5 inches)
- Length from underbust middle to floor: 115cm (45inch), back middle waist seam to floor about 136cms (53inch)
- bust point about 25cms
- back width about 30cms (12 inches)

Obviously, if these aren't your measurements, you've got to adjust the bodice. If you've never made that before, maybe this isn't the right project to start. You should know how to adjust stuff and have a bit of experience with sewing. I recommend sewing this by hand, it's easiest. also carefully mark and match.

Make a mock-up, at least of the bodice and the bodice-cover and the draping and sleeves, so you understand how the pleating works and where you might need to make further changes before cutting your nice favourite fabric. Especially the sleeves need attention, because they are set deeply into the back and have no folds or tucks to give enough space.

To be worn over appropriate underwear. (e.g. bodiced petticoat, short stays...)


Fabric required:
At least 6meters of thin cotton batist or voile or something comparable. About 50cms of thin canvas or thin twill or other suitable fabric for the bodice base.

Cut out the bodice cover and bodice base (don't forget the seam allowances).

bodice base assembly
center backs together. The original has a 6cms long piece of string or small band attached to the center back inside. Then proceed  with side back, sides and fronts. Attach shoulder strap only at the front.
The original has a tunnel with a string at the front, which I omitted.
Finish all visible (and if you want all invisible) hems. Sew the eyelets by hand. Use buttonhole stitch and poke throught the future-eyelet-hole with an awl after every stitch. Insert string. Try the bodice on before you proceed.

Bodice cover assembly
Center backs together and then sides. Attach shoulder straps at front only. Follow pleating guide to make it lie nicely on the bodice base and wing it a bit here. The front flaps overlap a little to cover the eyelet fastening. Don't forget to make the pleat "K". The double pleats are attached with only one seams on the bodice base as you can see on the picture.

Now the bodice base and cover should be assembled and you try them on and attach the shoulder straps together in the right place.

Finish remaining seams. 

Sleeves
Sew together sleeve and sleeve lining and treat as one. Set in sleeves by hand by easing them in, they go in quite wide into the back, but that's part of the fun. Finish sleeve hems.

Front draping
Again, make a mock-up first to understand the pleating. Then pleat the 2 sides, iron nicely and stitch together at the two lines "F" and just about "H".  Stitch Center Back (will be a slight V-shape) and mount on a piece of band, about 1,5cms wide, from "D" to "E". (I've used twill tape, Petersham should work nicely, too, something that gives it a bit of stability). Attach the back and sides to the Bodice where indicated on the pattern. Make sure to leave enough space at the bottom to attach to the Front Skirt. Finish all other hems.

Skirts
Cut the skirts, sew back and front together and pleat according to pleating guide, to match back and sides. Attach the front panels to the Front Draping only, not to the bodice and make the seam wide enough to create a tunnel for the drawstrings. Then attach the back panel on the bodice from point B to C. Finish all hems, the original has a 7mm ribbon at the side "pocket opening" and at the bottom.

Insert string in front and attach.

I hope this could help you, if you have any problems, just ask.

Again, here is the link to my gown. (And I know already what I sould have done differently...)
http://hertzwerk-freiburg.blogspot.de/2015/09/danish-chemise-dress-1790s.html

Thursday, 3 September 2015

Danish Chemise dress 1790s - Danish National Museum


I've finally finished my "Danish Dress". It's about 99% handsewn, which is a first for me. :) And I like it SOOOO much. I love the way it is drafted and assembled, I am absolutely awstruck and I think the seamstress that made the dress was ingenious.


The Original dress: (more picture of my version futher below...)

http://natmus.dk/historisk-viden/temaer/modens-historie/1790-1840/hvid-brudekjole/

I had seen this lovely dress quite a while ago and wanted to make it. I had a bit of black voile left, so I considered remaking it in black.  if you want to know more about Chemise Gowns in black hop over to Festive Attyre http://www.festiveattyre.com/search/label/chemise%20gown)

Anyway, as you can see from the pictures, I didn't choose black fabric, because whilst searching for that, I stumbled across Matilda ... a lovely fabric from our favourite Swedish furniture shop. Matilda is a very sheer cotton curtain  (yes!!) with white stripes with bobbles woven into the fabric. I love it.

The dress is from the Danish National Museum in Kopenhagen.
http://natmus.dk/historisk-viden/temaer/modens-historie/1790-1840/hvid-brudekjole/
They even deliver the free pattern (taken from the actual dress, like e.g. Janet Arnold PoF)
http://natmus.dk/fileadmin/user_upload/natmus/historisk-viden/modens-historie/snitmoenster/hvid-brudekjole.pdf

The Museum dates it to "ca. 1797", but as they seem to know that it was Eleonora Sophie Baroness Rantzau's wedding dress and she married 1796, I suppose the date should be "ca 1796".

When I made the Mock-up, I found, that I could wear the pattern without many alterations. Just the sleeves needed slight adjustment and the length of the skirt. I felt a certain connection and wanted to know more about the lady, who wore this for her wedding. Also, I was brought up in Northern Germany, only 45min away from the Danish border and 3 hours from Kopenhagen. And my great grandfather is Danish. 

This is Eleonora Sophie Baronesse Rantzau:
http://finnholbek.dk/genealogy/showmedia.php?mediaID=269&medialinkID=570

She was born on the 24th August 1779 in Fjellebro Gods, that is on the island Odense (in Denmark, of course).  She was the second of 3 children, she had an older brother and a younger sister. When she was 16 (1st July 1796), she married Preben I. lensgreve Bille-Brahe (who 22 years old at the time). They had 2 children, Henrik lensgreve Bille-Brahe, (b. 21 Jan 1798) and  Frederik (Fritz) Siegfred baron Bille-Brahe (b. 26 Feb 1799). Her children were named after her father in law (Henrik) and possibly her father (Friederich Siegfried).
Only about a year after the birth of her second son, Eleonora died on the 21st of August 1800 aged 20 (that's only 3 days before her 21st birthday in fact, and also our wedding day, which is a bit creepy, but well, life's full of weird coincidences...). I couldn't find out the reason for her early death. I could imagine childbirth or pneumonia.
Her husband married again - 16 years later, a lady called Johanne Caroline Vilhelmine Falbe. They called their first born daughter Eleonora Sophie. Isn't that romantic? This is a picture of the couple a year after they married.

http://finnholbek.dk/genealogy/showmedia.php?mediaID=2346&medialinkID=25470

She died in 1823, and a year later he married another lady called Birgitte (Betzy) Susanne Sybilla komtesse Schaffalitzky de Muckadell  (b 1801) (wow, that name rocks!). But enough genealogy, if you are so madly interested, follow the links below for further information, because that's were I've got it from (including pictures)

http://finnholbek.dk/genealogy/family.php?familyID=F4376&tree=2
http://finnholbek.dk/genealogy/getperson.php?personID=I8847&tree=2
http://skeel.info/getperson.php?personID=I4890&tree=ks (look for Person ID I4890)
A little on the actual dressmaking:

The assembly of the dress is relatively straight forward, a big "thank you" to Mariell from https://www.facebook.com/Geschichtsgewaender// for her help with the translation of the Danish Annotations... the most important one is "the drawings are not too accurate, sometimes there is up to 2 mm difference and maybe more" or something like that. I have written a short tutorial here http://hertzwerk-freiburg.blogspot.de/2015/09/danish-dress-tutorial.html

I am wearing a white bodiced petticoat (La Mode Bagatelle) under the dress, which for me replaces the stays. I suppose to do it properly I should make a pair of transitional stays but that's another future project. Unfortunately the straps of the bodiced petticoat show through the sheer fabric (which reminds me: I should have made a lining, like in the original... never try to be more intelligent that an 18th century seamstress.... at least not this one, the dress was made in a extremely ingenious way). (If I make the dress again, I would line the fabric... or maybe I take the sleeves off and line them... or so...)

Finally, pictures!!


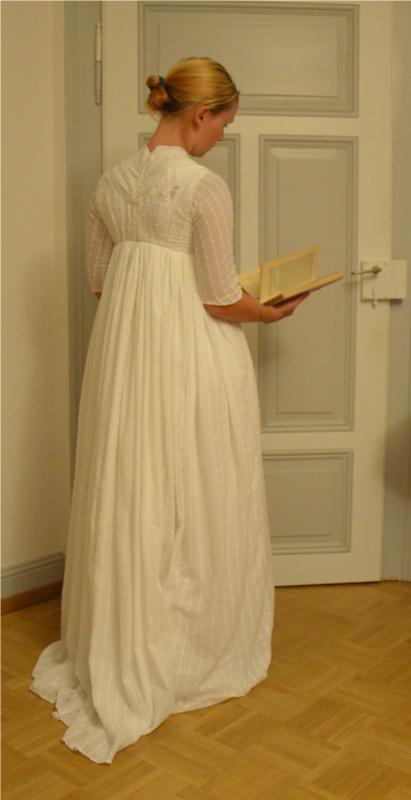
back view, with a very bad hair day and stupid straps destroying the wonderful inwards setting of the sleeves. :( The sleeves are very beautiful and I think I will use the pattern for more 18th century sleeves in the future. They don't need darts yet fit comfortable (hence the wrinkles under the arms...))


Love letters (The one from Guy the Maupassant was great, albeit being anachronistic!)

I am poking my nose up other people's love letters.

This is dedicated to https://www.pinterest.com/festiveattyre/regency-ladies-wedgie-society/


I also want to tell you a little story about the book I am holding in the pictures. It is a wonderful book called "Briefe der Liebe" (Letters of love), edited by Camill Hoffmann https://de.wikipedia.org/wiki/Camill_Hoffmann and some more about him here (in German language) http://www.radio.cz/de/rubrik/kultur/camill-hoffmann-botschafter-zweier-kulturen
The book was given by my great-grand-father to his then-fiancée for their engagement. This took place at Christmas 1912 (he wrote the date at the beginning of the book). It is love letters from the early 1700s to the late 1800s. And the choice of letters is wonderful. But here the romantic parts ends. Camill Hoffmann was killed in Auschwitz in 1944 together with his wife Irma. Life is bittersweet. If you can read German, try to get your hands on a copy. Or recreate the Danish Dress. Or both.


Have a great evening!

Hertzwerk X

Sunday, 7 September 2014

1790s jacket from IMATEX


My latest project is this 1790s jacket inspired by a 1790s jacket from the Imatex (Centre de Documentació i Museu tèxtil) here:
you can access lots of stuff there, if you want to look at the 1790s jacket, go to advanced search, then search for Register number 11551, then go to "full record" and voilà you can see pictures and read a despription in Catalan. I don't really understand catalan, but I think it's a children's jacket (they say) and the pictures do explain the rest. I call it the "Imatex jacket" (for obvious reasons).
What threw me a bit was, that I couldn't find many fashion plates depicting similar jackets. The ones that could be called similar were from fashion plates in the 1780s, but I suppose that doesn't mean much.
The following 3 pictures show the original jacket from the IMATEX collection.

original Imatex 1790s jacket

original Imatex 1790s jacket

original Imatex 1790s jacket.

This is the view of my pattern:
I've used the JPR Anglaise pattern as a start and then worked away on it. The sleeves are from Wingeo 207, but again, altered quite a bit (as I am NOT a giant). 


and these are the fabrics
silk repp in light cream with dots, silk damask in light blue/beige, ivory silk taffeta (for lining). Soutache apricot (not pictured) :)

I've used peach coloures soutache (2,5mm wide), about 12 metres. At first I was really sceptic about it, but I've used a colour scheme thingy on the internet called Paletton and determined the complementary colour to my blue-grey-brown silk was, in fact, peach. Wow, they did know what they were doing abck then. :)
So I dived in head first and attached the soutache. I am NOT a peach person... really. But I like the result. ;)
My biggest problem (apart from sleeves, right and left, buttonsholes patience and stuff like that) was to get fabric for the sleeve buttons matching the soutache - apricot  IS A NIGHTMARE! I did manage after months of repetitive visits to the fabric store (selfless...). :)

 And here are  pictures of the result:


 I am planning to make a matching hat like this for it, but have not got the materials for it yet (apart from the feathers and the black ribbon...)


Wednesday, 19 March 2014

The night before the revolution - a masked ball 1789

(C) Maren

I have attended NeheleniaPatterns Masked Ball 2014 which had the Motto "The Night Before The Revolution - 1789". Some of you might have seen my pictures of my blue Zone Gown - yes, that's what I was wearing. As I was horribly insecure whether the dress would stand the stress of being worn, I also took my Walpole Francaise - you can never go wrong with a robe a la Francaise!  But then the dress did not just explode (yipee! surprise!) and I was wearing it comfortably all night. :)
The Ball took place in the fantastic Schloss Körtlinghausen. So no worries about pretty picturesque surrounding. 
As it was a masked ball I had the pleasure of choosing a mask. I didn't really fancy a Colombina Mask (you know, the pretty one...) so I was looking for something really freaky. First I considered the Moretta Mask, which is REALLY scary, but as it would have meant to wear it with a button between my teeth and thus have my mouth covered (which isn't really handy for eating or talking...) I decided against it. I thought something Venetian Commedia dell'arte like would be nice and then couldn't resist the grotesquely big and ugly noses! Oh my god, I LOVE those!!! I chose the one with the quirkiest swing. ;) It's really creepy when I wear it. ;)This is a "Zanni" - more about that character here on wikipedia. It's a male character, but I had to admit I so wanted to have that nose, I didn't really mind. :)
I did have some unexpected difficulties drinking and eating with this mask, too, though, so I ended  up taking it off for the meal and drinks. Other than that it was pretty scary all way through. :) I got it from maskworld.com :)

The version with the Corset (a sort of lightly boned top with back lacing) was very comfortable to wear. I liked about it, that I don't have to attach an extra stomacher and that it didn't have optical interruption of the front fastening with needles. A Zone-Gown Front with front closure (which has also existed back then) is a very easy option though and doesn't need the extra fitting of the Corset. On the other hand I could use the Corset for another dress, too... some day, maybe. :) i made a new bum pad, too, from woolly felt, very much stuffed with IKEA cushion interiors. You can't see much of it, but it IS bigger. :)

Here are a few pictures of the dress and a few with the mask.


(C) Maren

(C) Maren


(C) Stefan

with flash the colour looks a bit brigther than it actually is! (C) Stefan
(C) Mie


Thank you Maren, Mie and Stefan for the pictures!!!


As to the ball, the castle was SUPERB, a real gem. It was great to see people again and get to know a few more sewing-addicts. I am left with slightly ambivalent feelings concerning some organisational things, but well, so what. Read a great, honest and very true review of the ball here at Silvermedusa's.


Friday, 24 January 2014

My 18th century muff

So, after my thoughts about the what's and when's on 18th century muffs I've come up with my own version.
I really liked the idea of having a muff base and then the option of sewing many many many different covers. Here's Katherine's tutorial muff base and muff cover for reference. It's really just working with rectangulars (this reminds me of this video on Sesame Street "Dancing with Triangles")

So I started with the base. I have used twill from my fabric stash. And the filling is synthetic fibre that used to be the stuffing of an IKEA pillow that was just sitting there waiting to be given another purpose. ;) I needed most of the stuffing, I was really surprised how much material you can stuff into that muff base!
My base was a 21x26 inches rectangle. I foldes that in half and made a tube (see Katherines tutorial) make sure you close the right end of the tube. :)


I've had some faux fur in black (or blackish blue, I'm not quite sure..) sitting around here for 12 ( in words TWELVE!!!) years and cut a 21x15 inch rectangle. Again, I did what Katherine did, I closed one side, made two tunnels on the "open" sides, some ribbon in it, FINISHED!!!


I think I am going to attach some sort of sturdier ribbon to one side so I can casually carry it around, but as I've not got anything suitable at home at the moment and I am not yet sure what that ribbon is supposed to look like... it might not happen. ;)
 I could also carry it around like this:


 And now I can make SO many covers, maybe like this...


All in all this muff business was done in about 2-3 hours (fabric search included), and making the cover takes about 30min... maximum....


Tuesday, 21 January 2014

Analysing - 18th century muffs

I have given making another 18th century accessoire some thought. A muff.
A while ago I have seen this tutorial by Kathrine http://koshka-the-cat.blogspot.de/2013/01/an-18th-century-muff-cover-tutorial.html and thought it was a rather simple task. Unfortunately she doesn't give any reference as to the suitable decade. To cut a long story short, this sort of smallish muff works for the whole century, which might account for the fact that she didn't refer to a certain decade. If you want to look at a few more pictures, I have collected some muff-picture on may Pinterest - 18th Accessoires

 Muffs in the 18th century seem to be smallish (rather earlier) to medium (always suitable) size. Towards the end of the 1780s and the 1790s muffs tend to grow up to ridiculous measurements. But also medium sized ones can be seen on fashion plates. What seems to always work is a smallish-medium sized fur coated muff.

Here are a few examples:

1740s
Jean Baptiste Massé (French, 1687–1767), 'The Blue Muff' c 1740
1750s

1755. Louise Henriette de Bourbon.
French 18th Century Young Woman with a Muff, c. 1750 Chester Dale Collection 1943.7.5
1760s

Portrait of Madame de Pompadour with a Fur Muff - François-Hubert Drouais, 1763-1764 - The Athenaeum
Catherine Havers, attr. Barthélemy du Pan, ca. 1765; LMG LEEAG.PA.1966.0002.0002


1770s

Galerie des Modes, 11e Cahier, 2e Figure Middle class woman in a striped Satin Gown with a furred pelisse and a white muff. (1778)


Miss Lovejoy, 1772.
Winter by Collett Satire: a woman and her daughter wearing fur coats and muffs walking in a street with snow; behind them fighting school boys and a boy carrying a toboggan. c.1778/9 Hand-coloured mezzotint


1780s
Muff. English, 1785–1800. Silk satin, mezzotint on fabric, silk embroidery, pearls, gauze appliques, and silk plain-weave lining - in the Museum of Fine Arts Boston.

Mrs. Wilbraham Bootle, 1781 by George Romney, oil on Canvas, (c) National Gallery of Scotland, Edinburgh, Scotland.
Dress of the Year 1781, by Ann Frankland Lewis.
Striped dress ensemble with large striped fur muff - Magasin des Modes - March 1789 .- I LOVE that outfit, actually. :)
1790s

Gallery of Fashion, January 1796.

Gallery of Fashion, March 1798.

I recommend the above mentionned tutorial by Katherine. :)  Some time soon I shall post my own version. See you!

Thursday, 19 December 2013

1780/90s Blue Zone Gown


Journal des Luxus und der Moden March 1793 >KLICK!!<


Above, from the 3/1793 issue of the "Journal des Luxus und der Moden" - pp. 163
"[...] 2) Aus Teutschland
vom Rhein, den 20. Febr. 1793.
hier folgen einige Bemerkungen, die ich unterm Gewuehle und Getuemmel der Kriegsheere, das sich taeglich bey uns vermehrt, ueber die neuen Geschenke der Goettin Mode, die darum nicht aussen bleiben, habe machen koennen. 
Zuerst eine Figur von der jetzigen ganz artigen Tracht unserer jungen Frauenzimmer (Taf. 7.). Ein blaues Kleid von einem seidenen FruehjahrsZeuche, weißgefuettert; Rock und Kleid uni, ohne alle Garnirung; das Corset weiß; ein weißes Halstuch von Linon und den Kopf nicht so franzoesisch hineingepackt, als wenn sich der schoene jugendliche Hals, wegen eines haeßlichen Kropfes wegen, nicht duerfte sehen lassen. Das Haar in natuerlichen Locken, nur halb gepudert, und drauf eine Art von Carcasse von Band, die aus 5 Ribben von blau und weißem Bande besteht, zwischen welchen die lockigt-frisirten Haare allenthalben durchgucken.Ueberhaupt werden Huete anjezt blos zum aeussersten Morgen-Negligee zum Anzuge aber gar nicht mehr, und zu diesem blos von jungen Personen solche Band-Carcassen, von aelteren Damen aber kleine sehr schmale Haeubchen getragen. Dieß muß ich Ihnen als etwas Neues berichten. [...]"


So,

My previous research has led me to the conclusion for my interpretation of the zone-gown

1. It's to be worn over a "corset"
2. The back of the Gown will have 4 back panels and extra shoulder straps, Front A shape.
3. The skirt will most likely not be lined as it was rather unusual (unless i happen to find something suitable in my fabric stash).
4. worn over bum pad, no train.
5. fabric is blue, greenish iridescent silk taffeta.
6. petticoat slightly shorter for practical reasons.

With A shaped stomacher (bottom line unfinished)


ad 1
The corset is the base of the thus recycled "kitsch corset" (that I never wore, twas a good exercise in attaching bias tape though... ... ...) so really it is a version of the Period Impressions half boned stays. I have removed most of the bones and just left a few in the front and around the back lacing. I also made small changes to the front and removed the taps. Then I added two layers of ivory silk taffeta. Just one layer looked a bit thin and flimsy. I also made a A shaped stomacher, just to have another option. The Stomacher still needs a bit of shortening, but I think the general idea is clear. ;) 


ad 2
I have based the bodice on the JPR Anglaise, that fitted quite well. I then changed the front to have the A shaped gap (about 1,5" at the top and just above the highest point of the hip bones at the sides (spina iliaca anterior superior)). The front in the picture seems to be nearly at the back. I am not sure about how far back it acutally went, but I didn't want it to be too far back so I settled for hip bone. Maybe the picture sort of shows front and side at the same time for illustration (who knows...), a bit of early cubism. ;)
I made a mock-up and then changed the back panels and shoulder strap and I actually made 4 real pieces in the back (not a fake 4-pieces-back as I had initially planned). I took the Anglaise pcitured below as an example but made slight changes. As those changes moved the sleeves in a bit, I had to change the sleeve pattern accordingly (and i HATE setting sleeves in!!! Sleeves are my pet hate in sewing, I find I always have to make changes to make them look the way I want and it takes AGES!). I prefer 3/4 length sleeves to long sleeves and so I didn't extend them. Also I planned to make the bottom of the bodice back not arrow but box shaped. Unfortunately I completely forgot about altering the skirt part fabric to match so I ended up making a triangular shape. Attaching those folds neatly to the bodice was really getting to me, I needed 3 tries and due to the nature of the tafetta I had to stop and be content with the way the back pleats of the skirt are now. I have certainly learned for the next Anlaise! ;)
I initially  had planned to make another skirt for some change (in ivory, like the Corset/stomacher) but when I pinned it to the dummy to get an idea what it would look like, i really didn't like it. the white A-Shapw with white skirt underneath the turquoise just looked boring and bland. So I decided in just making on skirt in turquoise. The skirt is a bit shorter than the one on the fashion plate, for practicality.Also I had to piece the skirt back, as I ran 20cms short... you can't see it anyway, I pieced it with some black tafetta. ;) 


MetMuseum Anglaise

And I am admitting: These fabrics have been maturing in my fabric stash for more than 2 (nearly 3!!) years!!!


And that Hat is STILL absolutely mental. In the picture below her nice earrings are visible, though. A hook with a plate and something in the middle (possibly a gemstone). It's always good to know what was available back then. ;)


I'm not making it, because it reminds me of this christmas nightmare below. And I have the suspicion those bands on bands will just look like a big wobbly pouf. A "Carcasse" hat, ... REALLY!!

from amazon.