Tuesday, 10 November 2015

Cloche Fever! - Autumn is great for hats!


 Novembre as begun and autumn weather has really reached us. Some days are pure gold, with sunshine, warm temperatures (still 20 degrees Celsius!) and clear blue skies. Others are grey, foggy and wet and you don't see the sun no matter how hard you try. And others are a bit of both, which I like best. When in the morning the fog lifts with the first rays of lights and seems to flow over the tops of the hills and retreat slowly, then comes back a bit, and then by early afternoon the sun has taken over and warms the skin and face.

Anyway, it inspired me to make some more cloches.

The light blue "bluebell" cloche seems to be more suitable for lighter days. I have to admit - light blue isn't really my colour... I do like the outcome though. I also start to like hats in weird colours, because  usually wear black (happy black, of course) and the coloured hats are a nice contrast. light blue also suits my complexion and eyes (says my husband, who also said "look, I would REALLY tell you if it wouldn't look good, don't worry), so I'll go with that. It reminds me a bit of my great-grandmother. The story goes, that when she went shopping for clothes and the shop keeper was telling her how wonderful the coat (or whatever) looked and she didn't really like it, she would say "yes, it definitely makes a small foot". And whoever accompanied her on the shopping day, would know what she meant by that. I assume it is another way of saying "the rest of me looks enormous in this coat".

awww, what a friendly creature!!

Maybe I will add feathers to this side... later...


This is the other hat I made. ACTUALLY I love it. It is great. It's the first hat in a non-weird colour and I like the outcome. Maybe I will reshape the bluebell cloche (or add a feather that crossed from left to the middle or something, it defnitely needs a little more "pzazz").


It is inspired by hats made by this talented lady http://behidadolic.com/   She used to do lots of free form felting on a simple balsa block, lots of cloches or smaller hats. It seems her newer creations (now also in "straw" for summer) are made more and more on special hat blocks, which I find really sad, I love her free form felt hats.

bonus material. :)

Monday, 26 October 2015

1770s big hair - a wig tutorial

When I made this wig, I didn't take any pictures, unfortunately, because I wasn't even sure how it would turn out. It turned out well (I think) and now I am a bit annoyed I have no pictures for a proper tutorial. I did a few drawings instead and am trying to describe what I was doing and how. If there are any problems, just let me know, maybe I can explain better. Also for the moment I haven't got better pictures, but I promise to add them ASAP. I wanted to get the tutorial out as soon as possible. :)

Pictures with very silly big cap and sockets. :)


I've made the instructions on paper, you can view and download them as a pdf. :)

https://goo.gl/EtF239


I have used

mesh wire
about 20x30cms
The holes are about 2-3cms (1 inch) wide


2 wigs (long hair, wavy or curly, no fringe; I have used lace front, but that's up to you; be careful with the colour, I have chosen something that is sort of similar to my own hair, and yes, it is synthetic.)

batting for the mesh wire "cage" (I used a piece of Vlieseline H640, because it was there. Just choose something that is softish to cover the "cage").

lots of pins
enormous amounts of hair spray and a bit of foam
lots of patience


You can find inspiration for hairdos on paintings and I found these drawings quite helpful. http://www.coiffure-ducher.fr/louisxvi_femdescr.html

As usual, I didn't copy anything in particular but just "absorbed" all the sources and then made something up that I think works for the 1770s. I have to admit though, that I might have looks at mid 20th century hairdos, I don't know why, I think I have made a set of victory rolls there... I like anachronisms though. And again it shows how much we are children of our own time...

I hope the tutorial is helpful, if you have any questions, just leave a comment below. 


wearing experience: after wearing the wig for an entire evening, I now know, why posture was so essential "back then". Despite my wig being very well secured to my head and reasonably well balanced, it does have quite a bit of weight and being a rather lively person (pulling faces, turning my head quickly ....) I felt it forced me to move more ... elegant... and slower... and while it suited the evening and the whole ensemble (the "Landgravine Anglaise"), I wouldn't want to wear it on a daily basis. I am too 21st century. ;)


Monday, 5 October 2015

With Flying Colours...!!!

 My dear readers,

today I would like to share with you the work of an incredibly talented and lovely lady, who is making superb accessories for historical reenactment, that will make the difference between "nice" and "wow". Everything is really well researched and tested on Germans. Believe me.:) Visit her on her facebook page: Flying Colours

Everything is handmade in Germany, but postage is no problem. Come and enjoy a few pictures of her work.

You need a walking stick? Something like this?

Walking Cane modelled after 18 century fashion
pewter knob and wooden cane with mahagony/shellack finish
130cm 60€

She does custom knobs, too. ;)


top of handpainted walking stick


Maybe you are reclining in the shade on a hot day... and need a fan?


Or you need a miniature of your beloved?


or just a caring eye?


important things in a nutshell

(reconstruction from actual historical piece!)
store your little thingys in style


threading nicely!


there is no reason why you shouldn't do your writing in pure style, either!


(more designs available)
you wouldt want to hide this ink! And i'm sure it improves handwriting, too!
Ah, you're more reading-type of person... authentically no problem! Super bookmarks!


to plan your next field trip....


or a night cat


have a historical cup of coffee or tea (with excellent sense of humour!)


or make a stand with these regency ladies!


Again: check her fb page https://www.facebook.com/flyingcoloursger/photos_stream?tab=photos_albums
or get in touch with her for custom orders. oh, and you know what? Not only you get unique items at really good prices and you support a craftswoman with know-how and love for her work. Like and share her page if you like what you see and spread the word! Thank you!

Friday, 11 September 2015

The "Duck à l'orange" Cloche

Another cloche in a colour that will definitely make car drivers see me in winter. :) For no real reason (other than the strikingly orange colour, obviously) it became the "Duck a l'orange" cloche.
This time I've planned the positions of the pleating a bit more careful, used stainless steel super fine needles and didn't brush as vigorously. :)


my skills considering hair-dos definitely need seeing to...


I still have a lot to learn about the free from felting but I think I am getting somewhere. Even the weather has changed - from nearly 40 degrees celsius to about 24 degrees. :) Autumn is definitely on its way!

Normally I wouldn't choose orange, but I do like the cloche, although I am not sure, whether orange really suits my complexion. Nevertheless, I guess in winter it will look nice with a  black coat. 

Sunday, 6 September 2015

Danish Chemise Dress - Tutorial

Because I am so in love with this light, airy, elegant Chemise Dress and there is a free pattern available on the Museum homepage here  http://natmus.dk/historisk-viden/temaer/modens-historie/1790-1840/hvid-brudekjole/


I thought I'd write a small tutorial how to assemble the dress - because all of the info on the pattern is in Danish.


http://natmus.dk/historisk-viden/temaer/modens-historie/1790-1840/hvid-brudekjole/

So, after you've downloaded the pdf I suggest you do this to get something to work with:


1.Copy the museum's pdf into inkscape
2. Enlarge it so the boxes are 5cms wide (about 2 inches)
3. Save it as a .png
4. Copy that it into a Word Excel file (adjust the pages so there is hardly any margin, other wise you just have tons of overlap and waste paper...)
5. Print. I printed only the pages with the bodice pieces, and the top pleats of the skirt to safe paper, because the length of the skirt I have to determine anyway after finishing the bodice piece. And you can also measure that on the pdf.
6. Make a print-out of the Museum's pdf, too, so you know how to assemble your paper.
7. Don't forget to save the pdf to your computer, in case the museum's page goes down or so... :)


Now you've got a pattern for a lovely gown
- The underbust measurement is 67-70cms (about 26,5-28 inches)
- Chest is about 80-83 cms (about 31,5-32,5 inches)
- Length from underbust middle to floor: 115cm (45inch), back middle waist seam to floor about 136cms (53inch)
- bust point about 25cms
- back width about 30cms (12 inches)

Obviously, if these aren't your measurements, you've got to adjust the bodice. If you've never made that before, maybe this isn't the right project to start. You should know how to adjust stuff and have a bit of experience with sewing. I recommend sewing this by hand, it's easiest. also carefully mark and match.

Make a mock-up, at least of the bodice and the bodice-cover and the draping and sleeves, so you understand how the pleating works and where you might need to make further changes before cutting your nice favourite fabric. Especially the sleeves need attention, because they are set deeply into the back and have no folds or tucks to give enough space.

To be worn over appropriate underwear. (e.g. bodiced petticoat, short stays...)


Fabric required:
At least 6meters of thin cotton batist or voile or something comparable. About 50cms of thin canvas or thin twill or other suitable fabric for the bodice base.

Cut out the bodice cover and bodice base (don't forget the seam allowances).

bodice base assembly
center backs together. The original has a 6cms long piece of string or small band attached to the center back inside. Then proceed  with side back, sides and fronts. Attach shoulder strap only at the front.
The original has a tunnel with a string at the front, which I omitted.
Finish all visible (and if you want all invisible) hems. Sew the eyelets by hand. Use buttonhole stitch and poke throught the future-eyelet-hole with an awl after every stitch. Insert string. Try the bodice on before you proceed.

Bodice cover assembly
Center backs together and then sides. Attach shoulder straps at front only. Follow pleating guide to make it lie nicely on the bodice base and wing it a bit here. The front flaps overlap a little to cover the eyelet fastening. Don't forget to make the pleat "K". The double pleats are attached with only one seams on the bodice base as you can see on the picture.

Now the bodice base and cover should be assembled and you try them on and attach the shoulder straps together in the right place.

Finish remaining seams. 

Sleeves
Sew together sleeve and sleeve lining and treat as one. Set in sleeves by hand by easing them in, they go in quite wide into the back, but that's part of the fun. Finish sleeve hems.

Front draping
Again, make a mock-up first to understand the pleating. Then pleat the 2 sides, iron nicely and stitch together at the two lines "F" and just about "H".  Stitch Center Back (will be a slight V-shape) and mount on a piece of band, about 1,5cms wide, from "D" to "E". (I've used twill tape, Petersham should work nicely, too, something that gives it a bit of stability). Attach the back and sides to the Bodice where indicated on the pattern. Make sure to leave enough space at the bottom to attach to the Front Skirt. Finish all other hems.

Skirts
Cut the skirts, sew back and front together and pleat according to pleating guide, to match back and sides. Attach the front panels to the Front Draping only, not to the bodice and make the seam wide enough to create a tunnel for the drawstrings. Then attach the back panel on the bodice from point B to C. Finish all hems, the original has a 7mm ribbon at the side "pocket opening" and at the bottom.

Insert string in front and attach.

I hope this could help you, if you have any problems, just ask.

Again, here is the link to my gown. (And I know already what I sould have done differently...)
http://hertzwerk-freiburg.blogspot.de/2015/09/danish-chemise-dress-1790s.html

Thursday, 3 September 2015

Danish Chemise dress 1790s - Danish National Museum


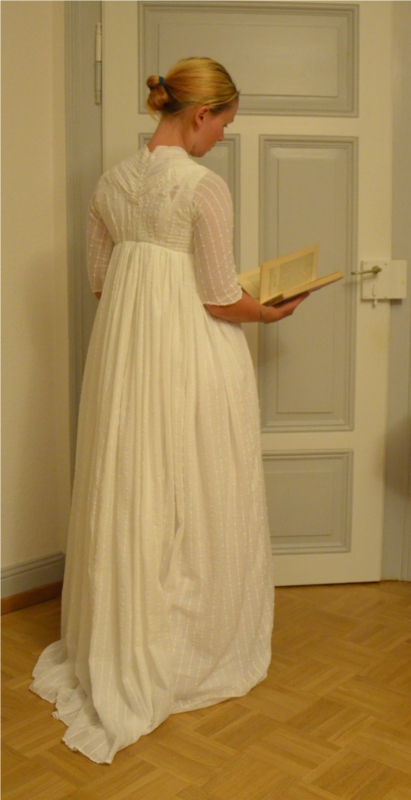
I've finally finished my "Danish Dress". It's about 99% handsewn, which is a first for me. :) And I like it SOOOO much. I love the way it is drafted and assembled, I am absolutely awstruck and I think the seamstress that made the dress was ingenious.


The Original dress: (more picture of my version futher below...)

http://natmus.dk/historisk-viden/temaer/modens-historie/1790-1840/hvid-brudekjole/

I had seen this lovely dress quite a while ago and wanted to make it. I had a bit of black voile left, so I considered remaking it in black.  if you want to know more about Chemise Gowns in black hop over to Festive Attyre http://www.festiveattyre.com/search/label/chemise%20gown)

Anyway, as you can see from the pictures, I didn't choose black fabric, because whilst searching for that, I stumbled across Matilda ... a lovely fabric from our favourite Swedish furniture shop. Matilda is a very sheer cotton curtain  (yes!!) with white stripes with bobbles woven into the fabric. I love it.

The dress is from the Danish National Museum in Kopenhagen.
http://natmus.dk/historisk-viden/temaer/modens-historie/1790-1840/hvid-brudekjole/
They even deliver the free pattern (taken from the actual dress, like e.g. Janet Arnold PoF)
http://natmus.dk/fileadmin/user_upload/natmus/historisk-viden/modens-historie/snitmoenster/hvid-brudekjole.pdf

The Museum dates it to "ca. 1797", but as they seem to know that it was Eleonora Sophie Baroness Rantzau's wedding dress and she married 1796, I suppose the date should be "ca 1796".

When I made the Mock-up, I found, that I could wear the pattern without many alterations. Just the sleeves needed slight adjustment and the length of the skirt. I felt a certain connection and wanted to know more about the lady, who wore this for her wedding. Also, I was brought up in Northern Germany, only 45min away from the Danish border and 3 hours from Kopenhagen. And my great grandfather is Danish. 

This is Eleonora Sophie Baronesse Rantzau:
http://finnholbek.dk/genealogy/showmedia.php?mediaID=269&medialinkID=570

She was born on the 24th August 1779 in Fjellebro Gods, that is on the island Odense (in Denmark, of course).  She was the second of 3 children, she had an older brother and a younger sister. When she was 16 (1st July 1796), she married Preben I. lensgreve Bille-Brahe (who 22 years old at the time). They had 2 children, Henrik lensgreve Bille-Brahe, (b. 21 Jan 1798) and  Frederik (Fritz) Siegfred baron Bille-Brahe (b. 26 Feb 1799). Her children were named after her father in law (Henrik) and possibly her father (Friederich Siegfried).
Only about a year after the birth of her second son, Eleonora died on the 21st of August 1800 aged 20 (that's only 3 days before her 21st birthday in fact, and also our wedding day, which is a bit creepy, but well, life's full of weird coincidences...). I couldn't find out the reason for her early death. I could imagine childbirth or pneumonia.
Her husband married again - 16 years later, a lady called Johanne Caroline Vilhelmine Falbe. They called their first born daughter Eleonora Sophie. Isn't that romantic? This is a picture of the couple a year after they married.

http://finnholbek.dk/genealogy/showmedia.php?mediaID=2346&medialinkID=25470

She died in 1823, and a year later he married another lady called Birgitte (Betzy) Susanne Sybilla komtesse Schaffalitzky de Muckadell  (b 1801) (wow, that name rocks!). But enough genealogy, if you are so madly interested, follow the links below for further information, because that's were I've got it from (including pictures)

http://finnholbek.dk/genealogy/family.php?familyID=F4376&tree=2
http://finnholbek.dk/genealogy/getperson.php?personID=I8847&tree=2
http://skeel.info/getperson.php?personID=I4890&tree=ks (look for Person ID I4890)
A little on the actual dressmaking:

The assembly of the dress is relatively straight forward, a big "thank you" to Mariell from https://www.facebook.com/Geschichtsgewaender// for her help with the translation of the Danish Annotations... the most important one is "the drawings are not too accurate, sometimes there is up to 2 mm difference and maybe more" or something like that. I have written a short tutorial here http://hertzwerk-freiburg.blogspot.de/2015/09/danish-dress-tutorial.html

I am wearing a white bodiced petticoat (La Mode Bagatelle) under the dress, which for me replaces the stays. I suppose to do it properly I should make a pair of transitional stays but that's another future project. Unfortunately the straps of the bodiced petticoat show through the sheer fabric (which reminds me: I should have made a lining, like in the original... never try to be more intelligent that an 18th century seamstress.... at least not this one, the dress was made in a extremely ingenious way). (If I make the dress again, I would line the fabric... or maybe I take the sleeves off and line them... or so...)

Finally, pictures!!


back view, with a very bad hair day and stupid straps destroying the wonderful inwards setting of the sleeves. :( The sleeves are very beautiful and I think I will use the pattern for more 18th century sleeves in the future. They don't need darts yet fit comfortable (hence the wrinkles under the arms...))


Love letters (The one from Guy the Maupassant was great, albeit being anachronistic!)

I am poking my nose up other people's love letters.

This is dedicated to https://www.pinterest.com/festiveattyre/regency-ladies-wedgie-society/


I also want to tell you a little story about the book I am holding in the pictures. It is a wonderful book called "Briefe der Liebe" (Letters of love), edited by Camill Hoffmann https://de.wikipedia.org/wiki/Camill_Hoffmann and some more about him here (in German language) http://www.radio.cz/de/rubrik/kultur/camill-hoffmann-botschafter-zweier-kulturen
The book was given by my great-grand-father to his then-fiancée for their engagement. This took place at Christmas 1912 (he wrote the date at the beginning of the book). It is love letters from the early 1700s to the late 1800s. And the choice of letters is wonderful. But here the romantic parts ends. Camill Hoffmann was killed in Auschwitz in 1944 together with his wife Irma. Life is bittersweet. If you can read German, try to get your hands on a copy. Or recreate the Danish Dress. Or both.


Have a great evening!

Hertzwerk X

Monday, 24 August 2015

HTTP NP 404 - or "the shortcut is never the shortest way" - a pattern review

This is a short review of the pattern NP 404.

I had fallen in love with this Dress from the Danish National Museum in Copenhagen a loooong time ago... and dreamt about making my own version of it.


picture from here: http://natmus.dk/historisk-viden/temaer/modens-historie/1790-1840/hvid-brudekjole/

Because I had a sort of lazy phase I thought I'd spare myself the tiresome enlarging and printing and cutting and thinking and I just get the pattern NeheleniaPatterns NP404 which claims to be based on the exact robe. Too good to be true. That lovely gown without the work. Yep. And so it is.

The pattern is inspired by the above dress, but not the actual pattern of that dress.
The bodice and collar construction are quite different, in fact. (and as it is a chemise dress, that's all there is, really... so... )
Also the marks for folding the back/front piece are wrong and after figuring out that I had to look at the museum's pattern to know how to pleat it I've had enough, chucked that pattern into the next corner (which is what I would recommend to you, if you own it...) and used the free pdf from the museum (which I recommend to do).

Don't get me wrong, the pattern is usable, if you don't want exactly THAT Danish Dress but something that looks like it, and if you don't mind that some things are simply wrong (like the pleating guide for that pleated collar-thingy). But as I put quite a bit of effort into fitting my stuff (even if it doesn't show, but that's a completely different story) I find it annoying if a pattern 1. isn't what it claims to be and 2. causes more work than neccessary.
I even tried to get in touch with the pattern people, but after weeks without reply I presume there is no interest in an honest opinion. Which is quite a shame. But like friend said "HTTP404 - that should have made you think about it twice". Listen to your friends! ;)

And as we all know : the longest way between 2 points is the shortcut.

If you you want to know how the Original Danish Chemise Dress turn out... I am going to post about it soon here ----> http://hertzwerk-freiburg.blogspot.de/2015/09/danish-chemise-dress-1790s.html

Lots of love, beware of shortcuts, Hertzwerk


Friday, 14 August 2015

The Postillon Cloche


The past few days (well, over a week really, with several interruptions...) I've spent experimenting with free form felting. And I can only say: I love it. I found it a very sensual experience to work with the felt cones with all the steaming and manual shaping. It made me think about millinery and milliners in a completely different way. 
This friendly person is trying to present you her first felt hat creation. What you don't see is the totally enthusiastic 3 year old clinging to her left leg.

Anyway, some time (...ages...) ago I had bought a set of hat cones in light colours and I started by choosing the one with the colour I thought I'd wear least... in case it goes wrong you don't want to waste the really nice super colour. It was a bright yellow wool felt cone. Yellow happens to be the colour of the German Post. In the end I attached a wood button covered in very dark dark blue woolen fabric, and then I thought "this would go really well with the German Post work gear" and for a very short moment considered an alternative career. 
Despite the vigorous colour (that doesn't really suit me...) I really like the outcome for the first time felting. I learned a great deal of things about the directions of felting, about how the material behaves, ... and about needles. It is really annoying if your needles rust away while the hat is drying. As I had put it in the loft to dry, I didn't see what was happening right away so I unfortunately have a few rust stains that mark the ex-needle-holes. In a way I don't mind too much,  probably because the hat is ... yellow... although I guess it's great in winter on the bike - people will definitely see me... :) 
Talking about the weather - I can't answer the question why I made a wool felt cloche while the outside temperature was nearly 40 degrees Celsius. I also made a batch of dark chocolate macaron. 

40 degrees Celsius outside (nearly) - it WAS a little hot under that wooly cloche, I have to admit.


If you want to try free form felting, these are the things I learned this time
1. It is really good to thoroughly spray the hat with water the night before and keep it in an airtight plastic bag over night so it is nice and evenly moist. 
2. Hot water steam is still really hot.
3. Use needles that don't rust and that aren't too thick. 
4. Cover your hat block with cling film, it really helps cleaning up. 
5. When you brush your hat for the last finish, don't get carried away. I tried to remove a few of the rust stains by brushing the hell out of the felt with a suede brush, and while a few strokes really liven up the colour and texture, everything beyond "a few strokes" creates a fluffly sheep like surface. Unless you go for fluffy and sheeplike. It sure didn't help against the rust stains. :) 


 I wish you a lovely day. Enjoy! X


Thursday, 23 July 2015

Biohazard Sauber-Zauber-Windeletui

I am sewing lots of stuff at the same time at the moment, covering the time between the 1770s and well, now.... here's something practical, if you have children that still need nappies.
The instructions (German) are from this great blog http://schnabelina.blogspot.de/2009/11/sauber-zauber-windeletui.html

The Biohazard machineembroidery is from http://www.urbanthreads.com/products.aspx?ProductID=UT5101


Monday, 13 July 2015

Ottobre Design - Crawler - for winter....

Due to the really good weather and lots of stuff going on I am not really at the sewing table regularly. But yesterday I just had to make this little romper suit. The fabric was leftovers from The Elephant Jacket and because I didn't have enough fabric to follow the pattern exactly I had to divide it a bit and use side seams, too. As a base I've used Ottobre Design 4/13 "Crawler" in size 68 (because I need it for winter and the sizes are huge, their size 68 is a size 74 really...). I've used plastic press fasteners for the first time and I have to say, I really like them, not only for children's stuff. Here are a few (exactly 2... really...) pictures. If you have too much time on your hands, you can try and spot my many mistakes, if you are like me, just enjoy the colourful elephants. ;)
What I like about the pattern (apart from the usual easy to follow instructions) is, that the bottom trouser bit is cut like a normal pair of trousers. Some romper suits have this extra lemon or so shaped piece in the crotch to make room for that wonderfully big baby nappy bum. This one has enough room, too, but is cut like normal trousers. With feet, though. ;)  I am really nearly a little jealous. It looks SO comfy!