I found this page with lots of free (or "pay as you wish") patterns just recently and wanted to share it.
They have patterns for all sizes and ages and my first deed were 6 beanie hats for the children... unfortunately in the past month (before I managed to take a picture) ALL of them have disappeared... no idea where to... I thought I had seen a survivor just a couple of days ago but there is absolutely no trace of them now. So, no pictures for you, but there are plenty on https://www.mamahoch2.de/2013/05/muetzenparade.html

Saturday, 28 May 2016

Thursday, 26 May 2016
More Charles! (Compagnie-M)
I made some more Charles trousers. Again. I simply love that pattern. I widened the legs a little for a more "bootcut version". I've also made a pair in black wide corduroy (a little bit like German traditional carpenter's trousers), but they are in the wash.. I will try and add a picture when the little lady doesn't dirty them faster than I can take a picture...
 |
| Actually the colour is a lovely "teal", but my camera doesn't love me today. It's a nice corduroy. |
Monday, 23 May 2016
A shirt with "American Neckline"...! (Schnabelina)
I have so much knit fabrics in my stash (don't ask...), I am really going crazy with making shirts for the girls.
This is one of my favourite FREE patterns at the moment (besides the raglan shirt from "mamahoch2"):
Schnabelina Regenbogenbody. It's originally a bodysuit, but obviously you can also just use it as a t-shirt pattern. Again, the sizing is really accurate, I appreciate that a lot.

There are plenty of sizes available 46 (small newborn) to 146 (teenager). And 3 different necklines. I personally love the "American neckline". In fact I would love a shirt like that myself...
Schnabelina is really creative, there are lots of tutorials and free patterns on her page!
all her patterns: http://schnabelina.blogspot.de/p/tutorials.html
http://schnabelina.blogspot.de/p/regenbogenbody-365.html
This is one of my favourite FREE patterns at the moment (besides the raglan shirt from "mamahoch2"):
Schnabelina Regenbogenbody. It's originally a bodysuit, but obviously you can also just use it as a t-shirt pattern. Again, the sizing is really accurate, I appreciate that a lot.

There are plenty of sizes available 46 (small newborn) to 146 (teenager). And 3 different necklines. I personally love the "American neckline". In fact I would love a shirt like that myself...
Schnabelina is really creative, there are lots of tutorials and free patterns on her page!
all her patterns: http://schnabelina.blogspot.de/p/tutorials.html
http://schnabelina.blogspot.de/p/regenbogenbody-365.html
Sunday, 22 May 2016
Princess Castle and Fall Basics SHIRTS (ottobre design)
I tried a basic raglan-shirt from the Ottobre Design 4/13, it is called "fall basic". The shirt runs about 2 sized big, so instead of a 110 I made a 98. I somehow messed up the bias at the top because I didn't stretch it enough, but she loves the shirt so I didn't change it.


Thursday, 19 May 2016
Size Tags - Print your own
I used to try and remember the sizes of the garments I made... which now seems a really silly idea to me... because I really can't keep track of what is what... especially with the children's clothes... so I came up with this idea of marking the sizes.
I bough some of these t-shirt iron on transfers (although I can't quite remember whether it actually is this brand, it might be another one, but I think you get the picture. Important: it has to be for DARK clothes, so the background is white) http://www.avery-zweckform.com/avery/de_de/Produkte/Kreativprodukte/Textil_Folien/Textilfolien-fuer-farbige-Textilien_MD1003.htm?N=0&Ns=&refchannel=259c8e9a44f8c110VgnVCM1000002218140aRCRD
then i used word.docx to create my own labels which look like this. :)
The top left is left blank intentionally: with a textile marker I fill
in the different sizes. Like that I can always print of a while sheet
and then fill in the size accordingly.
I usually iron them in after I've finished them, but you can also put them in, before you put the garment together, sometimes that is easier. I don't know, why I've not come up with this idea a long time ago... So I thought I'd share this idea.
The cost depends entirely on the paper you buy (the tags are about 6x3,6cms big, I printed 21 tags on an A4 sheet so in my case that was about 5 cents per tag) plus the cost for a washproof textile marker.
I've washed them quite a lot already (children...), I have no complaints so far, the labels don't come off, the colour does fade a little bit but not too much and it is not itchy. I think it's pretty nifty.
I bough some of these t-shirt iron on transfers (although I can't quite remember whether it actually is this brand, it might be another one, but I think you get the picture. Important: it has to be for DARK clothes, so the background is white) http://www.avery-zweckform.com/avery/de_de/Produkte/Kreativprodukte/Textil_Folien/Textilfolien-fuer-farbige-Textilien_MD1003.htm?N=0&Ns=&refchannel=259c8e9a44f8c110VgnVCM1000002218140aRCRD
then i used word.docx to create my own labels which look like this. :)
 |
I usually iron them in after I've finished them, but you can also put them in, before you put the garment together, sometimes that is easier. I don't know, why I've not come up with this idea a long time ago... So I thought I'd share this idea.
The cost depends entirely on the paper you buy (the tags are about 6x3,6cms big, I printed 21 tags on an A4 sheet so in my case that was about 5 cents per tag) plus the cost for a washproof textile marker.
I've washed them quite a lot already (children...), I have no complaints so far, the labels don't come off, the colour does fade a little bit but not too much and it is not itchy. I think it's pretty nifty.
Thursday, 5 May 2016
Unterwegs mit Kindern (2) - Raus in die Natur!!
.... Und irgendwann braucht man kein Wickel- und Stillzimmer mehr und Mikrowellen sind kein Qualitätskriterium für Auflugsziele - irgendwann muss man ...
RAUS IN DIE NATUR!!!
Ich finde, es gibt nichts Schöneres, als mit der ganzen Familie raus in die Natur zu gehen. Die Kinder können rennen und sind am Abend schön müde und ausgeglichen von frischer Luft und "Grün". Kleine Vesper einpacken, ein Gutsle und viel Wasser und los geht's!
Von uns ausprobiert und für gut befunden:
Das Liliental (wir lieben es!)
http://www.familienkultour.de/natur/baden-wuerttemberg/das-liliental-am-kaiserstuhl
https://kaiserstuhl.net/sw/liliental.htm
Der Baldenweger Hof ist für einen kurzen Nachmittagsausflug geeignet, auch Kindergärten fahren hier gern mal hin. Der Hof wird bewirtschaftet und man darf einfach mal zugucken. Und Kuchen gibt es auch. Manchmal auch Waffeln. Lecker ist es immer. Mit Hofladen und super Spielplatz!
http://www.familienkultour.de/natur/baden-wuerttemberg/der-baldenwegerhof-im-wittental
Unterhalb des Schloss Bürgeln http://www.schlossbuergeln.de/ ist ein Wanderparkplatz mit 5 kurzen Wanderungen zwischen 30 und 120min, gut ausgeschildert. :)
Es gibt eine Wandertour rund um die Staufener Burg, die sehr schön ist, Karte unbedingt vorher ausdrucken und mitnehmen. HIER
Außerdem gibt es noch kurze SUPER beschilderte Wanderungen, die alle am Schloßpark in Badenweiler starten. https://www.badenweiler.de/Aktiv/Wandern/Wunderschoene-Spazier-und-Rundwege-rund-um-Badenweiler Die Karten gibt es auch kostenfrei in der Tourist Information in Badenweiler. Nicht Kinderwagengeeignet, aber kleinkindgeeignet (getestet an 2,5 Jahre und 5,5 Jahre haben wir den Pfarrwaldweg - wir haben unter anderem eine ganze Herde Grüffelos (oder ein einzelnes, SEHR schnelles, das quasi ÜBERALL war, gesehen) und zahlreiche Gnomen, Zwerge, Feen und Elfen bzw. deren Behausungen. Aber noch mehr Grüffelos. Bei Weitem.)
Auch ausprobiert und für sehr gut befunden, der Räuber-Hotzenplotz-Weg. Genau genommen gibt es 2 Räuberpfade - einen Kleinen und einen Großen. Wir haben den Kleinen ausprobiert (für 4 Jahre und 7 Jahre alte Kinder und Eltern problemlos machbar, auch mal steil und rutschig, also auf trittfestes Schuhwerk achten). Supertoll! https://www.gengenbach.info/Entdecken/Erlebnis/Naturerlebnispfad-Raeuber-Hotzenplotz/Raeuber-Hotzenplotz-Pfad-Gengenbach
Allgemeine Info für Wanderungen im Schwarzwald
Die "Schwarzwald Tourismus.info" sehr praktisch, da kann man in der Tourensuche Schwierigkeit und Dauer/Länge bestimmen und obs kinderfreundlich ist, steht auch dabei.
http://www.schwarzwald-tourismus.info/Media/Touren/%28ansicht%29/liste/%28category%29/12225295
Auf der Suche nach geeigneten Zielen bin ich auch über diese Webseite gestolpert, in der man (superpraktisch!!) eine PLZ-Umkreissuche machen kann. Sehr angenehm ist der Einteilung nach 0, 10, 50 und 100 km... je nachdem, wie lange man fahren möchte. Und es ist in aufsteigender Entfernung sortiert.
Bei jedem Artikel steht eine Altersempfehlung, ggf link zur Beschreibung etc. Man kann auch auswählen, ob man lieber Natur oder doch Zoo, Hallenbäder etc pp sucht.
http://www.familienkultour.de/postleitzahlen-suche/
Die Seite gibt auch Hilfestellung zum Organisatorischen http://www.familienkultour.de/natur/naturtipps/blog
wenn Ihr also Natur in 20km Umgebung von Freiburg sucht -> hier lang http://www.familienkultour.de/umkreis-suche?loczip=79098&radius=20&areas[0]=2
Wer noch mehr Ausflugstipps hat, bitte gerne her damit... !!
Viel Spaß in der Natur!
RAUS IN DIE NATUR!!!
 |
| from http://blog.laaberry.de/wp-content/uploads/2013/06/lomer_wanderschuh.jpg |
Ich finde, es gibt nichts Schöneres, als mit der ganzen Familie raus in die Natur zu gehen. Die Kinder können rennen und sind am Abend schön müde und ausgeglichen von frischer Luft und "Grün". Kleine Vesper einpacken, ein Gutsle und viel Wasser und los geht's!
Von uns ausprobiert und für gut befunden:
Das Liliental (wir lieben es!)
http://www.familienkultour.de/natur/baden-wuerttemberg/das-liliental-am-kaiserstuhl
https://kaiserstuhl.net/sw/liliental.htm
Der Baldenweger Hof ist für einen kurzen Nachmittagsausflug geeignet, auch Kindergärten fahren hier gern mal hin. Der Hof wird bewirtschaftet und man darf einfach mal zugucken. Und Kuchen gibt es auch. Manchmal auch Waffeln. Lecker ist es immer. Mit Hofladen und super Spielplatz!
http://www.familienkultour.de/natur/baden-wuerttemberg/der-baldenwegerhof-im-wittental
Unterhalb des Schloss Bürgeln http://www.schlossbuergeln.de/ ist ein Wanderparkplatz mit 5 kurzen Wanderungen zwischen 30 und 120min, gut ausgeschildert. :)
Es gibt eine Wandertour rund um die Staufener Burg, die sehr schön ist, Karte unbedingt vorher ausdrucken und mitnehmen. HIER
Außerdem gibt es noch kurze SUPER beschilderte Wanderungen, die alle am Schloßpark in Badenweiler starten. https://www.badenweiler.de/Aktiv/Wandern/Wunderschoene-Spazier-und-Rundwege-rund-um-Badenweiler Die Karten gibt es auch kostenfrei in der Tourist Information in Badenweiler. Nicht Kinderwagengeeignet, aber kleinkindgeeignet (getestet an 2,5 Jahre und 5,5 Jahre haben wir den Pfarrwaldweg - wir haben unter anderem eine ganze Herde Grüffelos (oder ein einzelnes, SEHR schnelles, das quasi ÜBERALL war, gesehen) und zahlreiche Gnomen, Zwerge, Feen und Elfen bzw. deren Behausungen. Aber noch mehr Grüffelos. Bei Weitem.)
Auch ausprobiert und für sehr gut befunden, der Räuber-Hotzenplotz-Weg. Genau genommen gibt es 2 Räuberpfade - einen Kleinen und einen Großen. Wir haben den Kleinen ausprobiert (für 4 Jahre und 7 Jahre alte Kinder und Eltern problemlos machbar, auch mal steil und rutschig, also auf trittfestes Schuhwerk achten). Supertoll! https://www.gengenbach.info/Entdecken/Erlebnis/Naturerlebnispfad-Raeuber-Hotzenplotz/Raeuber-Hotzenplotz-Pfad-Gengenbach
Allgemeine Info für Wanderungen im Schwarzwald
Die "Schwarzwald Tourismus.info" sehr praktisch, da kann man in der Tourensuche Schwierigkeit und Dauer/Länge bestimmen und obs kinderfreundlich ist, steht auch dabei.
http://www.schwarzwald-tourismus.info/Media/Touren/%28ansicht%29/liste/%28category%29/12225295
Auf der Suche nach geeigneten Zielen bin ich auch über diese Webseite gestolpert, in der man (superpraktisch!!) eine PLZ-Umkreissuche machen kann. Sehr angenehm ist der Einteilung nach 0, 10, 50 und 100 km... je nachdem, wie lange man fahren möchte. Und es ist in aufsteigender Entfernung sortiert.
Bei jedem Artikel steht eine Altersempfehlung, ggf link zur Beschreibung etc. Man kann auch auswählen, ob man lieber Natur oder doch Zoo, Hallenbäder etc pp sucht.
http://www.familienkultour.de/postleitzahlen-suche/
Die Seite gibt auch Hilfestellung zum Organisatorischen http://www.familienkultour.de/natur/naturtipps/blog
wenn Ihr also Natur in 20km Umgebung von Freiburg sucht -> hier lang http://www.familienkultour.de/umkreis-suche?loczip=79098&radius=20&areas[0]=2
Wer noch mehr Ausflugstipps hat, bitte gerne her damit... !!
Viel Spaß in der Natur!
Thursday, 17 March 2016
Preparing for {Dorothy Moore}
Taking your exact (i.e. honest...) measurements is essential to making your own clothes. Whether drafting patterns or altering them - you've go to know your measurements.
These are the measurements Dorothy Moore is working with for her pattern drafting course.
Before you take your measurements, think about what foundations you are going to wear with the garment you are going to draft - and then measure wearing those... (push-up)bra, shapewear, girdle, corset... they do make a difference...
Taking some of these measurements require a helping hand... and an elastic band around the waist to indicate the waistline properly.


then fill them in these sheets for better reference:

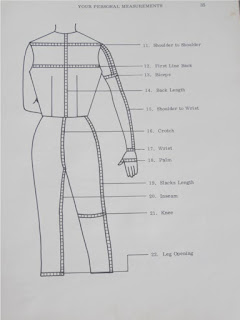
These are the measurements Dorothy Moore is working with for her pattern drafting course.
Before you take your measurements, think about what foundations you are going to wear with the garment you are going to draft - and then measure wearing those... (push-up)bra, shapewear, girdle, corset... they do make a difference...
Taking some of these measurements require a helping hand... and an elastic band around the waist to indicate the waistline properly.
 |
| tie an elastic band around your waist and move around a bit so it settles were your natural waist is! |
 |
| neckline is low, about where the collar bone is! |
 |
| use elastic band at waist again |
 |
| did I mention the elastic waistband? |
 |
| CAVE: crotch measurement taken slightly angled to the front, not straight |


then fill them in these sheets for better reference:


Sunday, 21 February 2016
{Dorothy Moore} Lesson 4 Basic Top
I didn't have enough brown paper to draft the trousers pattern (Lesson 3) and for the Lesson 2 "Skirt Variations" I still have to get a few notions (I have drafted an A-Line Yoke skirt already) so I am continueing unchronologically with Lesson 4 - a basic top.
The basic top pattern is used for all other patterns following in the book -> sheath dress, blouses, coats... so it is really the centre of all pattern/clothes-making and thus it is important to fit it well.

You first draft a basic top pattern
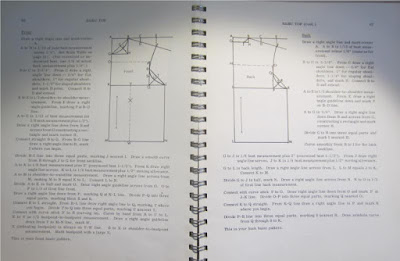
which you then adjust to the waist measurements and add darts

After making a muslin top from the first foundation top pattern you have to make what she calls "minor adjustments" to adjust this pattern to your shape. e.g. wide shoulder blades, gaping neckline, armhole gap, round upper back, low bust point, smaller cup room ...
I needed to make adjustments for a gap at the front armhole following these steps. I also noticed I had taken a slightly too wide "shoulder-to-shoulder" measurement, so noted the right measurement now and shortened the shoulder seam length by about 1 cm.

this what my pattern looks like (final version)

I forgot to take a picture of me wearing the mock-up, but this is what it looks like in its final version. :)

I really enjoyed the drawing for this pattern, it was really straight forward, the changes I had to make were minor and easy to do and I think I achieved an acceptable fit without too much effort.
After completing the Lesson 2 (Skirt Variations" A-Line Skirt with yoke) I am going to spend some time on a top with this pattern. It's going to be the green fan vest from Marilyn Monroes "Bauman sitting" (1954). To go with the dark blue pencil skirt from Lesson 1. ;)
The basic top pattern is used for all other patterns following in the book -> sheath dress, blouses, coats... so it is really the centre of all pattern/clothes-making and thus it is important to fit it well.

You first draft a basic top pattern

which you then adjust to the waist measurements and add darts

After making a muslin top from the first foundation top pattern you have to make what she calls "minor adjustments" to adjust this pattern to your shape. e.g. wide shoulder blades, gaping neckline, armhole gap, round upper back, low bust point, smaller cup room ...
I needed to make adjustments for a gap at the front armhole following these steps. I also noticed I had taken a slightly too wide "shoulder-to-shoulder" measurement, so noted the right measurement now and shortened the shoulder seam length by about 1 cm.
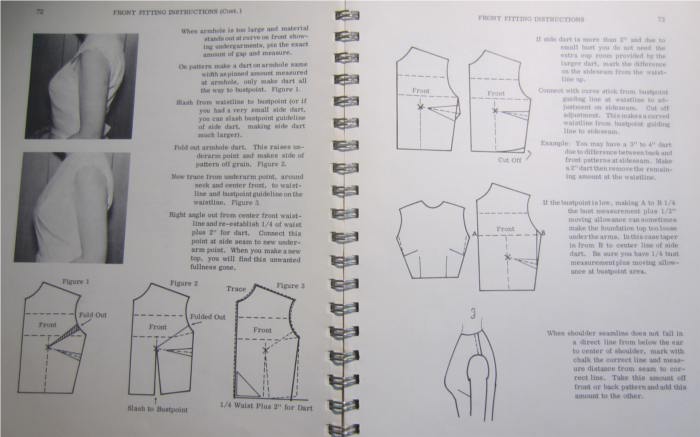
this what my pattern looks like (final version)

I forgot to take a picture of me wearing the mock-up, but this is what it looks like in its final version. :)

I really enjoyed the drawing for this pattern, it was really straight forward, the changes I had to make were minor and easy to do and I think I achieved an acceptable fit without too much effort.
After completing the Lesson 2 (Skirt Variations" A-Line Skirt with yoke) I am going to spend some time on a top with this pattern. It's going to be the green fan vest from Marilyn Monroes "Bauman sitting" (1954). To go with the dark blue pencil skirt from Lesson 1. ;)
Friday, 19 February 2016
{Dorothy Moore} Lesson 1 Straight Skirt
Dorothy Moore's Patternsdrafting and Dressmaking
Lesson 1 - Straight Skirt

In other words... how to draft a classic Pencil Skirt.
Out of general doziness I drafted the first skirt with wrong measurements and then started to wonder, why it didn't fit ... ah well.. so I drafted it again.
I then tried out a version for "big ratio for waist and lower hips/thighs", which suggested darts slanted towards the hip bone. I didn't quite like the outcome (hence no picture) and just went with the normal darts that I had to extend 1 inch in the skirt front piece to achieve a smoother fit in the mock-up.
This is what the drafting scheme looks like:


I wanted the pencil skirt to be quite "wiggly" so I didn't just use the straight skirt pattern but took the side seam in a bit: from the hip point I used the curve stick and tapered in slightly and then out again to the original seam. It's only about a centimetre (1/2 inch) at the most, but it does make a difference, I think.
I then stumbled across about 1,6m of a nice looking fabric at a local sale, and albeit being Polyester I took it with me (along with some lining fabric). It's a medium weight fabric suitable for suits in a very very dark blue. I don't usually go for Polyester. I don't ususally go for dark blue, either. :) The lining fabric is a very dark aubergine coloured Polyester (again...), I used the less shiny side as my "right" side. :)
I basted the fabric and lining together and then treated it as one layer (more in the sense of an underlining) because I wanted to try it out. :) The good thing about an underlining is that the nice outer fabric gets a bit of support and you can also make an invisible hem. I also inserted an "invisible" zipper. Now I might have to be careful I don't turn invisible myself. :)
I've not taken many construction pictures, it's just a skirt, really.
And voilà, the all-over result:
[I am looking a bit strange on these... I've got a nasty cold and somebody elses's voice which didn't really make me feel like dressing up a lot and putting on make-up. I did make an effort putting on nice shoes, though.]
The skirt also needs a bit more ironing.. I know...

For an easy step by step introduction on how to sew a pencil skirt for beginners refer to this site, her instructions are quite good and she's got a good sense of humour, too. :)
http://blog.tuppencehapenny.co.uk/2012/11/beginner-sew-along-1-yard-pencil-skirt.html
Lesson 1 - Straight Skirt

In other words... how to draft a classic Pencil Skirt.
Out of general doziness I drafted the first skirt with wrong measurements and then started to wonder, why it didn't fit ... ah well.. so I drafted it again.
I then tried out a version for "big ratio for waist and lower hips/thighs", which suggested darts slanted towards the hip bone. I didn't quite like the outcome (hence no picture) and just went with the normal darts that I had to extend 1 inch in the skirt front piece to achieve a smoother fit in the mock-up.
This is what the drafting scheme looks like:


I wanted the pencil skirt to be quite "wiggly" so I didn't just use the straight skirt pattern but took the side seam in a bit: from the hip point I used the curve stick and tapered in slightly and then out again to the original seam. It's only about a centimetre (1/2 inch) at the most, but it does make a difference, I think.
I then stumbled across about 1,6m of a nice looking fabric at a local sale, and albeit being Polyester I took it with me (along with some lining fabric). It's a medium weight fabric suitable for suits in a very very dark blue. I don't usually go for Polyester. I don't ususally go for dark blue, either. :) The lining fabric is a very dark aubergine coloured Polyester (again...), I used the less shiny side as my "right" side. :)
I basted the fabric and lining together and then treated it as one layer (more in the sense of an underlining) because I wanted to try it out. :) The good thing about an underlining is that the nice outer fabric gets a bit of support and you can also make an invisible hem. I also inserted an "invisible" zipper. Now I might have to be careful I don't turn invisible myself. :)
I've not taken many construction pictures, it's just a skirt, really.
 |
| I fact I have only taken 1 construction picture. You can see the underlining with the darts marked and then center basted through all layers and partly pinned together. |
And voilà, the all-over result:
[I am looking a bit strange on these... I've got a nasty cold and somebody elses's voice which didn't really make me feel like dressing up a lot and putting on make-up. I did make an effort putting on nice shoes, though.]
The skirt also needs a bit more ironing.. I know...

 |
| as you can see, you can't really see the kick pleat, but I promise, it's there... |
For an easy step by step introduction on how to sew a pencil skirt for beginners refer to this site, her instructions are quite good and she's got a good sense of humour, too. :)
http://blog.tuppencehapenny.co.uk/2012/11/beginner-sew-along-1-yard-pencil-skirt.html
Friday, 22 January 2016
Introduction to Dorothy Moore's Pattern Drafting and Dressmaking

As the result for my weakness for retro fashion (namely the 1950s-60s...) and after analysing quite a lot of pictures of clothes of that time, I found that one very big issue is the actual accurate fit of the garment. Something I've so far tried to ignore as much as possible. :)
While dwelling in the 18th century (sewing wise...), I found, that the proper fitting of the clothes is the key to the right look... and it made me rethink my rather casual attitude towards fitting of modern clothes. In other words: I would now prefer my 20th/21st century clothes to fit as well as my 18th century clothes. I really want to learn now and understand sewing and start doing it properly (instead of intuitively....)
My first step to understanding more about sewing techniques and patterns is to follow, page by page, lesson by lesson the book by Dorothy Moore "Pattern drafting and Dressmaking" from 1971. The plan is to follow all the instructions, understand what I am doing and to end up with innumerous muslin pieces. :)
- The book is meant to be a coursebook with 15 lesson on pattern drafting, only very basic notes on assembly are included.
- To help me with the actual sewing techniques, I am using "Vogue Sewing" from 2006 (editor Crystal McDougald) (and the internet....).
The chapters will always be easily accessible via the page "Dorothy Moore's Patterndrafting and Dressmaking" at the top.
Before I could start drafting and cutting and sewing, I had to accomplish a few tasks, though...
1. obviously to do a lot of reading in the afore mentioned books (done that, but doesn't look very exciting, so I will spare you the details)
2. to acquire the necessary tools (fashion rulers, namely a hip curve and a big 90degree angle/set square) and brown paper and scrap fabric for the muslins.
3. to take the my correct measurements (which will remain secret for now)
4. do the preliminary "foundation work" (and take measurement with those, too, where necessary)
(Without being too indiscreet I think I can say, that the correct foundations for the time have an enormous impact on the appearance and fit of the garment. For example, without stays, a robe a l'anglaise (18th century) wouldn't look right. And you can't just use the same 18th century stays in the mid 19th century - it would look completely wrong. You'd have to make a proper corset to measure. So, in all cases, always wear the appropriate underwear. Whatever time you are sewing for: know your undies!)
So after all the preparation work and reading I started with Preparing for Dorothy (link with info about the foundations to follow when finished...) :)
(PS: I am not using a tailor's dummy for now, because I found making the changes on myself (and then transferring them directly to the patterns) works better for me... I just don't get that plastic thing to have my shape...)
Subscribe to:
Posts (Atom)