Tuesday, 6 January 2015

sewing ideas for 2015 and the rest of the century!

So...

I've finally managed to get over a nasty cold that kept me out of order for about 2 weeks (yes, the holidays, what else?!)  and started thinking about 2015 in many many many ways. Also in sewing ways, of course.
And I had to face the fact, that probably most of 2015 I won't be able to sew "properly" fitted garments. At least not until October or so...  The happy reason for this is, that we are expecting our second child - but this of course means, life will be completely turned upside down (again) and if I find the time at all to do some stuff for myself (all mothers of small children will smile this weary smile now...) making fitted garment to a changing body won't make much sense. That is problem no 1.
Remembering the first months with little Miss L., a lot of carrying was involved. And walking around. With the baby in a carrysling. I've tried to sit in front of the sewing machine with a little one strapped to my front but I can assure you - it doesn't really work. That is problem no 2.

As I haven't given up hope to do at least a little bit of stuff, I am going to use this chance to cover new territory - and learn new things. Not that I had mastered sewing, far from it, BUT I think I could really do with some experience in the knitting and crocheting sector. Actually I've only crocheted one thing before (a lalylala doll, that little Miss L absolutely adores so i think I'm going to make another one...). And my knitting is... well... I wouldn't say I really know what I am doing there... So the next year will mostly be dedicated to knitting projects (I've seen some GREAT stuff out there already!!! oh my goodness, some people have magic fingers!). And sewing childrens stuff, of course, and maybe something stretchy and modern things for myself (I'm just saying "Martha"). But lets be honest, as a working mum (and after a year parental time I'm back into real life, full time work) with a lovely husband and 2 children that I ACTUALLY want to spend time with (yes, all three!) it will be a busy life. I wouldn't mind if someone managed to invent a machine where you can stop the world and have a few hours just for doing stuff (not just hobbies, also things like tax return, sorting papers, doing yoga, sleep(!), and so on). But on the other hand it makes me appreciate what I am doing even more. I've even come to terms with sewing by hand, which a few years ago, would have made me abandon a project. :)

Towards the end of this year I am going to make a Robe a l'Anglaise (you won't believe it - I've got all the material already... I am just waiting for my shape to reappear to see if and how I will still fit in my stays in October... I am going to use my favourite JPR pattern again, with slight modifications...) and I am also dedicated to do some (pattern and all) research into the 1940s-1950s (intending to wear them in everyday life) during 2015. I really enjoy sewing historical garments but I've been concentrating quite a lot on the 18th century and I would like some change.

So I am not only collecting ideas for 2015, but I am also announcing a project I am trying to pursue from late 2015 onwards:  
"A dress through the decades - from the late 16th century to the 1970s"
and I am very curious about the outcome. I am expecting to learn lots of new sewing techniques (let's not talk about the frustrations that are bound to come...) and apart from that I am also looking forward to sew some more "wearable" retro stuff for everyday life (as soon as we've established a sort of routine again...). I've pretty much covered a lot of the 18th century already, maybe a little weak on the 1790s and nothing 1700-1720. But I have absolutely no idea about the 1810s and the following years... some decades are causing serious headaches already... like the 1830s and 1890s... i'm not one for huge ridiculous sleeves...but then again... I am sure I will find some inspirational painting or print that will reconcile me with that decade and make me think that leg of mutton sleeves are the bees knees. I am also not sure about the 17th century yet - but again I have to admit I hardly know anything about it. But that's the whole point - to learn about different centuries and decades. :)
The scale of the project is rather big, too. After all, it's 10 decades per century and that means 10 dresses per century - strictly speaking it would mean 38 dresses covering 380 years... I am probably not going to be THAT strict about it and I am most certainly not going to sew chronologically (yes, exactly, it's like eating the dessert first!).
Considering my sewing speed... this project will take me YEARS if not decades. This seems daunting at first, but think about the possibilities!! Browsing through paintings, prints, books, fabrics (yay!! what chances to stash away TONS of fabric!) and learning new sewing techniques. I LOVE IT!!! This will probably keep me busy for the next 30 years. At least. Because we all know - it's not just the dress... it starts with the right undergarments with the dress come the right accessoires, shoes, hair, etc etc. The list doesn't stop.

So, basically, I've just planned the rest of my life (sewing wise). :) Does it show I'm German?
Anyway, I hope we'll have lots of fun sewing together and come up with some crazy stuff in the future!

Lots of love

Hertzwerk


Thursday, 1 January 2015

New Year's Eve Reflection

Instead of giving you a full account of what I've done in the past year and how I reflect on it, I give you - a link. I found this on the net (stumbling, again...) and I thought it was quite a good idea, a nice guide through reflecting your past year.

Here's the page
http://theartofsimple.net/new-years-eve-reflection-questions/


And they also offer pdfs for free, for adults and children.
http://theartofsimple.net/wp-content/uploads/2013/12/NewYearsEveQs.pdf
http://theartofsimple.net/wp-content/uploads/2013/12/NewYearsEveQs-kids.pdf


My next year will be very busy with .... life... probably I will do less sewing, but maybe I can make it count.

I wish all of you a very happy year 2015!

Friday, 5 December 2014

Trousers! more Trousers!

Wish I had trousers liket his... I love the the look!

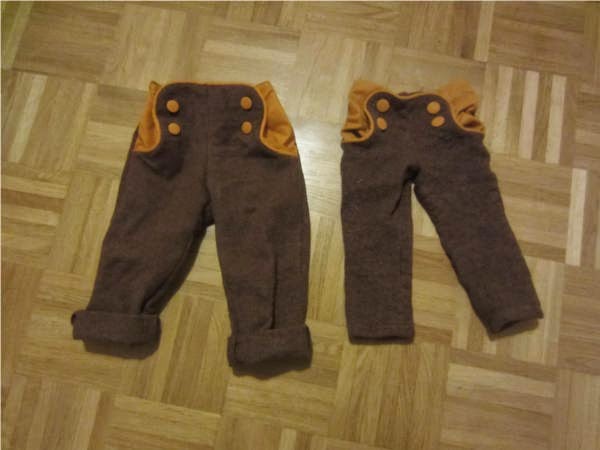
I have completely and totally fallen in love with the Charles Pattern from compagnie-M http://compagnie-m.com/ - they ARE SO EASY! And quick! And great! And with an elastic in the back for comfort and fit. I love details like that. And because I just couldn't get enough, I made some more. I also had to make some more, because I put the first Charles trouser in the regular Wash, and that lovely woolen fabric - felted... shrunk... and fits a doll now... you see the picture... those pants used to be the same size. Before mummy came...
More Charles - green Tweed woll and rusty red fine stretchy corduroy.
Charles - one size 98,and the shrunk Charles on the right. *sob*

And then to round a nice sewing weekend off, I made another of my favourites - The minikrea Ballonbuks http://minikrea.dk/baby/baby20301.html

my all time favourite - ballonbuks. with lining.


 And after that, I got a nasty cold... Well well well...
On the way to getting better now, so woopee, Christmas here we come, or so...

Love
Hertzwerk

Tuesday, 2 December 2014

Crema di fragola - strawberry yumyum!

So, my contribution to making the year 2014 end in delight was - a pizza and a dessert.
The dessert was an experiment and as it turned out nicely, i thought I'd share it with you. :)

It is called "crema di fragola" (strawberry cream) and i found it on the internet, here

In case the link doesn't work, here the German copy of it:


"Zutaten (für etwa 6-8 Gläschen):
250g Mascarpone
250g Sahne
2 Eigelb
4 Eiweiß
4 Päckchen Vanillezucker
70g Zucker
2 Blätter Gelatine
Erdbeeren nach Belieben (bei mir 400g)
Minze/Kakao nach Belieben

Sahne und Eiweiß getrennt voneinander steif schlagen und beiseite stellen. Eigelb mit Zucker und Vanillezucker verrühren und dann nach und nach die Mascarpone hinzugeben, bis eine halbwegs cremige Masse entsteht. Gelatine einweichen lassen und verflüssigen, danach zu der Masse hinzugeben und gut verrühren. Steife Sahne hinzugeben und unterrühren, danach den Eischnee hinzufügen und ebenfalls unterheben. Nun die Masse in den Kühlschrank stellen und in der Zwischenzeit die Erdbeeren waschen, gut abtropfen lassen und in Stücke schneiden (ich halbiere sie immer nur, man kann sie aber auch bspw. einfach vierteln, wenn man das lieber mag). Die Erdbeeren dann in die Gläschen füllen und mit der Masse übergießen. Anschließend kann man noch etwas Kakao drüberstreuen und das Ganze mit einem Minzblatt  verzieren. Danach wieder ab in den Kühlschrank und etwas durchziehen lassen. Fertig!" (von http://www.staenkerliese.com/2014/05/rezept-crema-di-fragola/ am 31.12.2014)


I have used raspberries instead of strawberries because I had some left in the freezer, worked as well. I also found I had used a little bit too much water to dissolve the leaf gelatine, but it didn't really matter in the end. the recipe is simple, you just need los of pots and pans. enjoy!

Friday, 31 October 2014

Charles Pants - autumn sun!!

Just in time for a bit of late summer (20 degrees!) I've finished the Charles pants in wool with herringbone pattern. :)

The Pattern is the Charles Pants Pattern by Compagnie-M (http://compagnie-m.com/)

Again, the pattern went well together, the size is correct and I really enjoyed working with it. I can really recommend it. What I LOVE about children's clothes is, how little fabric you need... just 70cms for these pants and a bit of scrap yellow cotton. Brilliant. :) (and again I am really jealous, I'd LOVE to have pants like these... maybe one day I manage to make them for myself...although given enough time I might shrink into them.... maybe...)

Here are some suboptimal pictures, but I think you get the gist. :)


Have a lovely Day and WOHOO; it's HALLOWEEN today!!! :)

- Hertzwerk

Sunday, 26 October 2014

The Louisa Dress !

As Halloween is approaching and I had always searched for an excuse to get the Louisa Dress Pattern by Compagnie-M (http://compagnie-m.com/) I finally got it and made this dress for Lucy. :) It is also the first time I made experiences with piping. I DO love the outcome. Maybe I should make a similar dress for myself? ;) Sorry the pictures are slightly overexposed. :)

Add caption


The dress is made from black cotton twill that was hanging around here, doing nothing. ;)
The dress is fully lined with thin curry coloured cotton/PE mix. I've followed the assembly intruction about 70%, but I altered the back (instructions were for a zipper, but i REALLY didn't feel like inserting an invisible zipper...) and set the lining a little different than in the instuctions. Not a big deal really. The pattern went together nicely. Compagnie M has a few really nice instant-download patterns on their homepage, I really like the designs, they are simple and practical and with that special "je ne sais quoi", a twist. The prices are about 7 Euros, but she gives discount if you order several patterns in one go.


Have a lovely halloween!

Hertzwerk.


Picture Update:

The Child with the dress. :) she's a real UFO - unbelievablely fast object!


Sunday, 5 October 2014

Oh help! Oh no! It's A Calash!


I am reading the Gruffalo a lot with our little daughter and when I came to writing this post about my latest project, I couldn't help thinking in those words.

Anyway. It was a rather spontaneous project which had the purpose of keeping my mind busy (for various reasons) and being inexpensive. So, I've been thinking about a calash for some time and had looked at some pictures, and now the time was ripe.
I've still had plenty of reed and some silks left over.
Calash (or Calèche) is a horse carriage, really. (read more here at Wikipeda e.g. )

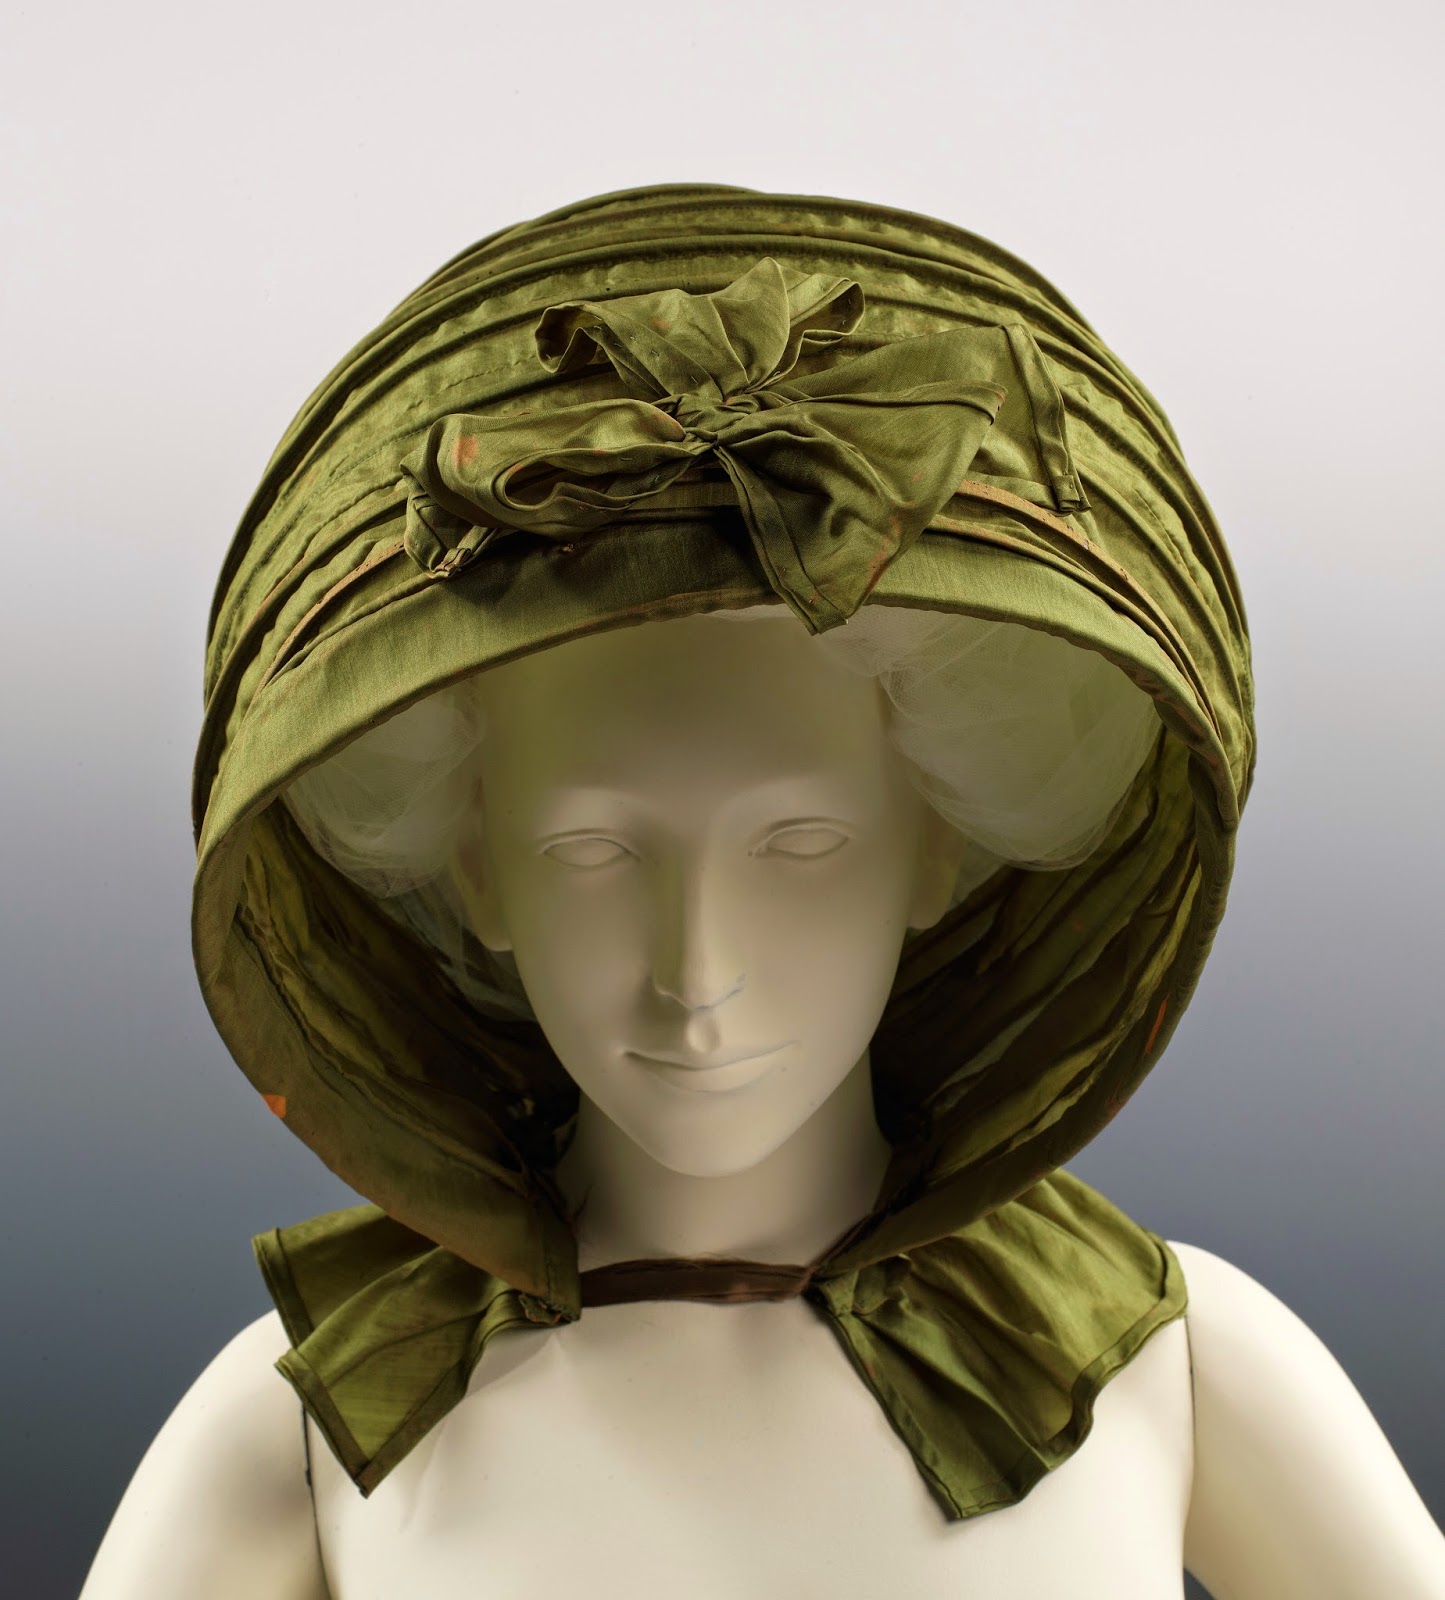
First a quick analyses of the calashes I used as examples. They can be found on the metmuseum.org homepage. Also refer to my pinterest board for more examples or this homepage, that has plenty of links to museums


http://www.metmuseum.org/collection/the-collection-online/search/116612?=&imgNo=0&tabName=related-objects


http://www.metmuseum.org/collection/the-collection-online/search/157763?img=1&imgNo=0&tabName=related-objects


If you follow the links you will find a few more photographs. The MetMuseum has some other Calashes from the 18th and early 19th century and also Pinterest is a good source for finding more pictures.

From those (and a few more, but let's not get overly into this) I have deducted the following things for my project:

1. The calash itself is based on a rectangle. The size of the rectangle is determined by the height and depth you want ot achieve. I noticed that in the above examples the boning seems to be "riding" on top of the calash. I assume, that first the lining is mounted to the outside fabric and then the tunnels are sewn through all layers. The reed probably has a distance of 2 inches. And in between there seems to be either a gathering stitch or an actual seem to allow that accordeon-like folding.

2. The back is either just the rest of the rectangle gathered and cut to fit into that sort of horse-shape OR it is a neatly cut flat extra piece of fabric and lining. Most calashes seem to have a ribbon in the back.

3. A ruffle (at least, could also extend to a "nearly-cape" length) was attached to the bottom of the calash and a ribbon in front to secure it and keep it in shape. Also seems to be a simple rectangle mostly.

4. Some calashes have (like the green one above) extra decoration (I love that extra bow on the green one!).

5. Although you don't see them on the pictures, I would think they had a small ribbon somewhere to pull them up agains the wind and over the head.

6. Both calashes have a sort of brim in the front, the green one has a rather straight one that might be padded with an extra layer of stiffer fabric, the violet one has some sort of double ruffle. Anyway, neither of them ends with a bone but with something decorative.

Personally I like the shape of the green one best, not very bulky and ruffly. So that's the shape I was trying to achieve.

13 boning chanels, 2 thereof in the back so slightly shorter. aprox. 2 inches apart?
in between fold to the inside, w/o boning.
2 bows.
supposedly flat back.
simple straight brim in front, possibly stiffened.
simple self fabric ties.

I've had particular fun with the reed I've used. It came in a round bundle and gave the whole thing the shape of an orange. But I wanted horse-shoe. My mock-up wasn't promising. So after doing some research into reed (which led me to most informative sited about basket making...) I've learned a lot of new stuff. Did it help the calash? Who knows.

So here we are, this is my version of a calash. Sorry, no big hair day... :) 


Also not a big smiley face day. Could be worse, though. 

my favourite view.


And for everyone who's made it this far: Here's an experimental pattern. It's not complete and will still take a bit of fiddling I'm afraid, but then I'm not a professional pattern person and it's free. ;) The pattern is in English. Sort of.

Calash Pattern.pdf

Enjoy your day!
(PS: No, it's not entirely handsewn, I've used the machine a fair bit, because I wasn't convinced it would turn out okay... shame on me... I would recommend sewing the boning channels on the outside by hand, though... if you want to do it half-properly... but well... next time...)

Friday, 12 September 2014

18th century garter MFA


While I was waiting for material for the 1790s Imatex jacket, I started this project which in the end I finished after the jacket, for various reasons. I have taken the liberty to change some details, but no worries, they essentially stayed garters. :) I've used scrap silk taffeta and cotton thread and I changed the motive in the middle, because I didn't quite understand what it is supposed to be... and I wasn't that motivated to stitch lots of strange birds.


It's been a quick and easy project that was just the thing to do. :) Plus you can never have enough small accessoires. :)

Have a lovely day!

Sunday, 7 September 2014

1790s jacket from IMATEX


My latest project is this 1790s jacket inspired by a 1790s jacket from the Imatex (Centre de Documentació i Museu tèxtil) here:
you can access lots of stuff there, if you want to look at the 1790s jacket, go to advanced search, then search for Register number 11551, then go to "full record" and voilà you can see pictures and read a despription in Catalan. I don't really understand catalan, but I think it's a children's jacket (they say) and the pictures do explain the rest. I call it the "Imatex jacket" (for obvious reasons).
What threw me a bit was, that I couldn't find many fashion plates depicting similar jackets. The ones that could be called similar were from fashion plates in the 1780s, but I suppose that doesn't mean much.
The following 3 pictures show the original jacket from the IMATEX collection.

original Imatex 1790s jacket

original Imatex 1790s jacket

original Imatex 1790s jacket.

This is the view of my pattern:
I've used the JPR Anglaise pattern as a start and then worked away on it. The sleeves are from Wingeo 207, but again, altered quite a bit (as I am NOT a giant). 


and these are the fabrics
silk repp in light cream with dots, silk damask in light blue/beige, ivory silk taffeta (for lining). Soutache apricot (not pictured) :)

I've used peach coloures soutache (2,5mm wide), about 12 metres. At first I was really sceptic about it, but I've used a colour scheme thingy on the internet called Paletton and determined the complementary colour to my blue-grey-brown silk was, in fact, peach. Wow, they did know what they were doing abck then. :)
So I dived in head first and attached the soutache. I am NOT a peach person... really. But I like the result. ;)
My biggest problem (apart from sleeves, right and left, buttonsholes patience and stuff like that) was to get fabric for the sleeve buttons matching the soutache - apricot  IS A NIGHTMARE! I did manage after months of repetitive visits to the fabric store (selfless...). :)

 And here are  pictures of the result:


 I am planning to make a matching hat like this for it, but have not got the materials for it yet (apart from the feathers and the black ribbon...)


Saturday, 30 August 2014

modern bears and meditative handicraft skills


This is Bina the Bear. I can't explain WHY i had the urge to learn how to crochet a bear, but while I was waiting for the buttons for the 1790s IMATEX jacket to arrive from China, I stumbled over this lovely little page http://www.lalylala.com/ and just HAD to make Bina the Bear.

I have never ever before done any crocheting before. And it is also not really connected to any historical period I've so far been entangled with... (apparently the first description of crocheting stuff appeared around the 1830s...says wikipedia...). But I wanted to make this bear, badly. And so I did.

Here's the result. I've learned how to crochet. I've learned how meditative it can be. I still have trouble with counting. Also my quality of crocheting varies heavily from day to day... resulting in the ears and arms being of different sizes... ah well... it's unique. :)
The pattern is 5.50 Euros, direct download. Instructions are available in many languages and they are very clear and easy with a slight sense of humour. I've immensely enjoyed this project and if you visit her homepage, look at Kira the kangaroo. SO sweet!!
I've used the yarns recommended in the pattern.